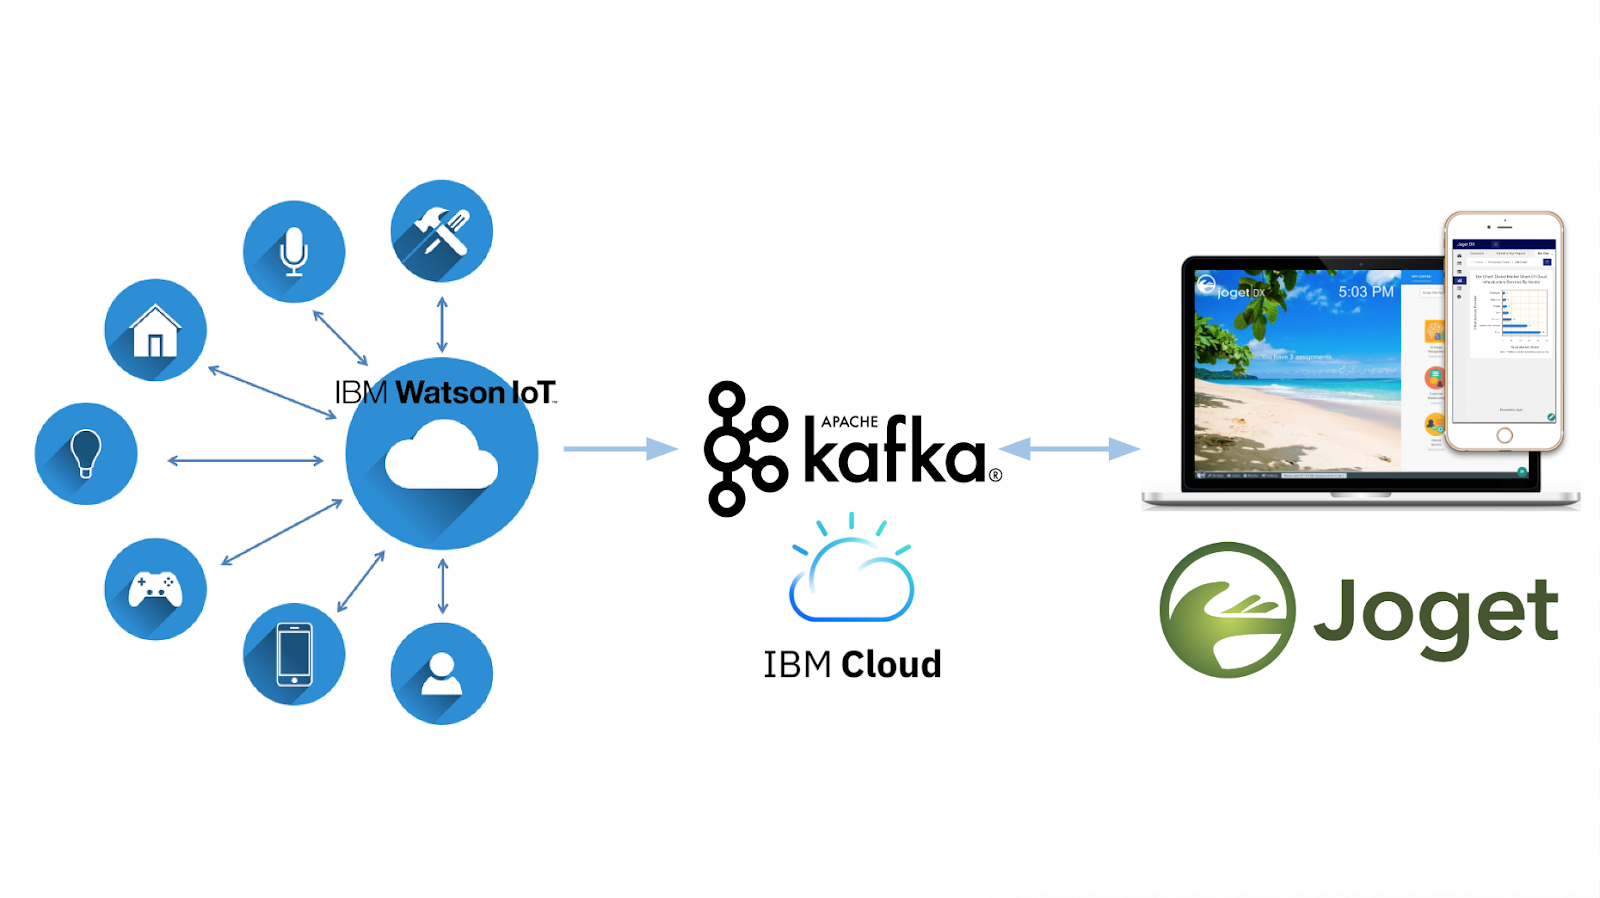
Apache Kafka and Low-Code: An Introduction and a Practical Tutorial on Integrating IBM Event Streams and Watson IoT Platform with Joget
In this article we will introduce Apache Kafka, a rapidly growing open source messaging system that is used by many of the most popular web-scale internet companies.
This will be followed by a practical tutorial on using a visual low-code approach to rapidly develop an application integrated with Kafka for an Internet of Things (IoT) use case. In this tutorial, we’ll integrate the Joget low code platform with IBM Event Streams (a hosted Kafka service) and IBM Watson IoT Platform.
Ready to see why popular internet companies such as LinkedIn, Uber, Netflix, Twitter, Airbnb, Spotify and Slack have come to rely on Kafka? Let’s find out!
Part 1: Introduction to Apache Kafka

What is Apache Kafka?
Apache Kafka is a highly scalable and reliable publish-subscribe messaging platform that allows disparate systems to publish messages, and subscribe to read messages, in real-time.
Conceptually, it is not all that different from earlier Message Queue (MQ) or Enterprise Service Bus (ESB) solutions. The main difference is that older systems were not able to handle the type of scale required. In traditional systems using ETL (extract, transform and load) and data warehouses, data is processed in batches so there might be a significant delay before relevant information can be obtained from the raw data. Imagine waiting hours or days to detect fraud when a credit card transaction occurs!
Instead of focusing on holding data like a relational database, Kafka treats data as a continuous stream of messages. Kafka is designed with a few key design principles in mind: high throughput, a simple API for integration, and a distributed architecture from the start. This means that Kafka can scale to trillions of messages in real-time.
Originally developed by Linkedin to handle their mission critical data, Kafka was open sourced and donated to the Apache Software Foundation in 2011 and now handles 7 trillion messages per day at Linkedin.
Kafka Use Cases
Kafka works well in use cases where you need to deal with absurd amounts of data, and need to process it in real-time. As described in the use cases page in the Kafka project website, Kafka is suited for many areas, for example:
- replacement for traditional messaging systems
- website activity tracking
- metrics or log aggregation
- processing large streams of transactions in real-time e.g. for fraud detection
- send and read real-time data from Internet of Things (IoT) devices
Kafka Architecture
Let’s now explore Kafka’s architecture and its basic terminology:

- Producer: Application that sends messages.
- Consumer: Application that receives messages.
- Message: Data that is sent from the producer to a consumer.
- Topic: A category to which messages are stored and published.
- Partition: Topics are divided into partitions, where data is split across multiple brokers.
- Offset: A unique identifier of a record within a partition to denote the position of the consumer in the partition.
- Broker: A single node or machine.
- Cluster: A group of brokers working together.
Kafka is a distributed system without a single point of failure, and it uses Apache Zookeeper to manage the cluster e.g. configuration management, synchronization, detecting when a new node joins or leaves the cluster, etc. At its core, Kafka stores messages in a commit log and this is the key to Kafka’s scalability, giving the same performance whether there is 50 KB or 50 TB of persistent data in storage.
Kafka and MQTT for IoT
The Internet of Things (IoT) refers to the system of physical devices around the world that are connected to the internet, collecting and sharing data. IoT devices are typically very small and constrained so it requires a lightweight messaging protocol, the most prominent of which is MQTT. MQTT is an ISO standard (ISO/IEC PRF 20922) and is widely used, but it is not built for high scalability or longer storage. Therefore, Apache Kafka and MQTT are a perfect combination for end to end IoT integration. An MQTT broker would read data from the IoT devices, and publish them to a Kafka topic. A consumer application could then subscribe to the Kafka topic, for example to programmatically send an alert when an IoT sensor exceeds a certain threshold. We’ll cover an example of this integration in the tutorial later.
Part 2: Create IBM Event Streams Service
Now that we have a general understanding of Apache Kafka, let’s setup an actual Kafka cluster. For this tutorial we’ll use IBM Event Streams, a managed Kafka service for the enterprise provided by IBM Cloud.
IBM Cloud provides a free tier which includes the Event Streams service, so you can get started for free. Once you have registered for an IBM Cloud account, you can create a new Events Streams service.
Step 1: Create an Event Streams service instance
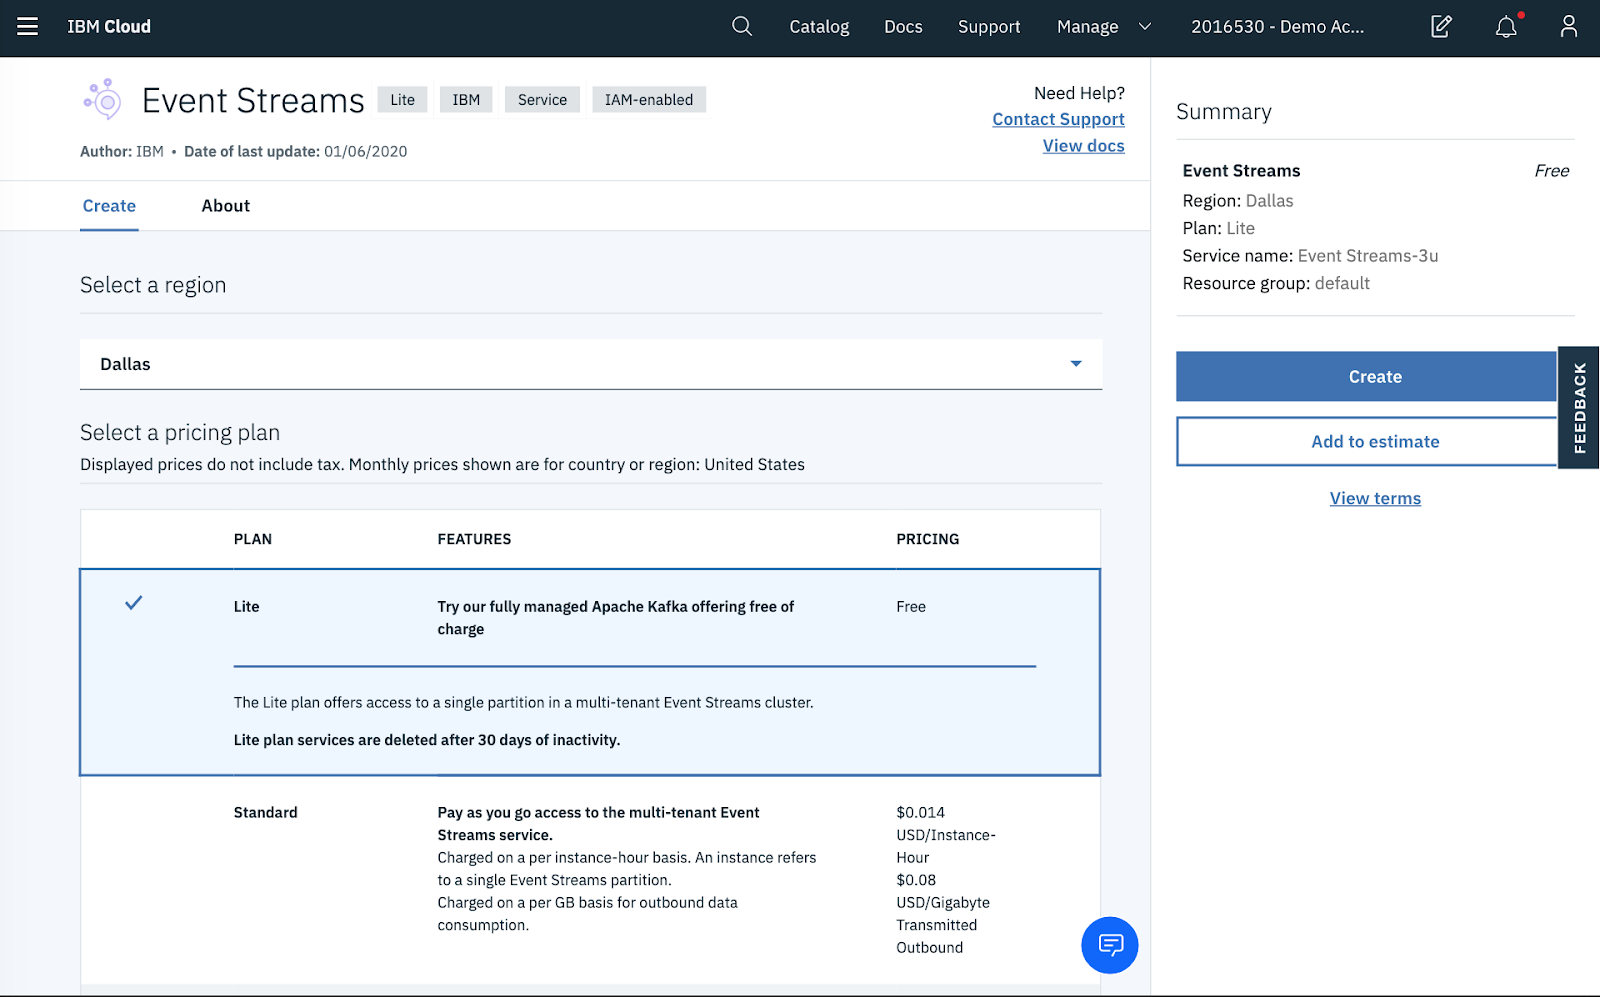
Choose the Lite plan, and click on Create.
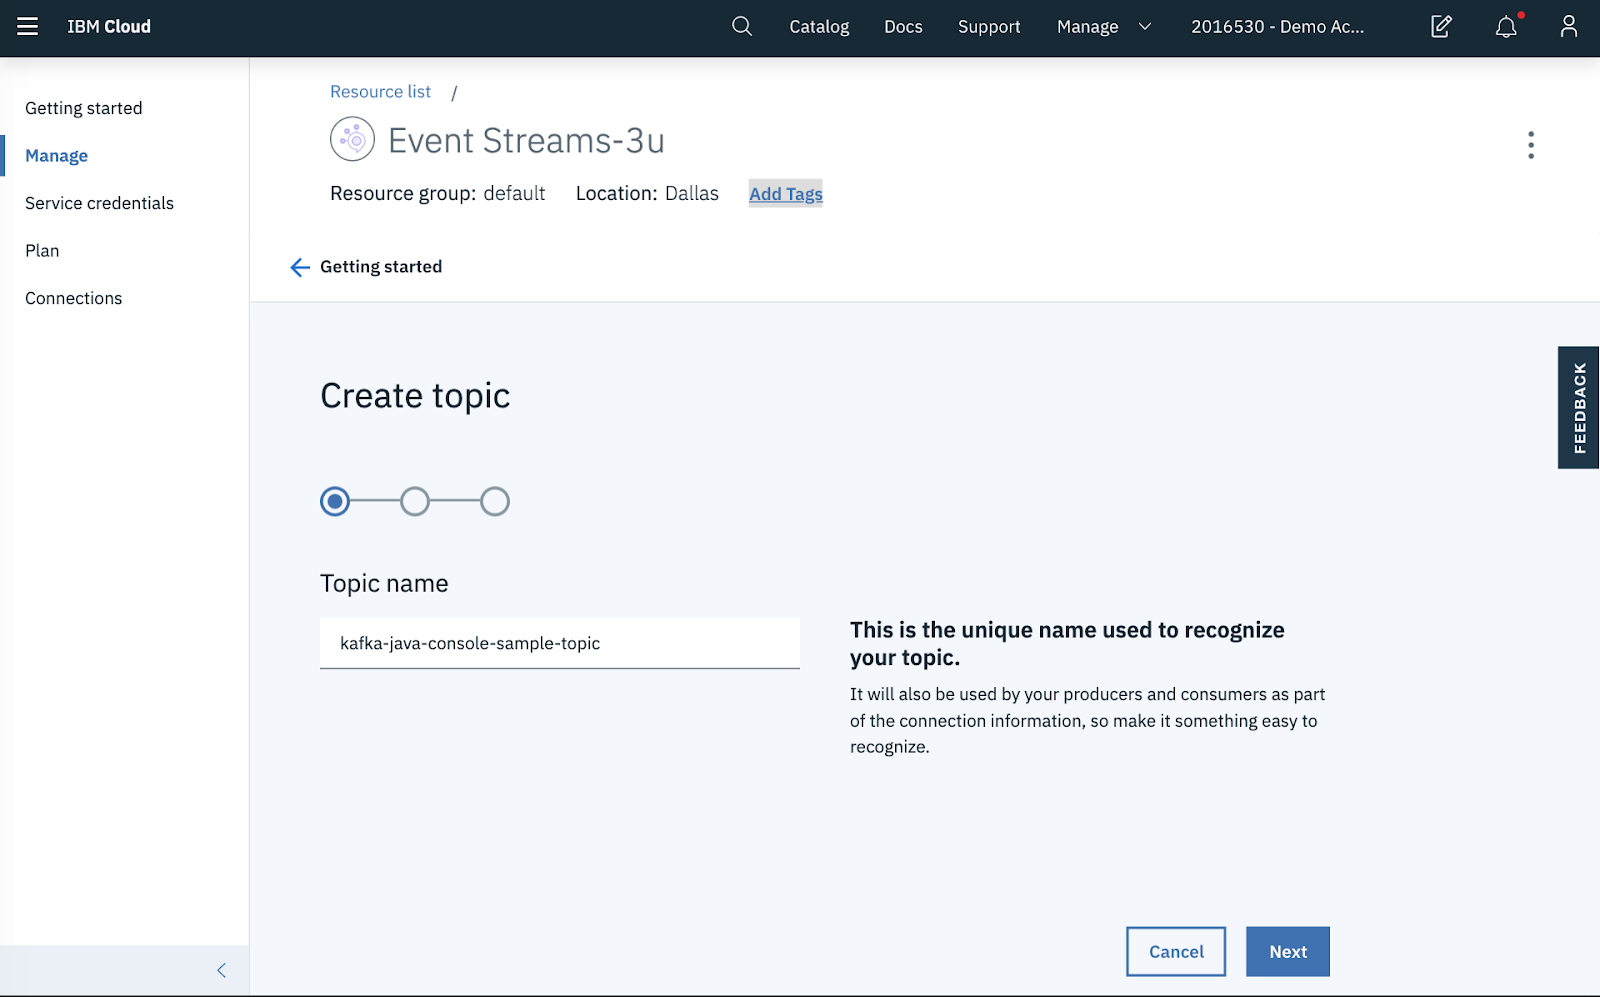
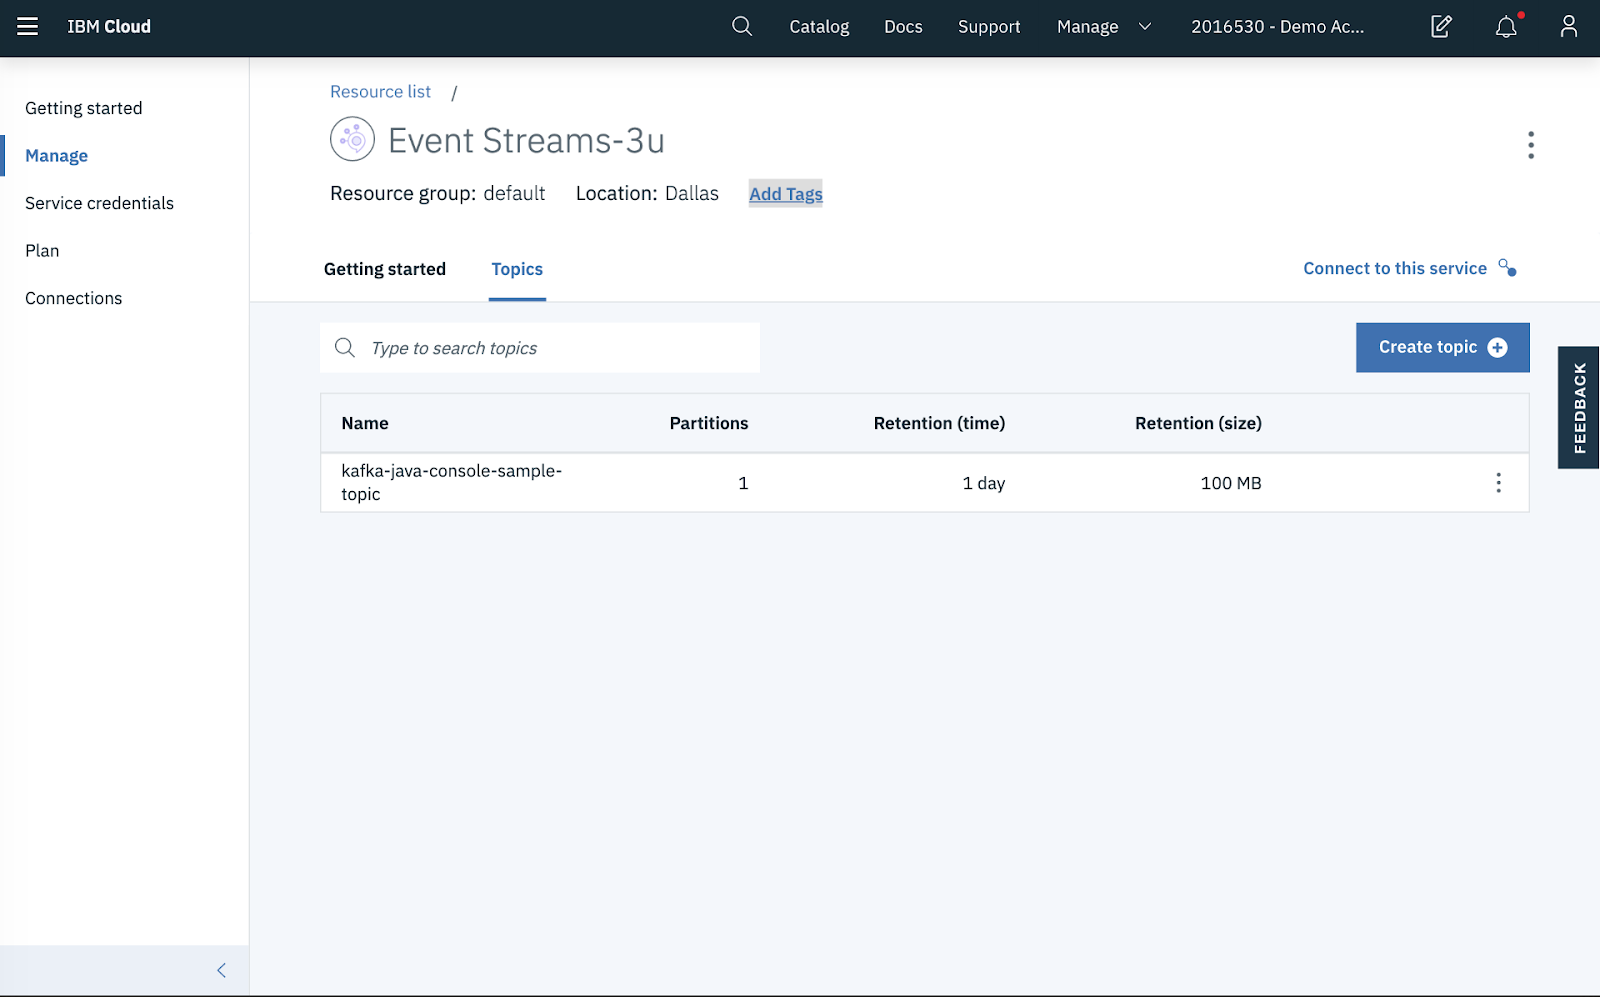
Step 2: Create Topic
Once the service has been created, click on Create a topic in the Getting started page.

Enter a topic name (e.g. kafka-java-console-sample-topic) and for testing purposes, select 1 partition and a day for message retention.


Step 3: Create Credentials
In the Service credentials page, click on New credential. Select the Manager role and Auto Generate the Service ID.
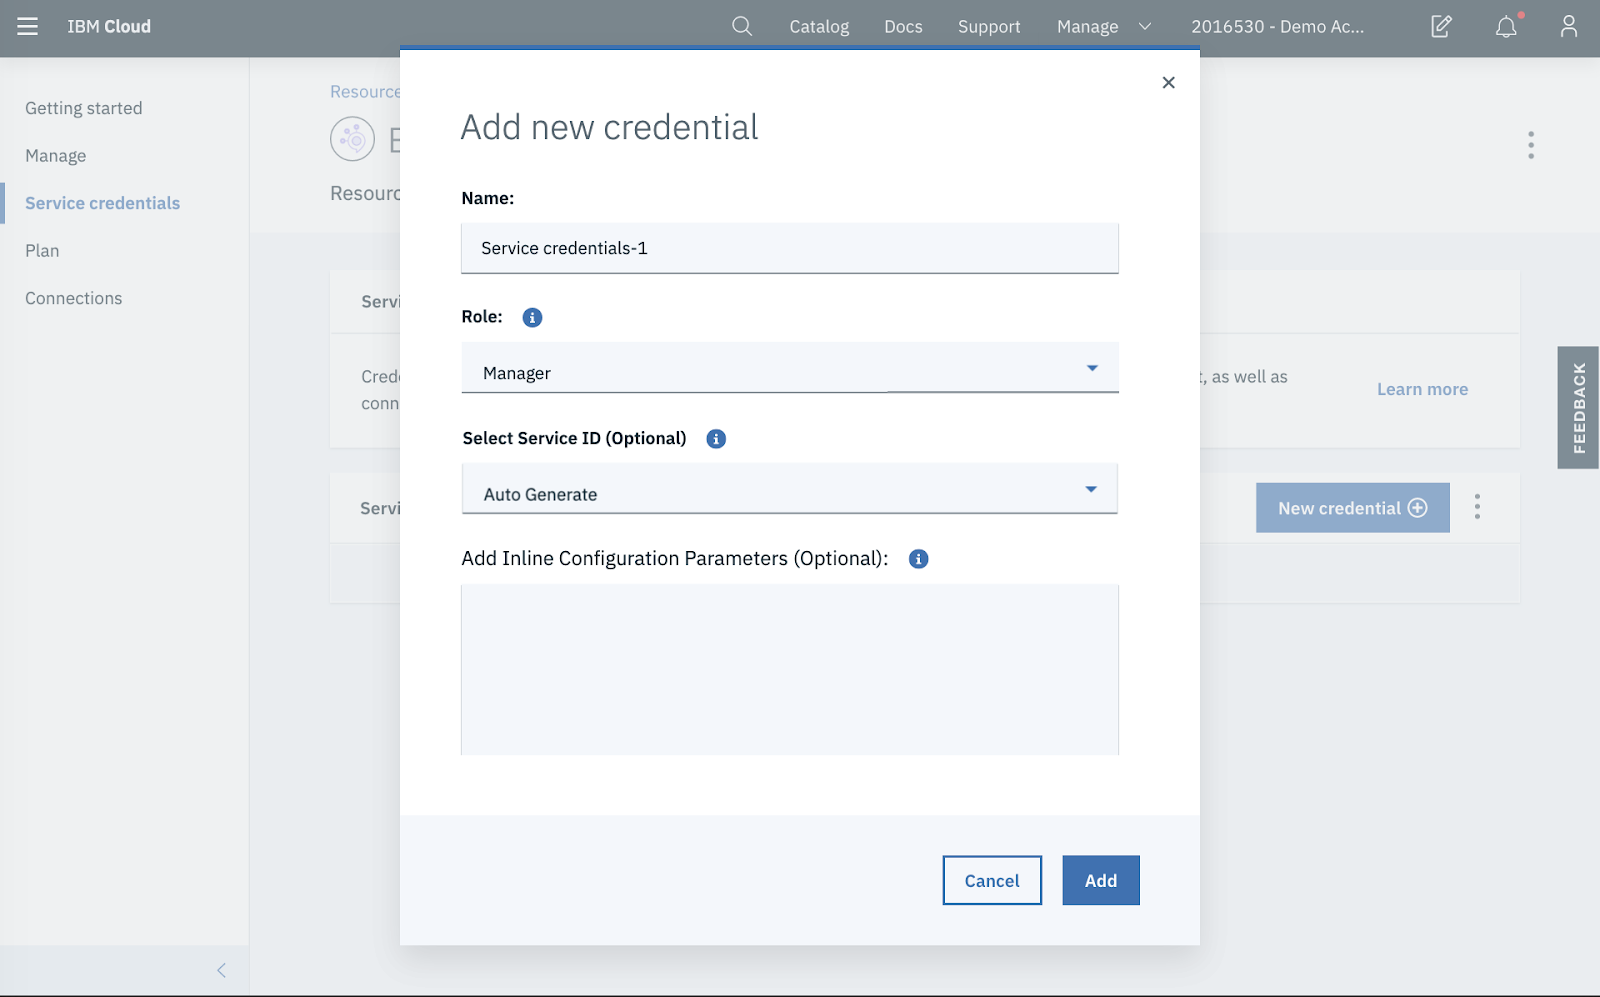

The credentials are provided in JSON format. Copy the JSON, which contains connection information e.g. API Key, Broker URLs, etc) to be used later.
{
"api_key": "p111111ZVt9Q8DQPluE6jYLYhmMmKLaKtXCjWkpSI6OZ",
"apikey": "p111111ZVt9Q8DQPluE6jYLYhmMmKLaKtXCjWkpSI6OZ",
"iam_apikey_description": "Auto-generated for key 8111111a-0a93-4a7a-9981-1500b1543e22",
"iam_apikey_name": "Service credentials-1",
"iam_role_crn": "crn:v1:bluemix:public:iam::::serviceRole:Manager",
"iam_serviceid_crn": "crn:v1:bluemix:public:iam-identity::a/3111111935dc885883a45beb7fde7546::serviceid:ServiceId-11111114-12e4-4fa8-94b1-1f3bbc37ed09",
"instance_id": "31111114-0ff1-42d7-b58b-a7f4fead3796",
"kafka_admin_url": "https://t111111q7ljf7f4n.svc02.us-south.eventstreams.cloud.ibm.com",
"kafka_brokers_sasl": [
"broker-1-t111111q7ljf7f4n.kafka.svc02.us-south.eventstreams.cloud.ibm.com:9093",
"broker-2-t111111q7ljf7f4n.kafka.svc02.us-south.eventstreams.cloud.ibm.com:9093",
"broker-5-t111111q7ljf7f4n.kafka.svc02.us-south.eventstreams.cloud.ibm.com:9093",
"broker-3-t111111q7ljf7f4n.kafka.svc02.us-south.eventstreams.cloud.ibm.com:9093",
"broker-4-t11111q7ljf7f4n.kafka.svc02.us-south.eventstreams.cloud.ibm.com:9093",
"broker-0-t11111q7ljf7f4n.kafka.svc02.us-south.eventstreams.cloud.ibm.com:9093"
],
"kafka_http_url": "https://t11111q7ljf7f4n.svc02.us-south.eventstreams.cloud.ibm.com",
"password": "p111111ZVt9Q8DQPluE6jYLYhmMmKLaKtXCjWkpSI6OZ",
"user": "token"
}
Step 4: Test the Service with a Sample Application
Now that we have a running Kafka service, let’s test it with a sample application (consumer and producer) provided by IBM in GitHub. Clone and build the GitHub repository:
$ cd event-streams-samples/kafka-java-console-sample
$ gradle clean && gradle build
Once the project has been built, let’s first run the consumer application in a command terminal. Replace the kafka_brokers_sasl and api_key values from the JSON obtained previously.
$ java -jar ./build/libs/kafka-java-console-sample-2.0.jar <kafka_brokers_sasl> <api_key> -consumer
The output will be as follows:
[2020-01-10 16:18:07,383] INFO Using command line arguments to find credentials. (com.eventstreams.samples.EventStreamsConsoleSample)
[2020-01-10 16:18:07,385] INFO Kafka Endpoints: broker-1-t111111q7ljf7f4n.kafka.svc02.us-south.eventstreams.cloud.ibm.com:9093 (com.eventstreams.samples.EventStreamsConsoleSample)
[2020-01-10 16:18:08,522] INFO Creating the topic kafka-java-console-sample-topic (com.eventstreams.samples.EventStreamsConsoleSample)
[2020-01-10 16:18:14,626] INFO Topic kafka-java-console-sample-topic already exists (com.eventstreams.samples.EventStreamsConsoleSample)
[2020-01-10 16:18:17,297] INFO [Partition(topic = kafka-java-console-sample-topic, partition = 0, leader = 2, replicas = [2,3,4], isr = [2,3,4], offlineReplicas = [])] (com.eventstreams.samples.ConsumerRunnable)
[2020-01-10 16:18:17,303] INFO EventStreamsConsoleSample will run until interrupted. (com.eventstreams.samples.EventStreamsConsoleSample)
[2020-01-10 16:18:17,303] INFO class com.eventstreams.samples.ConsumerRunnable is starting. (com.eventstreams.samples.ConsumerRunnable)
[2020-01-10 16:18:20,309] INFO No messages consumed (com.eventstreams.samples.ConsumerRunnable)
Open another command terminal, and run the producer application:
$ java -jar ./build/libs/kafka-java-console-sample-2.0.jar <kafka_brokers_sasl> <api_key> -producer
The output will be as follows:
[2020-01-10 16:19:21,655] INFO Using command line arguments to find credentials. (com.eventstreams.samples.EventStreamsConsoleSample)
[2020-01-10 16:19:21,656] INFO Kafka Endpoints: broker-1-t335226q7ljf7f4n.kafka.svc02.us-south.eventstreams.cloud.ibm.com:9093 (com.eventstreams.samples.EventStreamsConsoleSample)
[2020-01-10 16:19:22,192] INFO Creating the topic kafka-java-console-sample-topic (com.eventstreams.samples.EventStreamsConsoleSample)
[2020-01-10 16:19:26,767] INFO Topic kafka-java-console-sample-topic already exists (com.eventstreams.samples.EventStreamsConsoleSample)
[2020-01-10 16:19:29,016] INFO [Partition(topic = kafka-java-console-sample-topic, partition = 0, leader = 2, replicas = [2,3,4], isr = [2,3,4], offlineReplicas = [])] (com.eventstreams.samples.ProducerRunnable)
[2020-01-10 16:19:29,017] INFO EventStreamsConsoleSample will run until interrupted. (com.eventstreams.samples.EventStreamsConsoleSample)
[2020-01-10 16:19:29,017] INFO class com.eventstreams.samples.ProducerRunnable is starting. (com.eventstreams.samples.ProducerRunnable)
[2020-01-10 16:19:32,321] INFO Message produced, offset: 0 (com.eventstreams.samples.ProducerRunnable)
When you see the Message produced output, the consumer application should show the corresponding output when it receives the messages:
headers = RecordHeaders(headers = [], isReadOnly = false), key = key, value = This is a test message #0) (com.eventstreams.samples.ConsumerRunnable)
[2020-01-10 16:19:34,690] INFO Message consumed: ConsumerRecord(topic = kafka-java-console-sample-topic, partition = 0, leaderEpoch = 0, offset = 1, CreateTime = 1578644374326, serialized key size = 3, serialized value size = 25,
At this point, we’ve confirmed that the Kafka cluster works well with consumer and producer applications. More detailed instructions are available in the official getting started tutorial.
Part 3: Design a Joget App with Kafka Plugin
Let’s now visually design an app using the Joget platform. Joget provides an extensible plugin architecture, so we developed sample Kafka producer and consumer plugins.
Firstly, setup a Joget platform, either by downloading and installing on-premise, signing up for Joget Cloud, running on Docker, or other deployment options such as using the Joget certified operator on Red Hat OpenShift.
NOTE: The sample Kafka plugins currently do not work in a multi-tenant Joget environment, so if you wish to run the plugin on Joget Cloud, it needs to be on a dedicated plan.
Step 1: Design a New App
In the Joget App Center, login as an administrator and click on Design New App. Key in an App ID and App Name and click on Save.

Step 2: Configure a Kafka Consumer Plugin
First, ensure that the Kafka plugin has been uploaded to the platform. In Settings, select Manage Plugins, click on Upload Plugin, select the Kafka plugin file and click on Upload.
Back in the app, select Properties & Export and click on Set Default Plugin Properties.
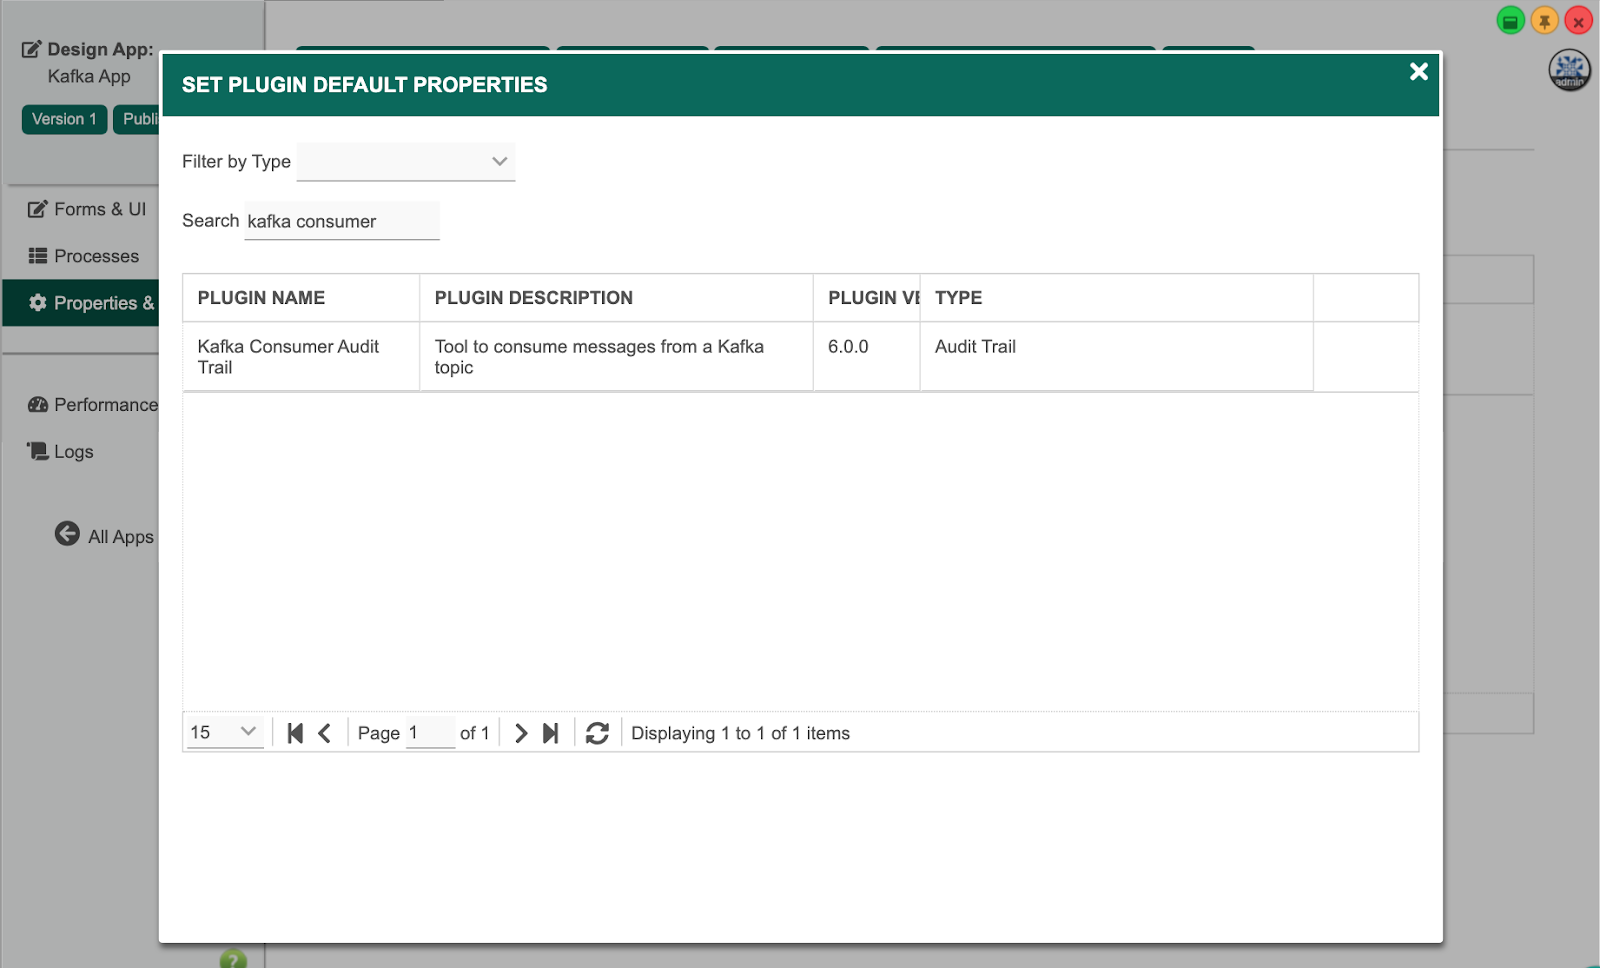
Select the Kafka Consumer Audit Trail plugin, and key in the Kafka configuration. The Bootstrap Servers and API Key are obtained from the credentials JSON downloaded in the previous IBM Event Streams tutorial.
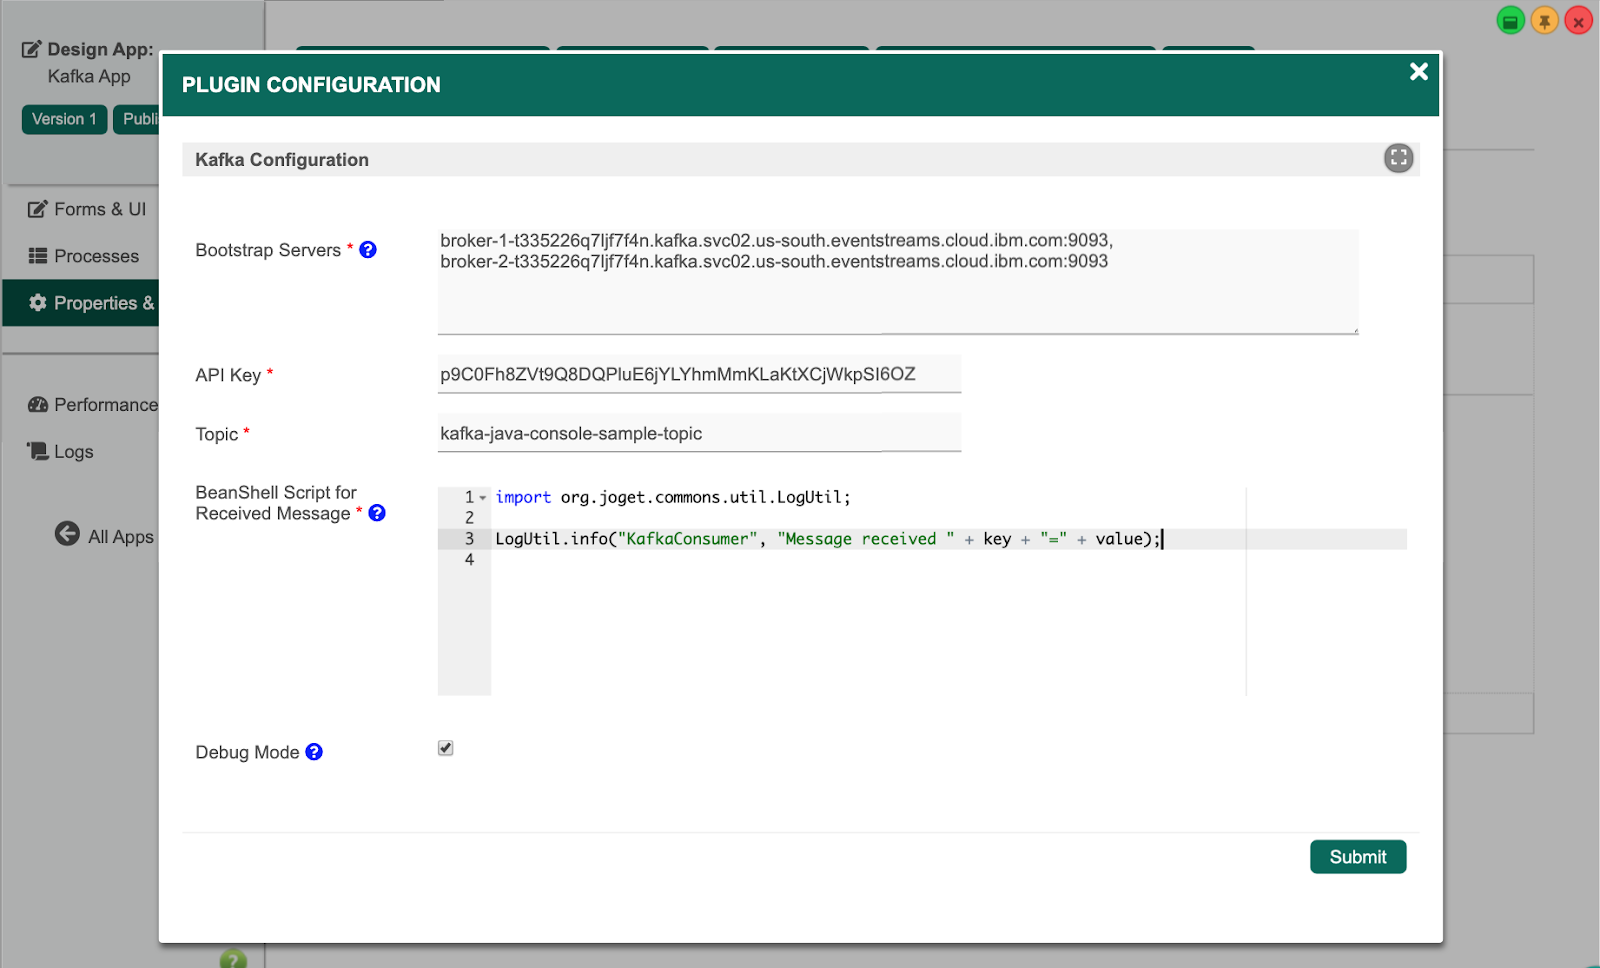
In the BeanShell Script for Received Messages, you can enter a BeanShell script (the variables key and value are injected when a message is received). As an example, a simple script to output the message to the log file:
import org.joget.commons.util.LogUtil;
LogUtil.info("KafkaConsumer", "Message received " + key + "=" + value);
You can code more complex scripts according to your requirement, based on the BeanShell guide in the Joget Knowledge Base.
Once the plugin configuration has been submitted, there will be a running background thread that is subscribed to the Kafka topic, with log output as below:
INFO 17 Jan 2020 16:17:40 org.joget.plugin.base.PluginManager - Bundle org.joget.kafka.joget-kafka started
INFO 17 Jan 2020 16:17:40 org.joget.kafka.ConsumerThreadMonitor - Waiting for platform init
INFO 17 Jan 2020 16:17:40 org.joget.kafka.ConsumerThreadMonitor - Started thread monitor
INFO 17 Jan 2020 16:17:45 org.joget.kafka.ConsumerThreadMonitor - Started Kafka consumer thread for app kafka
INFO 17 Jan 2020 16:17:45 org.joget.kafka.ConsumerRunnable - Consumer is starting.
INFO 17 Jan 2020 16:17:59 org.joget.kafka.ConsumerRunnable$1 - Partitions [kafka-java-console-sample-topic-0] assigned, consumer seeking to end.
INFO 17 Jan 2020 16:18:02 org.joget.kafka.ConsumerRunnable$1 - current Position: 421
INFO 17 Jan 2020 16:18:02 org.joget.kafka.ConsumerRunnable$1 - Seeking to end...
INFO 17 Jan 2020 16:18:03 org.joget.kafka.ConsumerRunnable$1 - Seek from the current position: 421
INFO 17 Jan 2020 16:18:03 org.joget.kafka.ConsumerRunnable$1 - Producer can now begin producing messages.
Step 3: Design Kafka Producer Process
Let’s now create a simple producer process that sends a message to the Kafka cluster. Back in the Kafka app, select Processes and click on Design Process to launch the Process Builder. Add a Tool to the process, rename it appropriately and click on Deploy. Once the process has been deployed successfully, close the Process Builder.
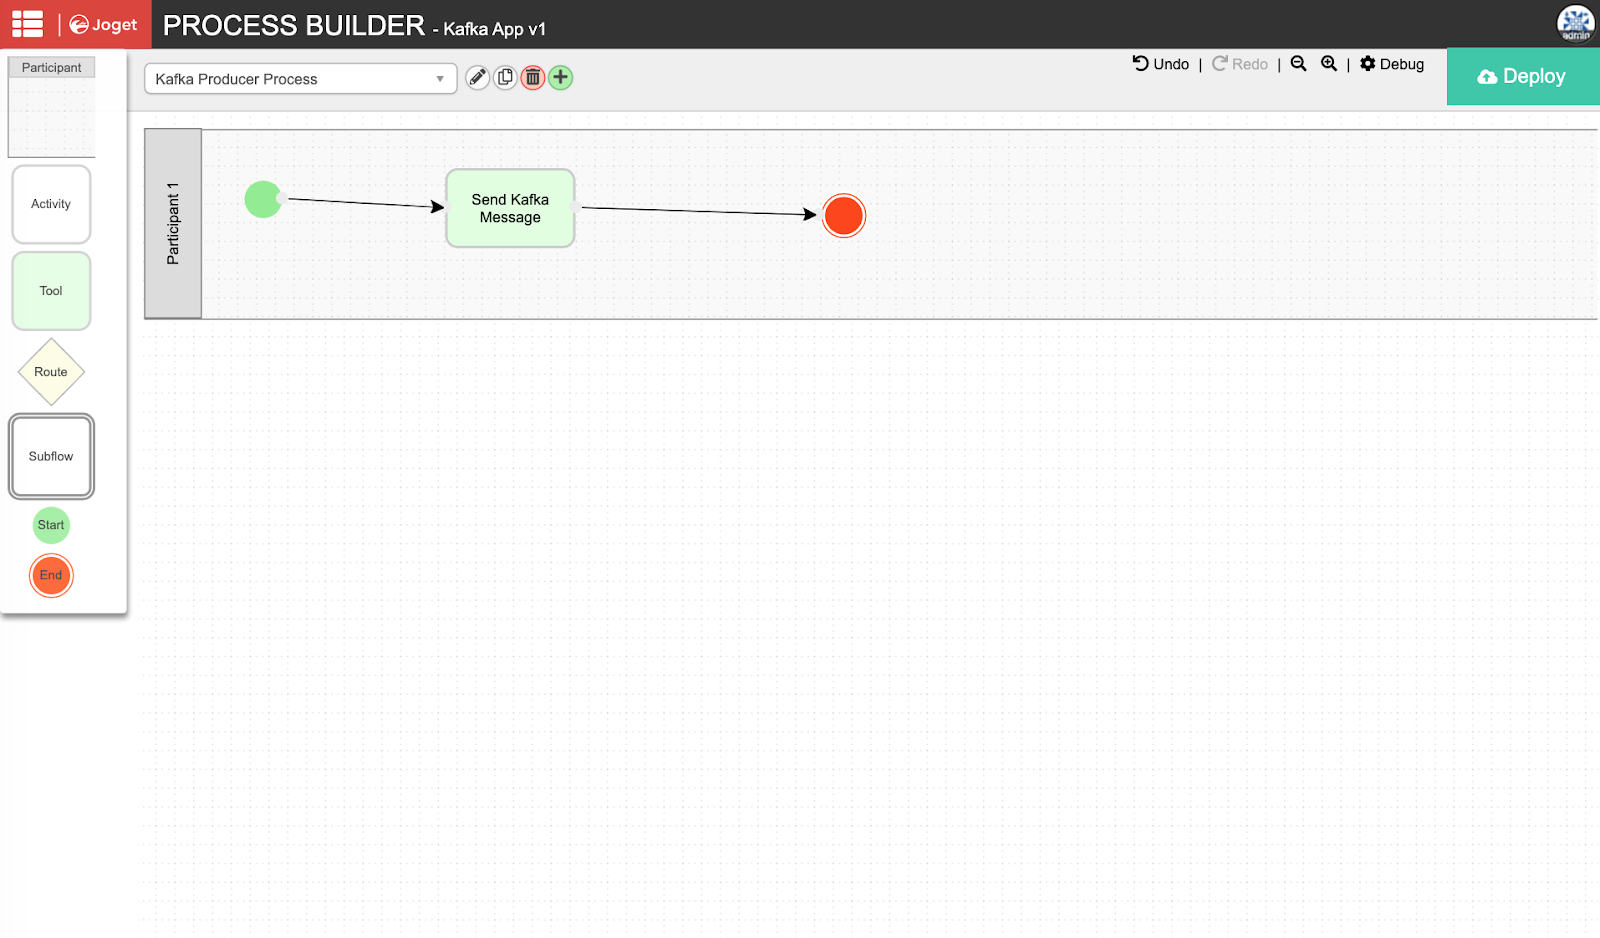
In the Processes page, select the Map Tools to Plugins tab, and click on Add/Edit Plugin.

Select the Kafka Producer Tool, and key in the Kafka configuration. The Bootstrap Servers and API Key are obtained from the credentials JSON downloaded in the previous tutorial, and the Topic, Key and Value can be set according to the required message.
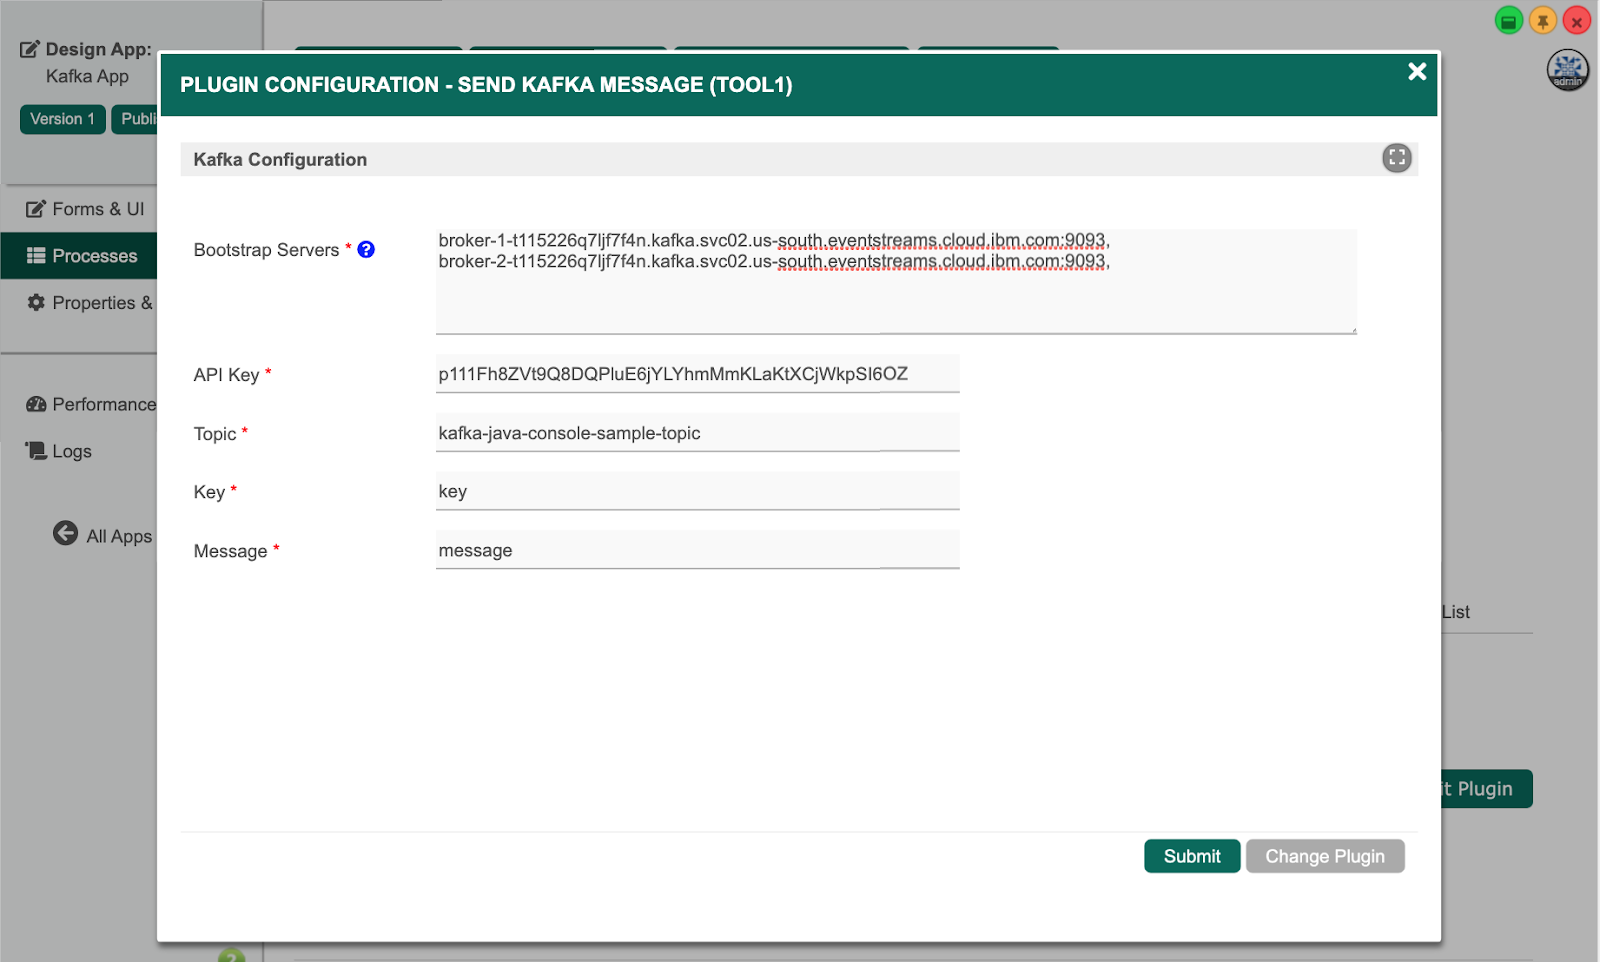
Click on Run Process to run the process. When the tool is executed, you should see the log output indicating that the message has been sent to the Kafka cluster:
INFO 17 Jan 2020 16:19:10 org.joget.kafka.ProducerRunnable - [Partition(topic = kafka-java-console-sample-topic, partition = 0, leader = 2, replicas = [2,3,4], isr = [4,3,2], offlineReplicas = [])]
INFO 17 Jan 2020 16:19:10 org.joget.kafka.ProducerRunnable - class org.joget.kafka.ProducerRunnable is starting.
INFO 17 Jan 2020 16:19:13 org.joget.kafka.ProducerRunnable - Message produced, offset: 421
INFO 17 Jan 2020 16:19:13 org.joget.kafka.ProducerRunnable - class org.joget.kafka.ProducerRunnable is shutting down.
INFO 17 Jan 2020 16:19:13 org.joget.kafka.ProducerRunnable - class org.joget.kafka.ProducerRunnable has shut down.
The Kafka consumer plugin will receive the message and execute the configured BeanShell script. Here is the sample log output:
INFO 17 Jan 2020 16:19:14 org.joget.kafka.ConsumerRunnable - Executing script. Offset: 421
INFO 17 Jan 2020 16:19:14 org.joget.kafka.ConsumerRunnable - Key=key. Value=message
INFO 17 Jan 2020 16:19:14 KafkaConsumer - Message received key=message
INFO 17 Jan 2020 16:19:14 org.joget.kafka.ConsumerRunnable - Script execution complete.
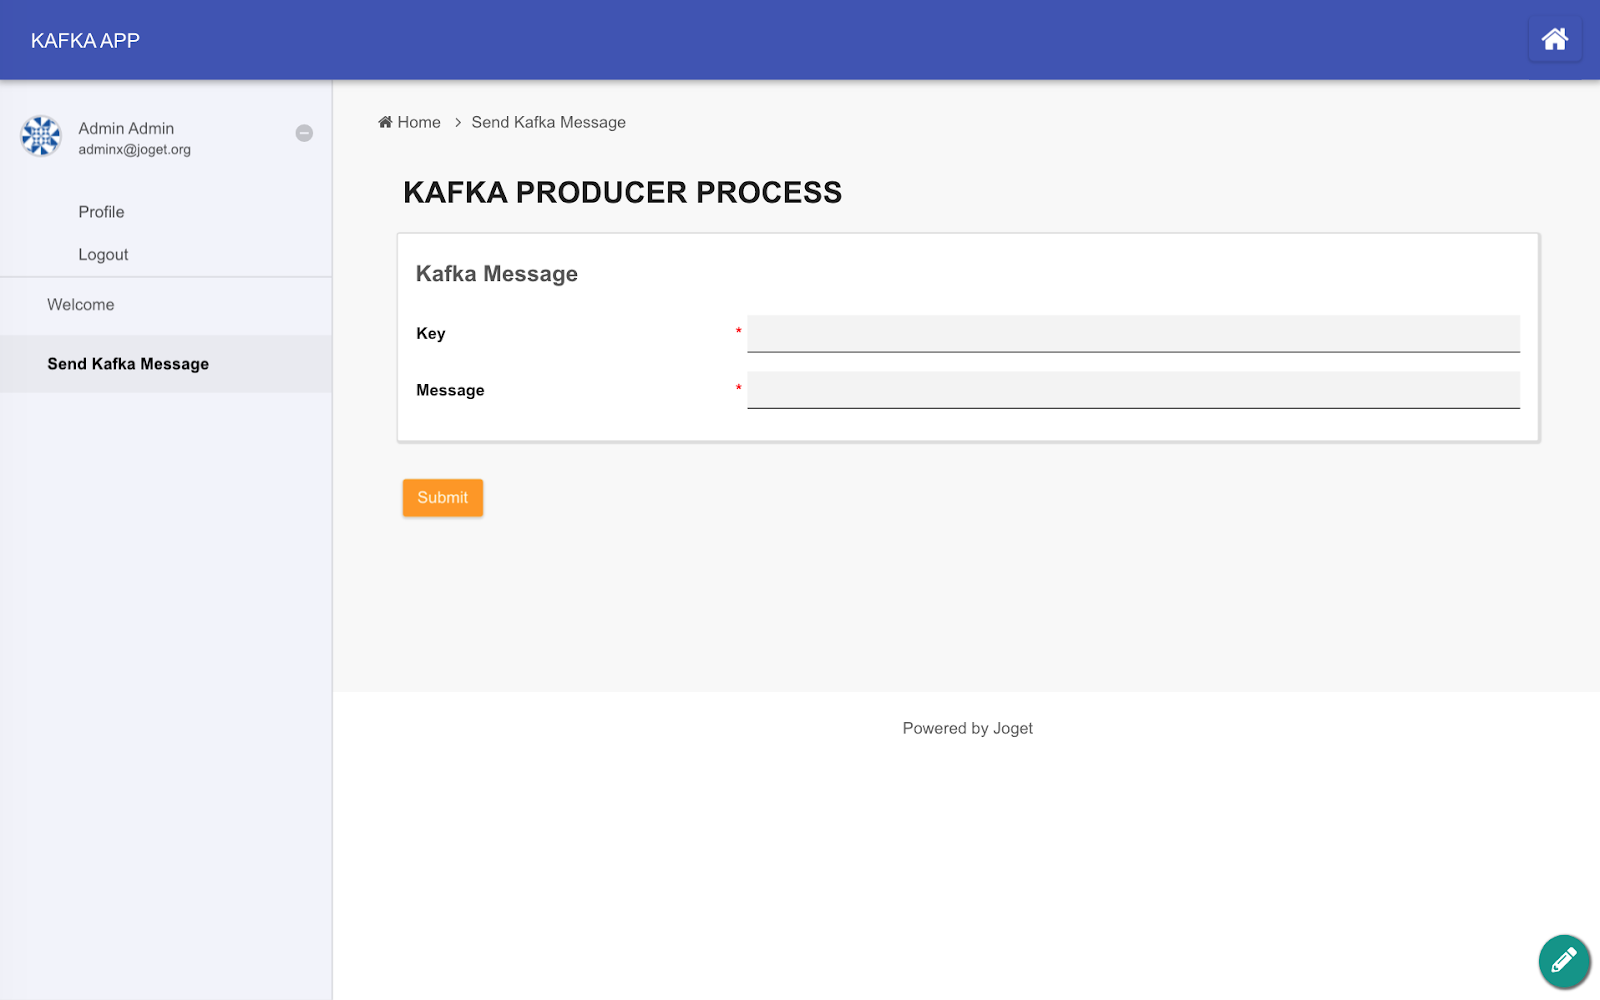
At this point, we have a Kafka producer and consumer running in a Joget app. You can enhance the app using the Form Builder and Userview Builder to add a message form and UI for the app, as the screenshots below demonstrate:


Part 4: Create IBM Watson IoT Platform Service
IBM Watson IoT Platform is a managed cloud service to connect, control, monitor and analyze data from IoT devices using the MQTT protocol. As a part of IBM Cloud, it also has a free tier offering so you can get started for free.
Step 1: Create IoT Platform Service
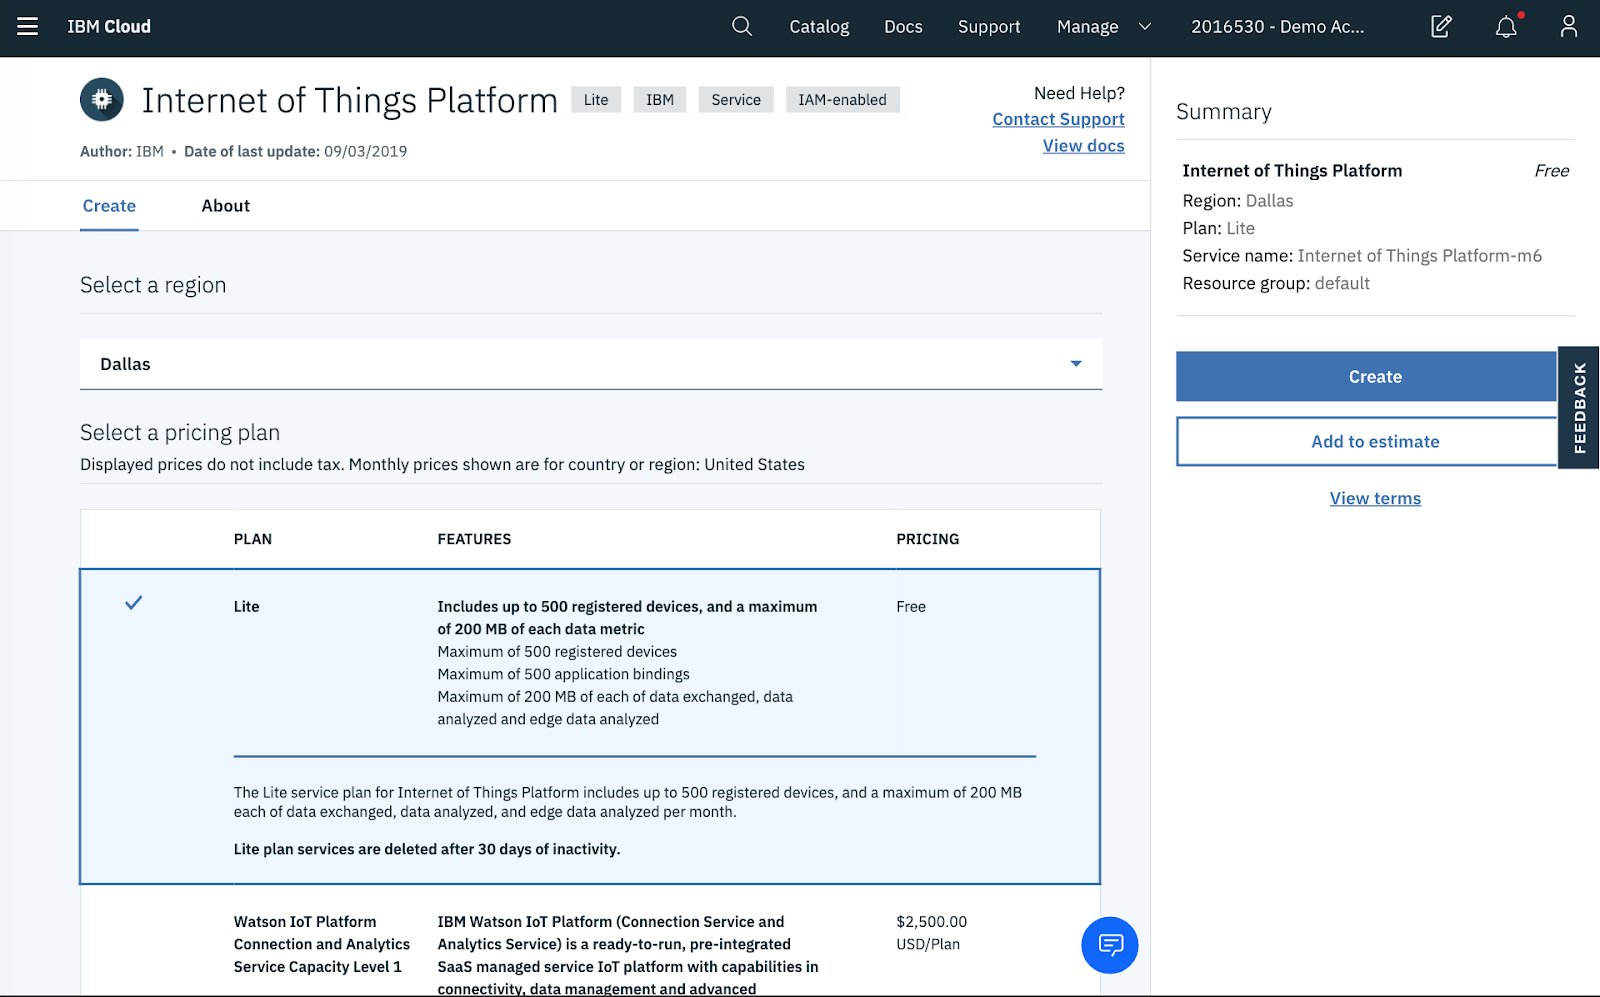
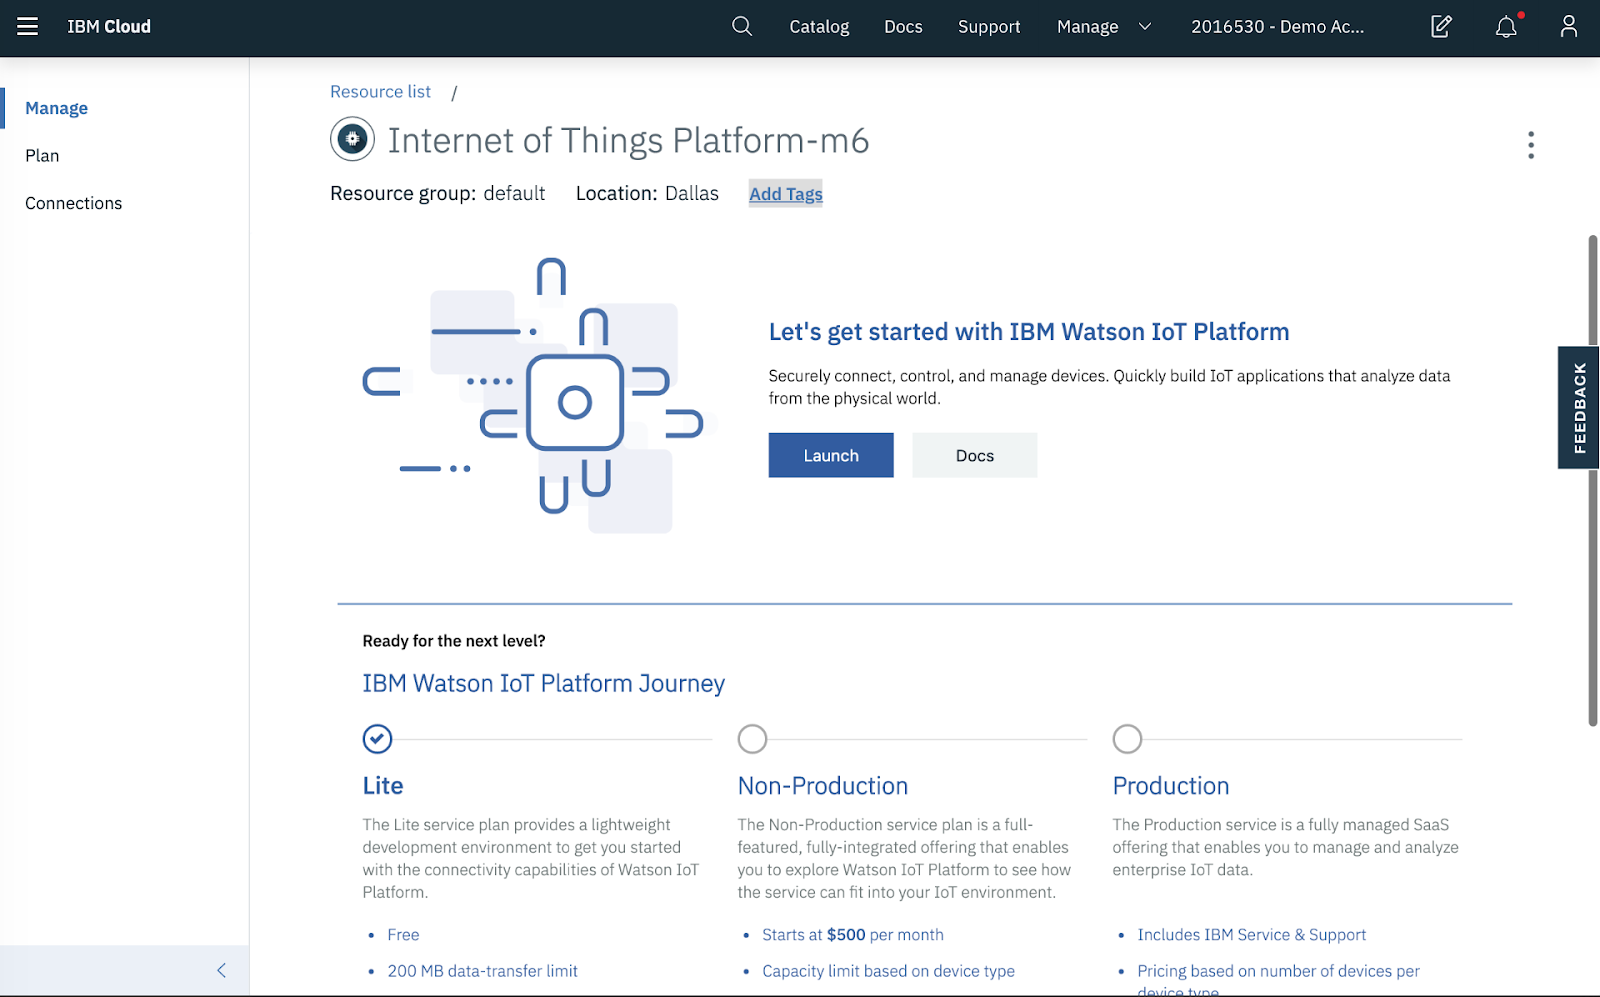
Choose the Lite plan, and click on Create. The service should be created within a few minutes.
Step 2: Add an IoT Device
Now, let’s create a device in the service. Browse to Devices, and click on Create a device.

Enter a Device Type, Device ID and any other optional information. You can use the defaults for all the other settings.
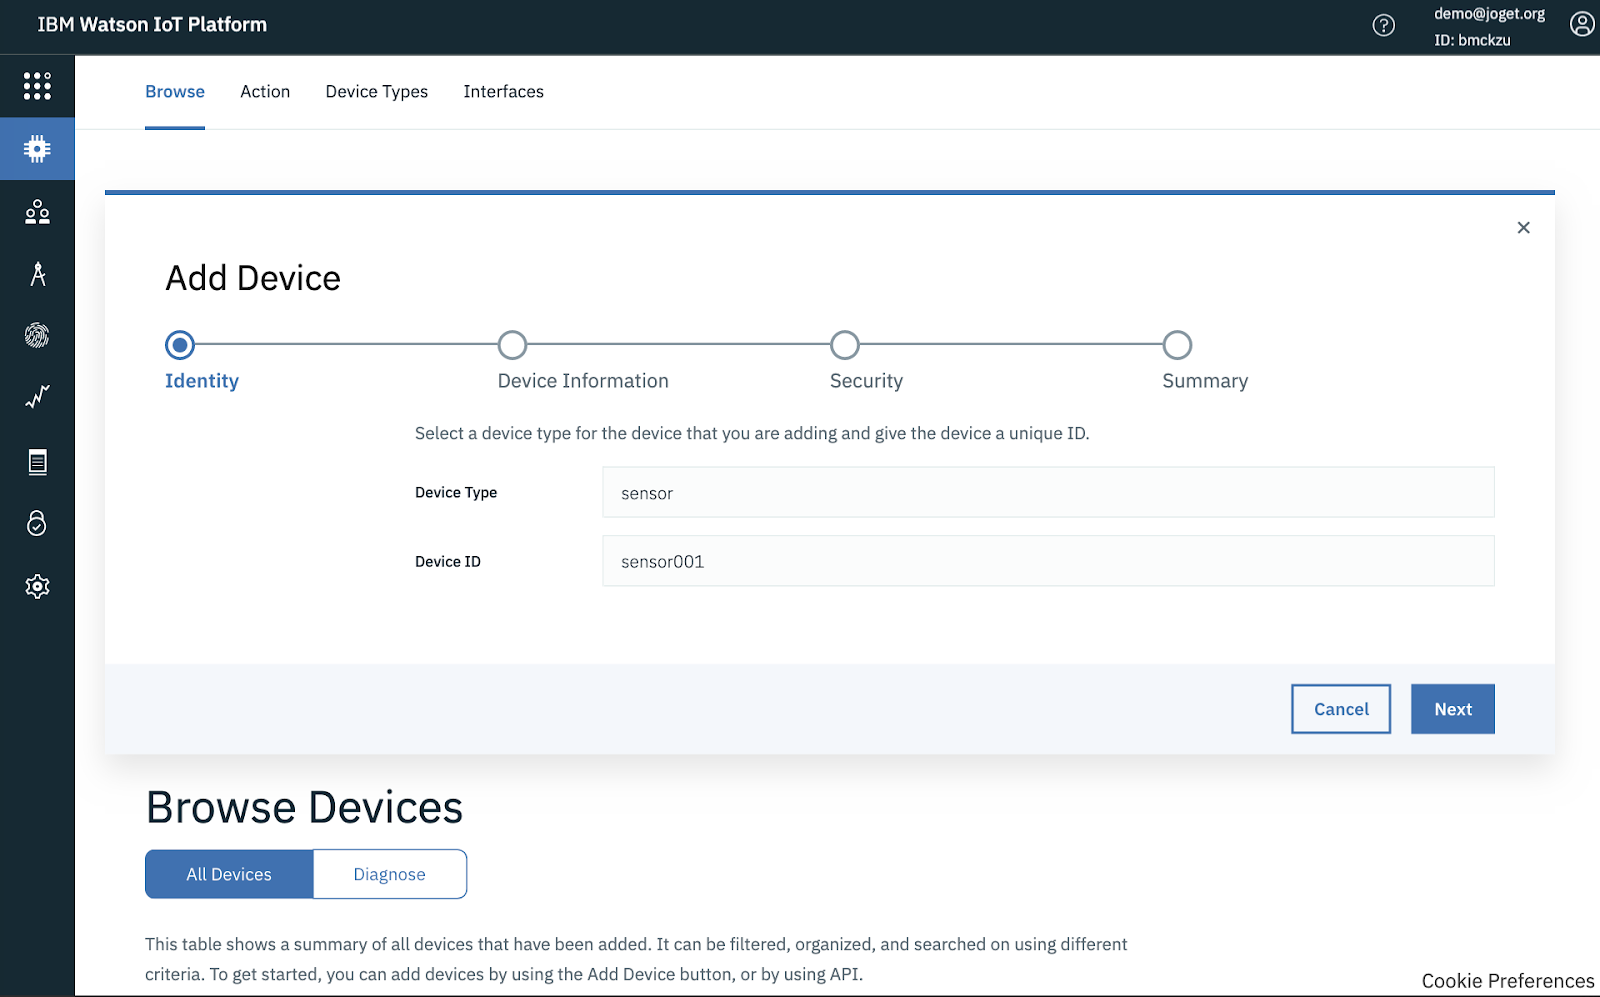


Click on Finish, and the Device Credentials will be presented. Keep a copy of the credentials, especially the Authentication Token which is not recoverable.

More detailed information can be found in the Getting started with Watson IoT Platform page.
Part 5: Integrate Watson IoT with Event Streams
The Watson IoT platform provides data store connectors to connect it to other IBM Cloud services. Let’s setup a service binding and data store connector for Event Streams, so that device data will be automatically published to a Kafka topic.
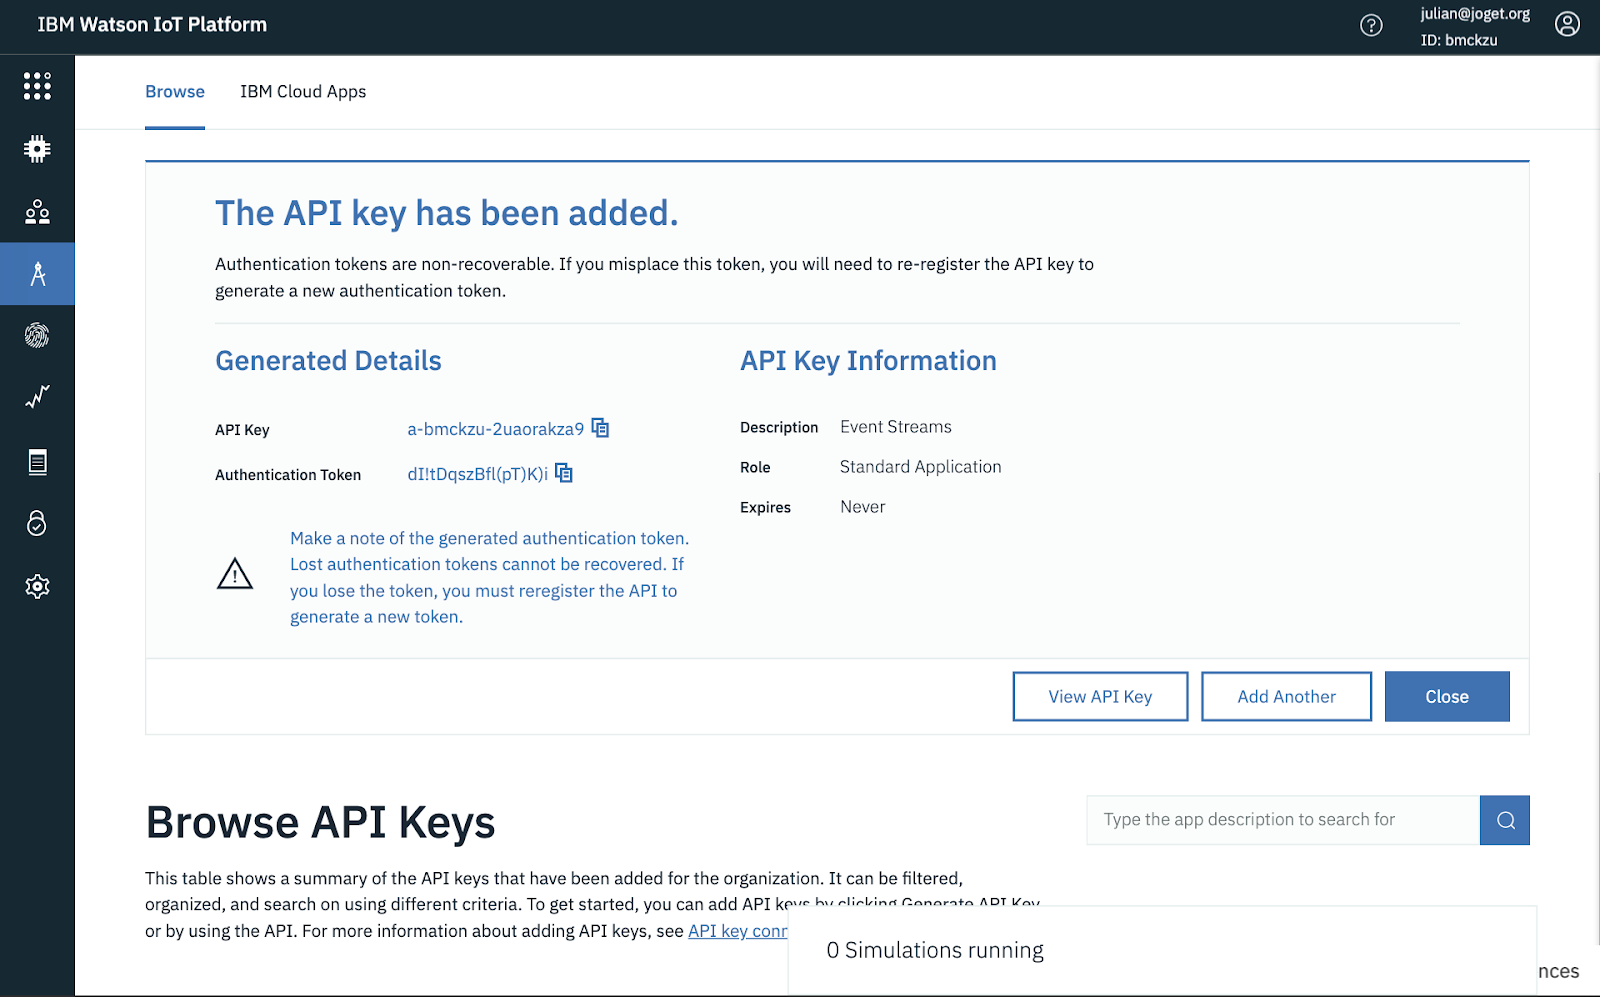
Step 1: Generate API Key
Browse to Apps, and click on Generate API Key. Set the Role to Standard Application and click on Generate Key.


Make a note of the generated API Key and Authentication Token.
Step 2: Add Service Binding and Add Data Store Connector for Event Streams
To set up a service binding between Watson IoT and Event Streams, you will need to use the Python SDK. On a machine with Python installed, install the SDK using the command:
pip install wiotp-sdk
Save the following Python code in a file bind.py (replace the credential values with your Event Streams credentials):
import wiotp.sdk.application
from wiotp.sdk.api.services import EventStreamsServiceBindingCredentials, EventStreamsServiceBindingCreateRequest
options = wiotp.sdk.application.parseEnvVars()
appClient = wiotp.sdk.application.ApplicationClient(options)
serviceBinding = {
"name": "test-eventstreams",
"description": "Test EventStreams instance",
"type": "eventstreams",
"credentials": {
"api_key": "p111111ZVt9Q8DQPluE6jYLYhmMmKLaKtXCjWkpSI6OZ",
"user": "token",
"password": "p111111ZVt9Q8DQPluE6jYLYhmMmKLaKtXCjWkpSI6OZ",
"kafka_admin_url": "https://t111111q7ljf7f4n.svc02.us-south.eventstreams.cloud.ibm.com",
"kafka_brokers_sasl": [
"broker-1-t111111q7ljf7f4n.kafka.svc02.us-south.eventstreams.cloud.ibm.com:9093",
"broker-2-t111111q7ljf7f4n.kafka.svc02.us-south.eventstreams.cloud.ibm.com:9093",
],
},
}
service = appClient.serviceBindings.create(serviceBinding)
# Set up the connector
connector = appClient.dsc.create(name="connector1", serviceId=service.id, type="eventstreams")
# Set up destinations
destination = connector.destinations.create(name="kafka-java-console-sample-topic", partitions=1)
# Set up rules
rule1 = connector.rules.createEventRule(name="allevents", destinationName="kafka-java-console-sample-topic", typeId="*", eventId="*")
Set the WIOTP_API_KEY and WIOTP_API_TOKEN variables to match your Watson IoT API Key, and execute the Python file.
export WIOTP_API_KEY='a-bmckzu-2uaorakza9'
export WIOTP_API_TOKEN='dI!tDqszBfl(pT)K)i'
python bind.py
NOTE: You can also use the IBM Watson IoT Platform Historical Data Storage Extension API to manage (create, list and delete) the service bindings and data store connectors.
Step 3: Activate Device Simulator for Testing
To test the service binding between Watson IoT Platform and Event Streams, let’s set up a simulated device.
Browse to Settings, select Device Simulator and enable the Activate Device Simulator option. You can use the default configuration to simulate events at a fixed frequency.


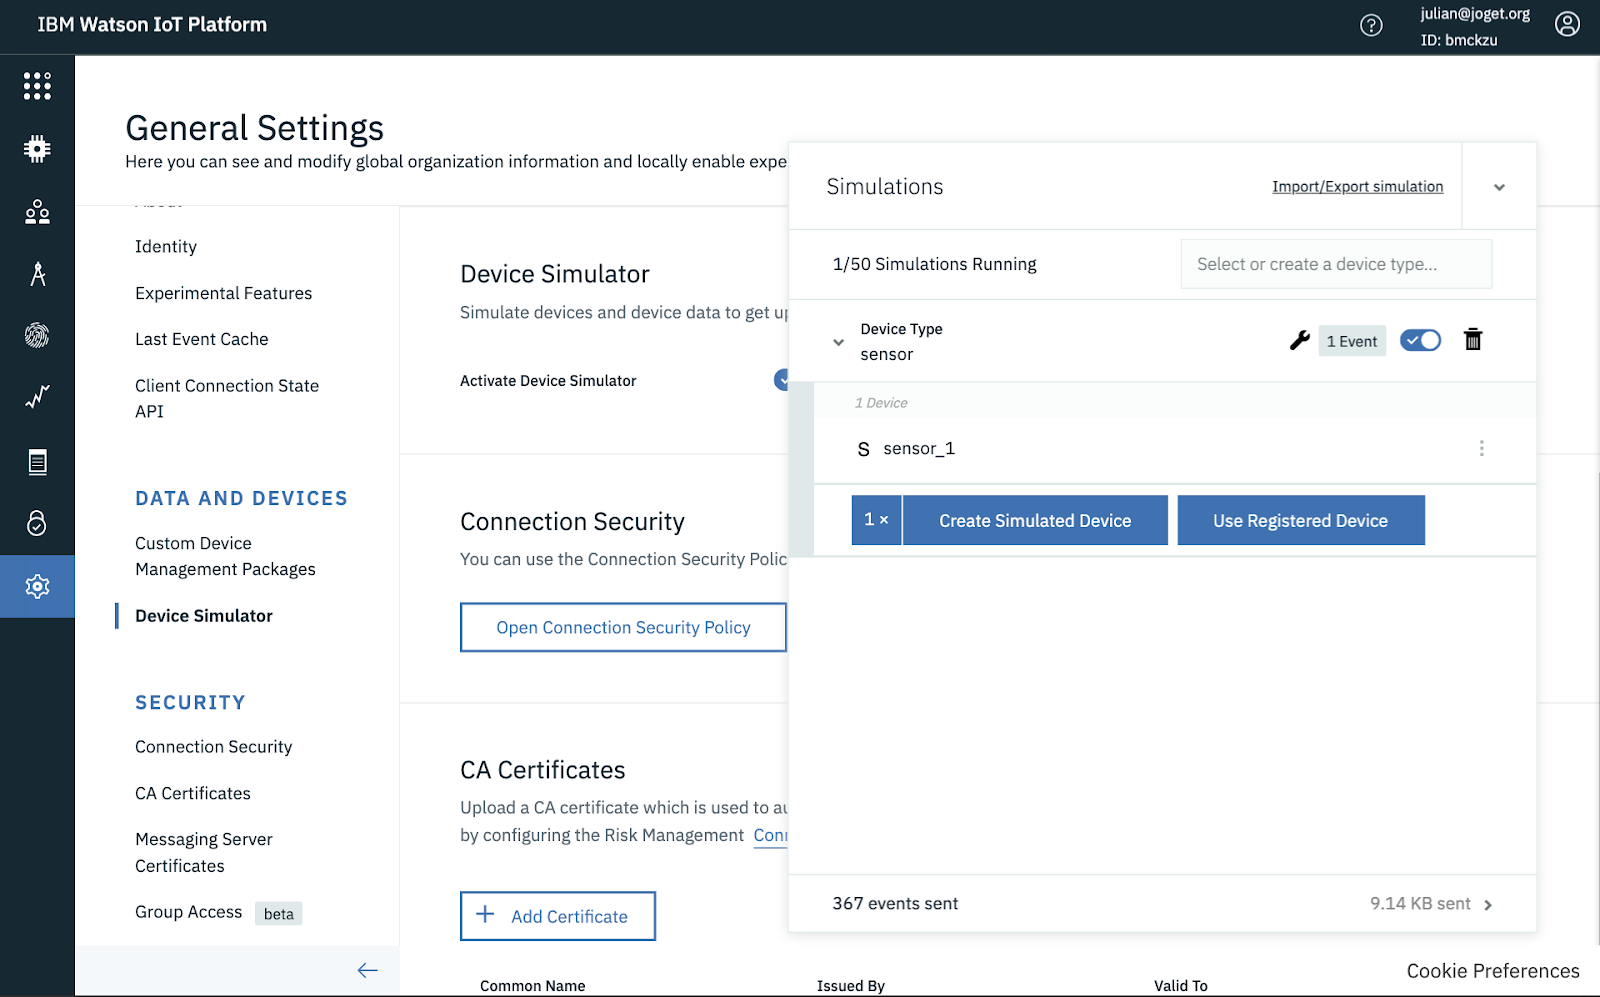
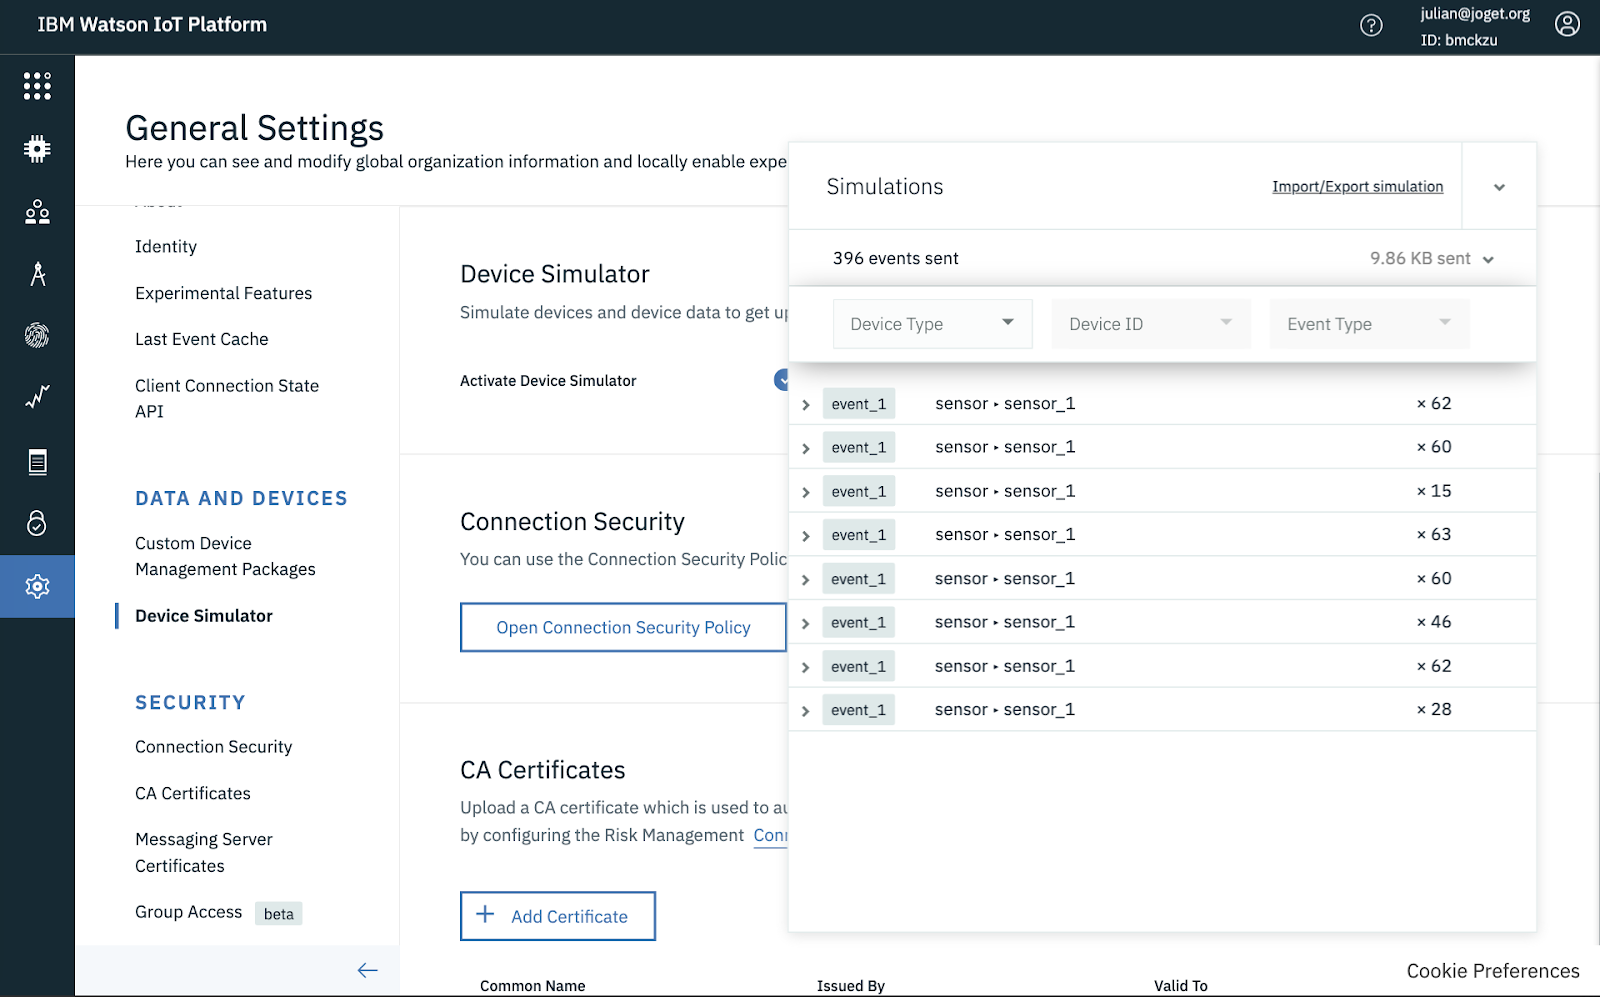
Once the simulation has been created and enabled, you will see events being generated.
If you have set up the data store connector correctly, you should see the messages published to the Kafka topic in the Event Streams service.
When you run the sample IBM consumer application, you should see the Message consumed log messages:
$ java -jar ./build/libs/kafka-java-console-sample-2.0.jar <kafka_brokers_sasl> <api_key> -consumer
[2020-01-13 17:33:40,572] INFO Using command line arguments to find credentials. (com.eventstreams.samples.EventStreamsConsoleSample)
[2020-01-13 17:33:40,576] INFO Kafka Endpoints: broker-1-t111111q7ljf7f4n.kafka.svc02.us-south.eventstreams.cloud.ibm.com:9093 (com.eventstreams.samples.EventStreamsConsoleSample)
[2020-01-13 17:33:42,234] INFO Creating the topic kafka-java-console-sample-topic (com.eventstreams.samples.EventStreamsConsoleSample)
[2020-01-13 17:33:48,058] INFO Topic kafka-java-console-sample-topic already exists (com.eventstreams.samples.EventStreamsConsoleSample)
[2020-01-13 17:33:50,505] INFO [Partition(topic = kafka-java-console-sample-topic, partition = 0, leader = 2, replicas = [2,3,4], isr = [4,3,2], offlineReplicas = [])] (com.eventstreams.samples.ConsumerRunnable)
[2020-01-13 17:33:50,511] INFO EventStreamsConsoleSample will run until interrupted. (com.eventstreams.samples.EventStreamsConsoleSample)
[2020-01-13 17:33:50,512] INFO class com.eventstreams.samples.ConsumerRunnable is starting. (com.eventstreams.samples.ConsumerRunnable)
[2020-01-13 17:33:59,527] INFO No messages consumed (com.eventstreams.samples.ConsumerRunnable)
[2020-01-13 17:34:02,532] INFO No messages consumed (com.eventstreams.samples.ConsumerRunnable)
[2020-01-13 17:34:02,865] INFO Message consumed: ConsumerRecord(topic = kafka-java-console-sample-topic, partition = 0, leaderEpoch = 6, offset = 106, CreateTime = 1578908009923, serialized key size = 139, serialized value size = 19, headers = RecordHeaders(headers = [], isReadOnly = false), key = {"orgId":"bmckzu","format":"json","timestamp":"2020-01-13T09:33:28.095Z","deviceType":"sensor","deviceId":"sensor_1","eventType":"event_1"}, value = {"randomNumber":99}) (com.eventstreams.samples.ConsumerRunnable)
If you have the sample Joget Kafka app running, you should see the following log output showing the received messages:
INFO 17 Jan 2020 16:31:58 org.joget.kafka.ConsumerRunnable - Executing script. Offset: 422
INFO 17 Jan 2020 16:31:58 org.joget.kafka.ConsumerRunnable - Key={"orgId":"bmckzu","format":"json","timestamp":"2020-01-17T08:31:56.169Z","deviceType":"sensor","deviceId":"sensor_1","eventType":"event_1"}. Value={"randomNumber":8}
INFO 17 Jan 2020 16:31:58 KafkaConsumer - Message received {"orgId":"bmckzu","format":"json","timestamp":"2020-01-17T08:31:56.169Z","deviceType":"sensor","deviceId":"sensor_1","eventType":"event_1"}={"randomNumber":8}
INFO 17 Jan 2020 16:31:58 org.joget.kafka.ConsumerRunnable - Script execution complete.
INFO 17 Jan 2020 16:31:58 org.joget.kafka.ConsumerRunnable - Script result: null
INFO 17 Jan 2020 16:31:58 org.joget.kafka.ConsumerRunnable - Executing script. Offset: 423
Conclusion
In this article, we introduced Apache Kafka and presented a practical tutorial on integrating the Joget low-code platform with IBM Event Streams and IBM Watson IoT Platform. As evidenced by its adoption in many web-scale internet companies, Apache Kafka is a very powerful distributed streaming platform. However, it is also important to understand that like any other system, it is not a silver bullet to every problem on its own. When used in conjunction with a low-code platform like Joget, you can rapidly build and deploy applications to process large streams of data in real-time.
To get started with Apache Kafka and Joget, download the sample Joget app and plugins.
To get started with Apache Kafka and Joget, download the sample Joget app and plugins.

.png)
.png)


Great
ReplyDeletegreat blog
ReplyDelete