Move Over Native Apps, Progressive Web Apps Are Coming For You

TL;DR
Progressive Web Apps (PWAs) are the future of mobile apps and the web. Start building PWAs using a visual no-code/low-code approach with Joget DX.Introduction
Imagine using an app launched from an icon on your mobile phone, with a user interface that is not only fast and responsive, but also works offline. And you get push notifications when the app isn’t even running. This sounds a lot like a native app, doesn’t it? Not necessarily so, as all this is possible today with Progressive Web Apps (PWA).What is a Progressive Web App (PWA)?
Progressive Web Apps are web applications that incorporate additional features such as installing to a device, offline support, background push notifications, fast and responsive user experience, and more. A PWA pushes the boundaries of what a web app is capable of, and blurs the lines between a web and native app.PWAs are the future of mobile apps and the web. This might seem like a hyperbolic claim but since our last article Progressive Web Apps: Apple App Store, Google Play Store, It Was Nice Knowing You, PWAs have increased in maturity and progress. Many popular brands such as Google Maps, Google Photos, Twitter, Pinterest, Starbucks, AliExpress and FlipKart have started offering PWAs, so adoption has been picking up pace.
Several case studies discovered that PWAs greatly boosted user engagement. For example, Twitter posted a 75 increase in tweets sent and a 20 percent reduction in bounce rate, while AliExpress boosted its new user conversions by 104 percent.
What does a Progressive Web App offer that makes it such a compelling proposition?
Installable on Mobile and Desktop
By bypassing app stores as well as allowing apps to be discovered and accessed directly via a URL, PWAs make it easier to reach users. PWAs also reduce the steps required between discovering an app and getting it on the home screen, thus reduces the friction in getting an app installed.App installation not only works for mobile devices, but also apply to the desktop for a seamless experience. Chrome 73 in March 2019 introduced support for Progressive Web Apps on Desktop, which means PWAs are now supported on all desktop platforms, including Chrome OS, Linux, Mac, and Windows.
Once installed, PWAs appear as icons in the device menu so they appear like a native app would. They also launch in their own windows without any browser navigation bars to further enhance the immersive full screen app experience.
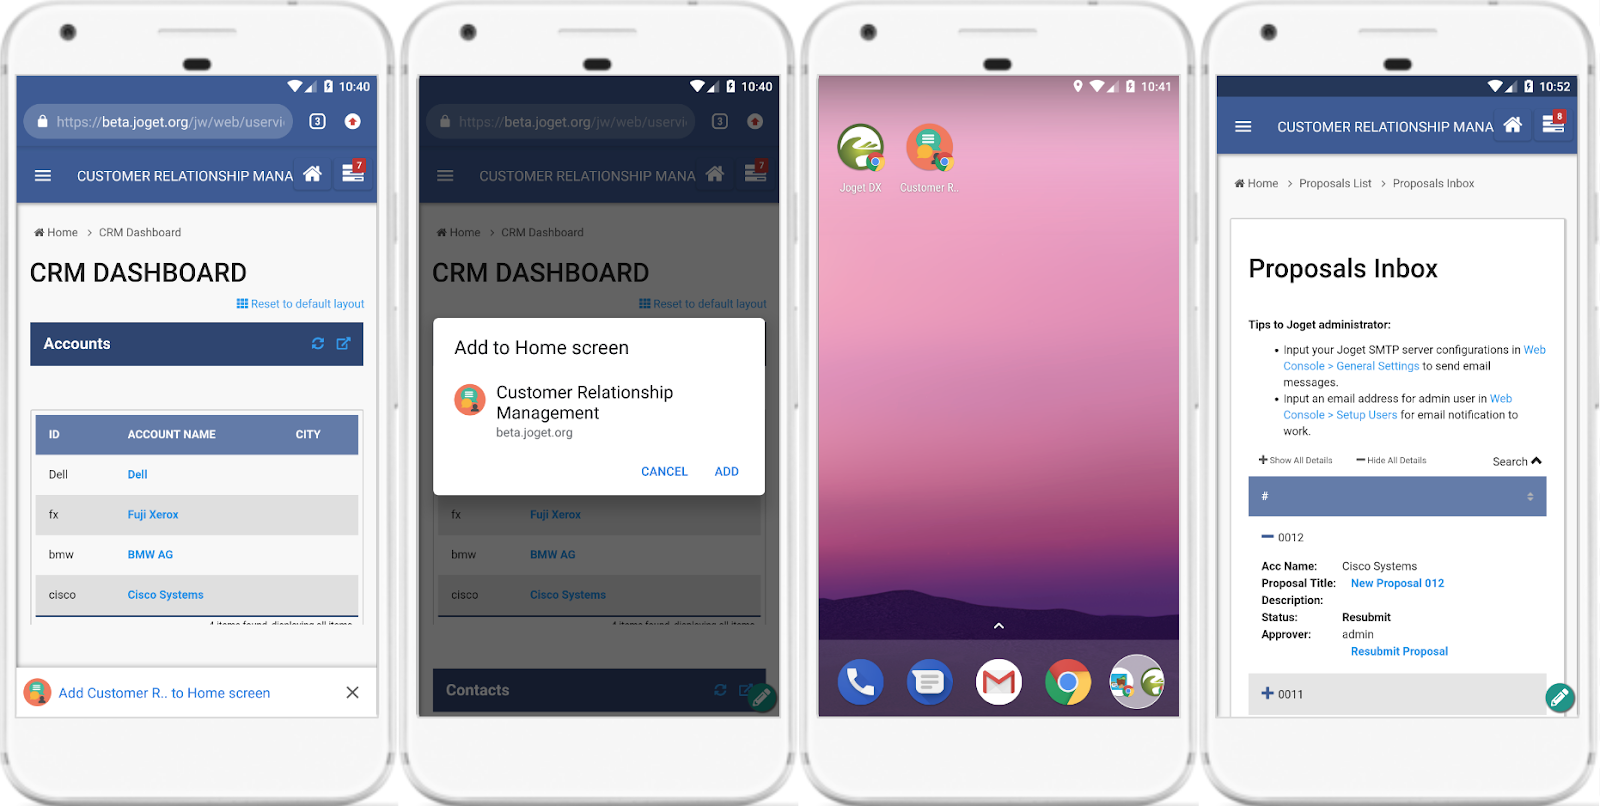 |
| Add to Home Screen on Chrome Android |
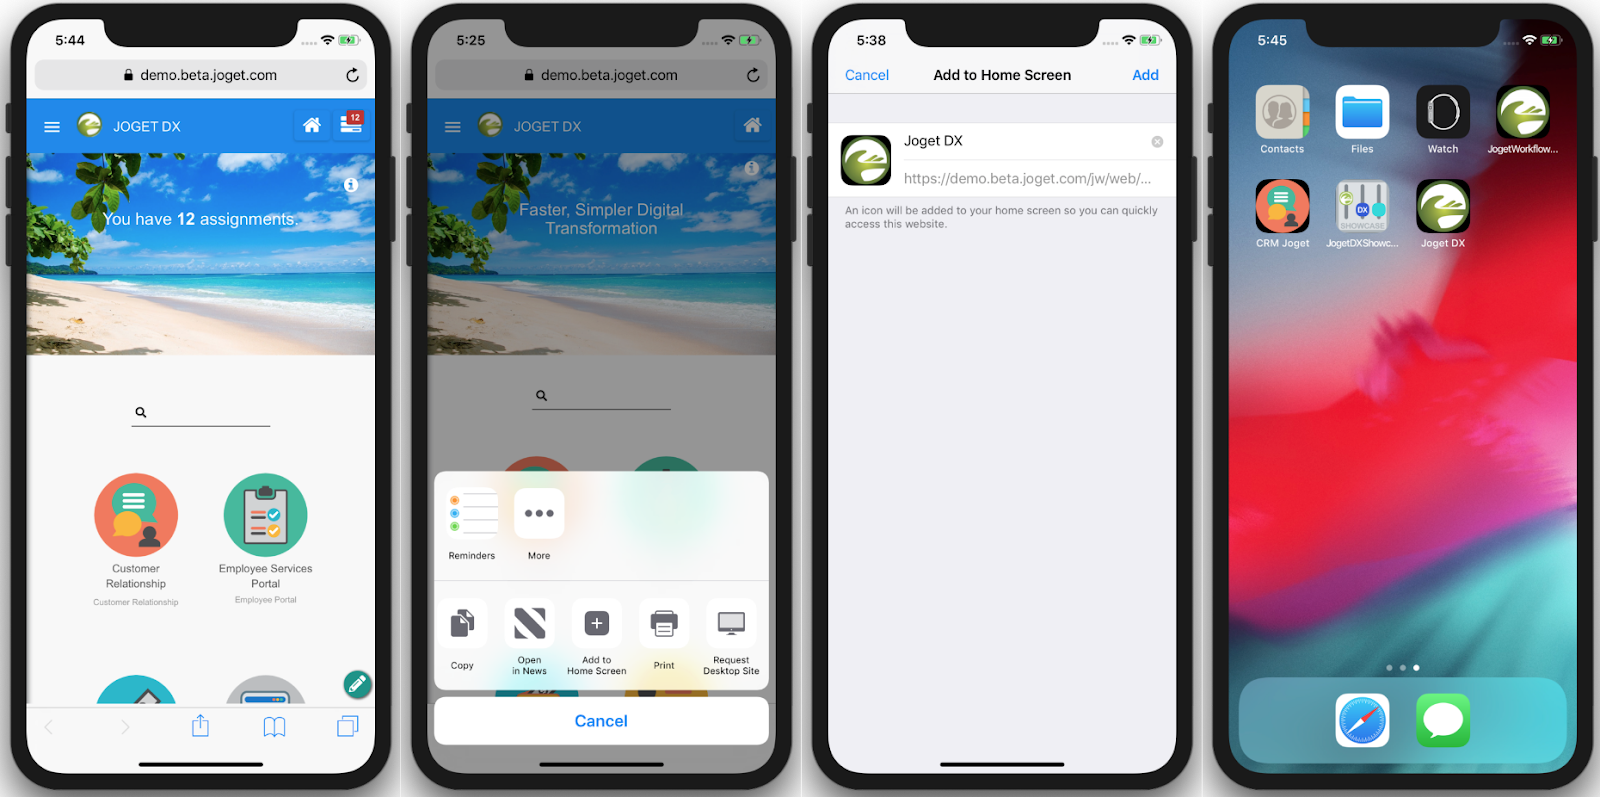 |
| Add to Home Screen on Safari iOS |
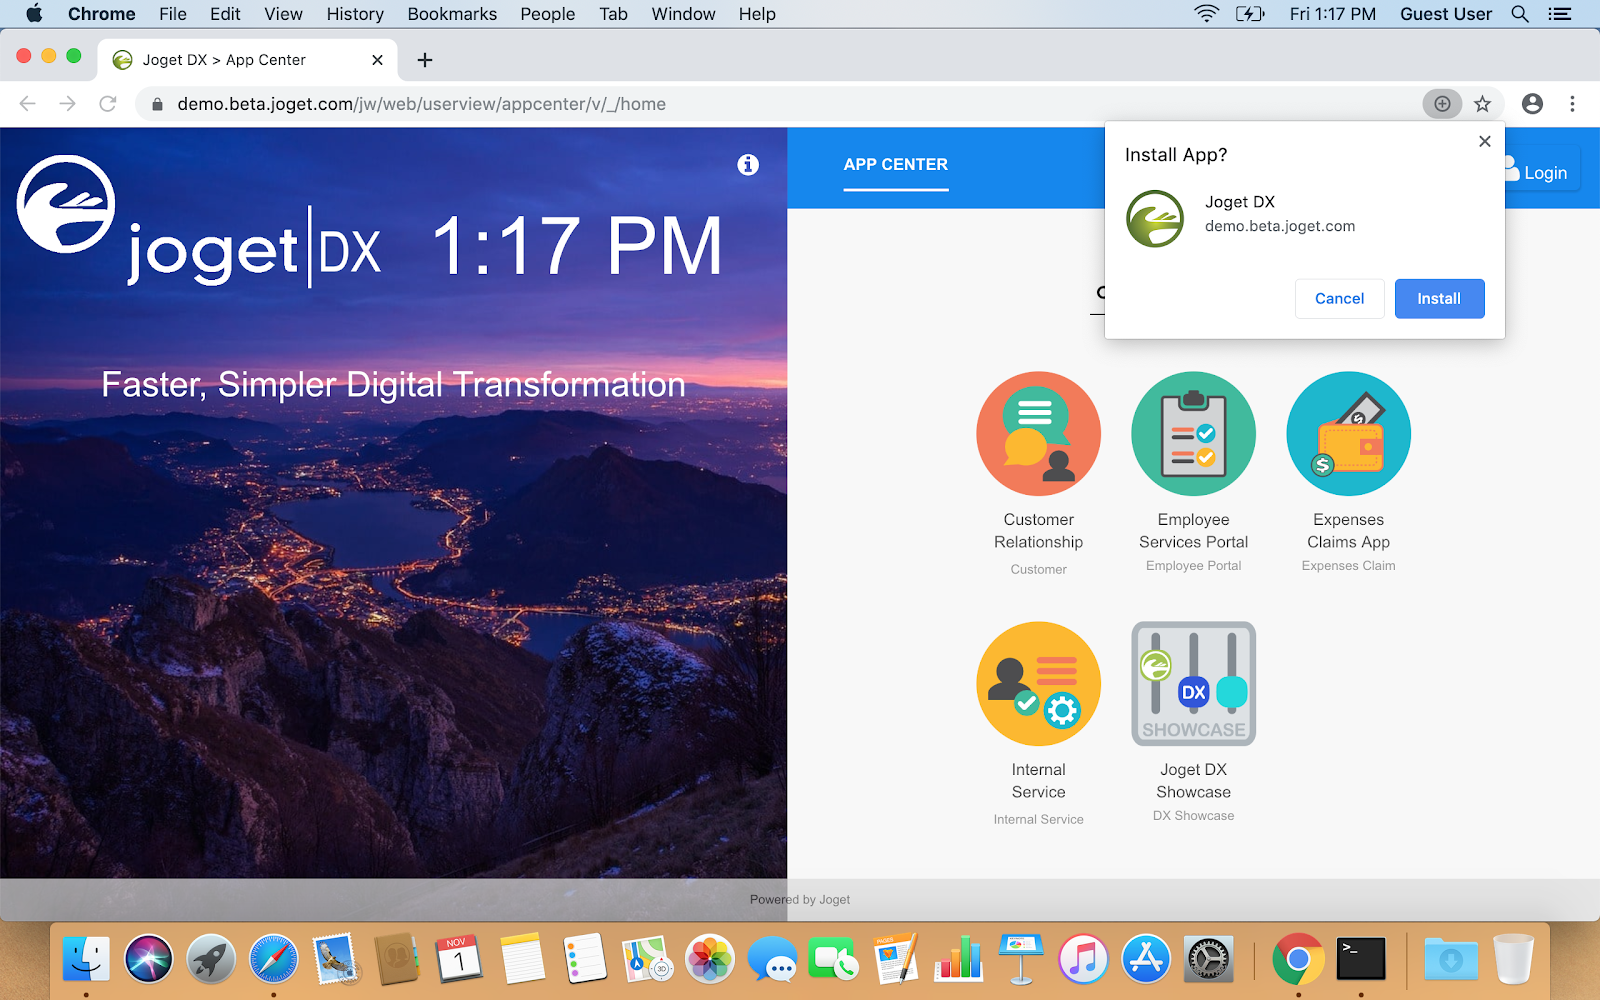 |
| Add to Home Screen on Chrome Desktop |
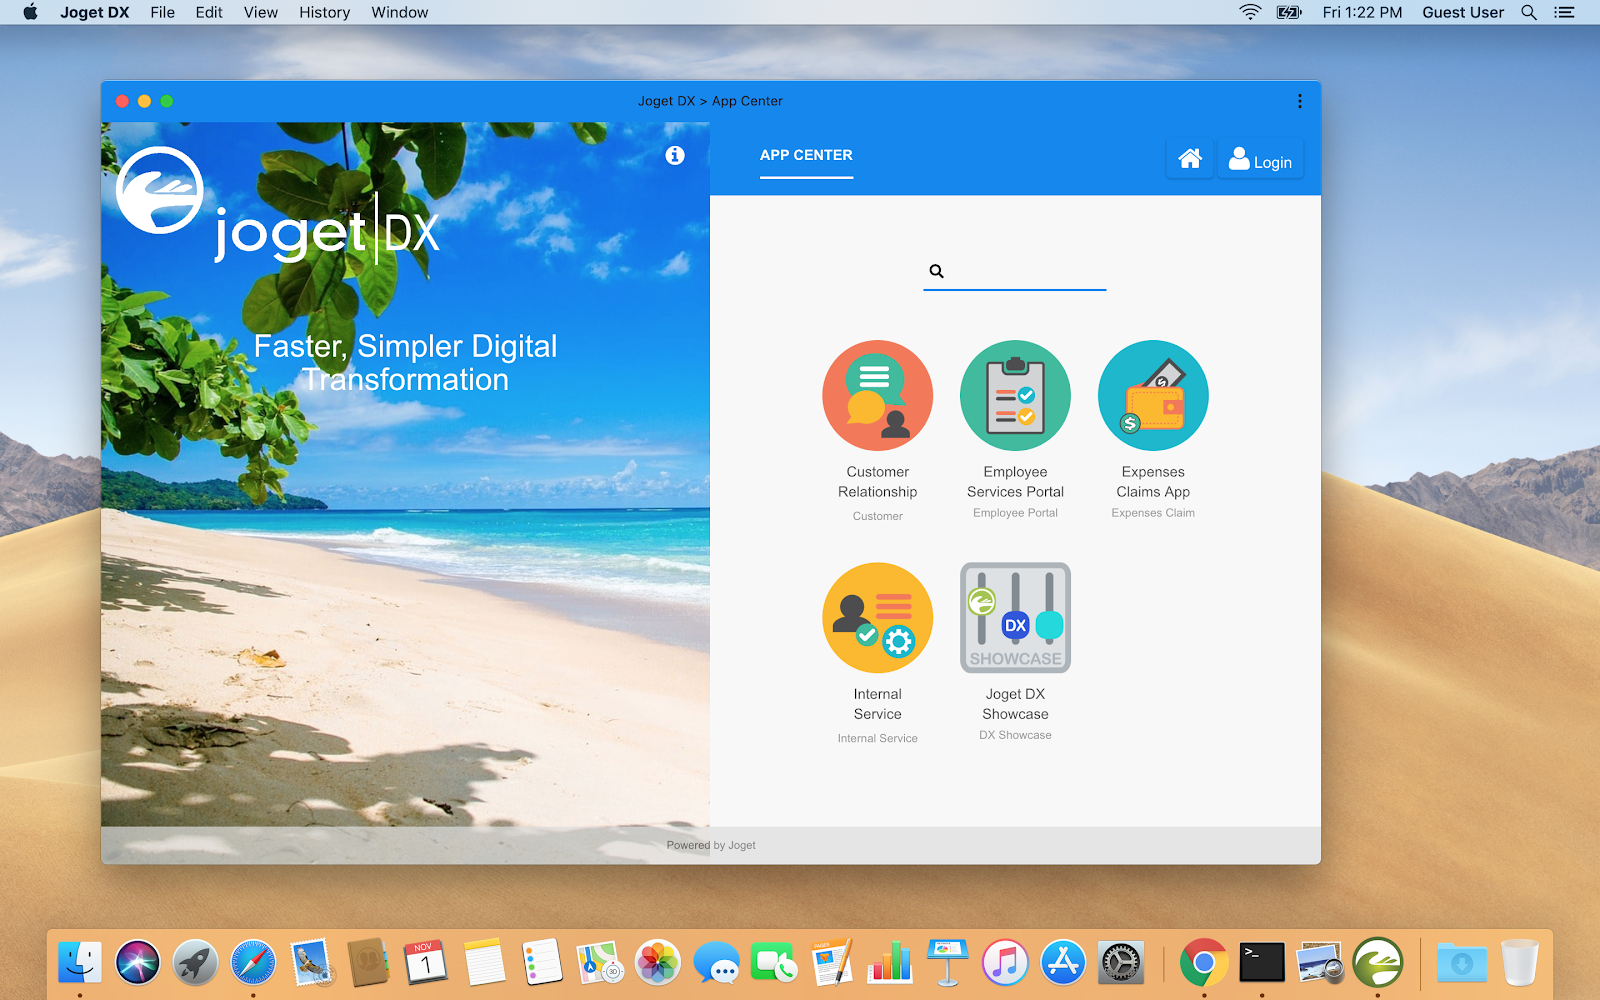 |
| PWA Icon and Window Appearance on macOS |
Fast and Responsive UX with Offline Support
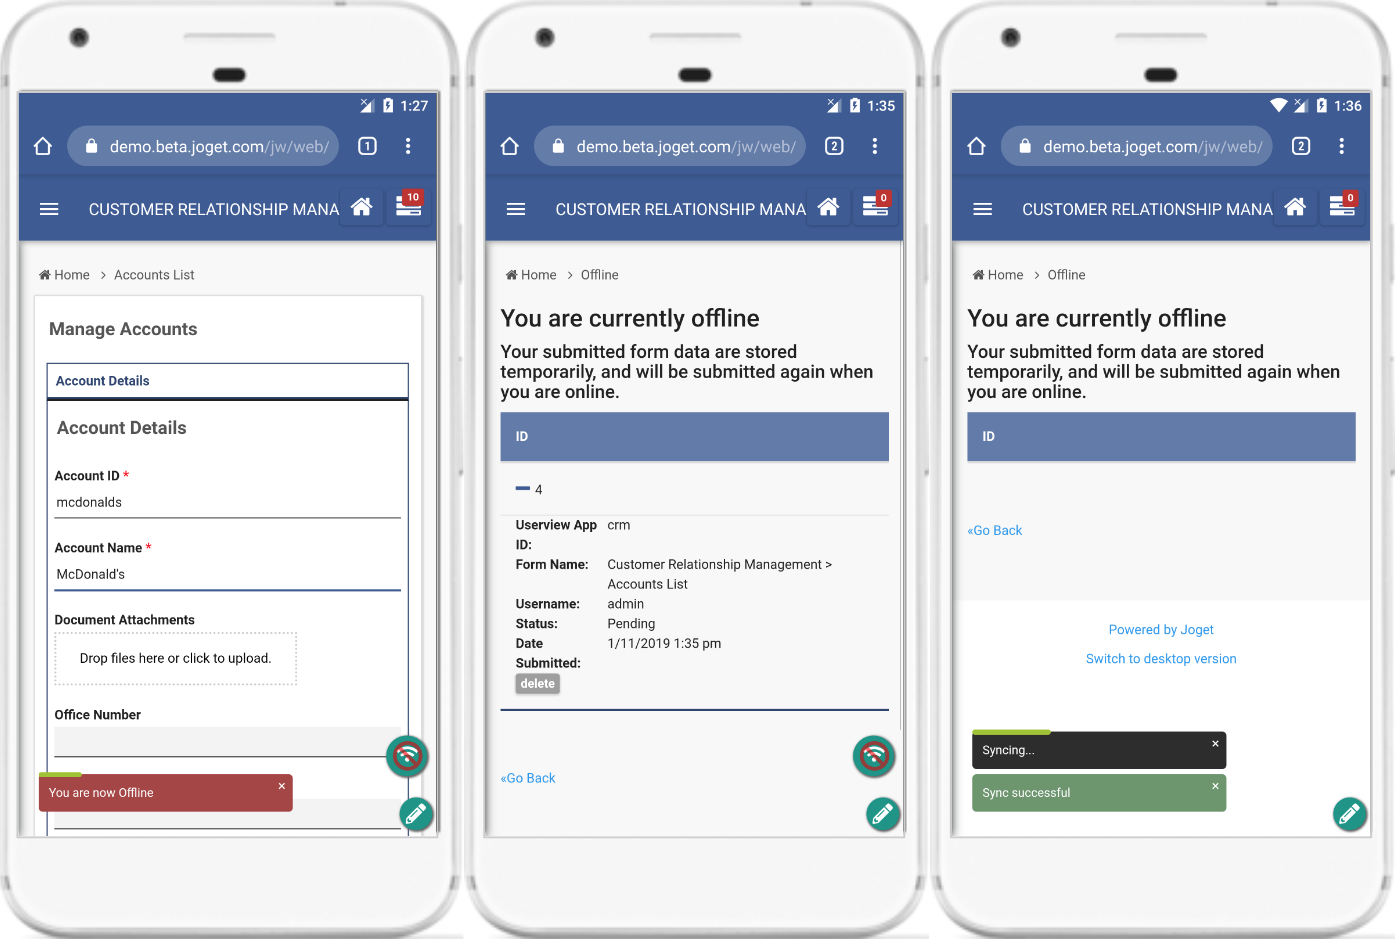 |
PWA detecting when you go offline, and synchronizing form data once you get back online
|
User Engagement and Background Push Notifications
Previously this was a big missing native feature but with PWAs, push notifications now even work in the background.
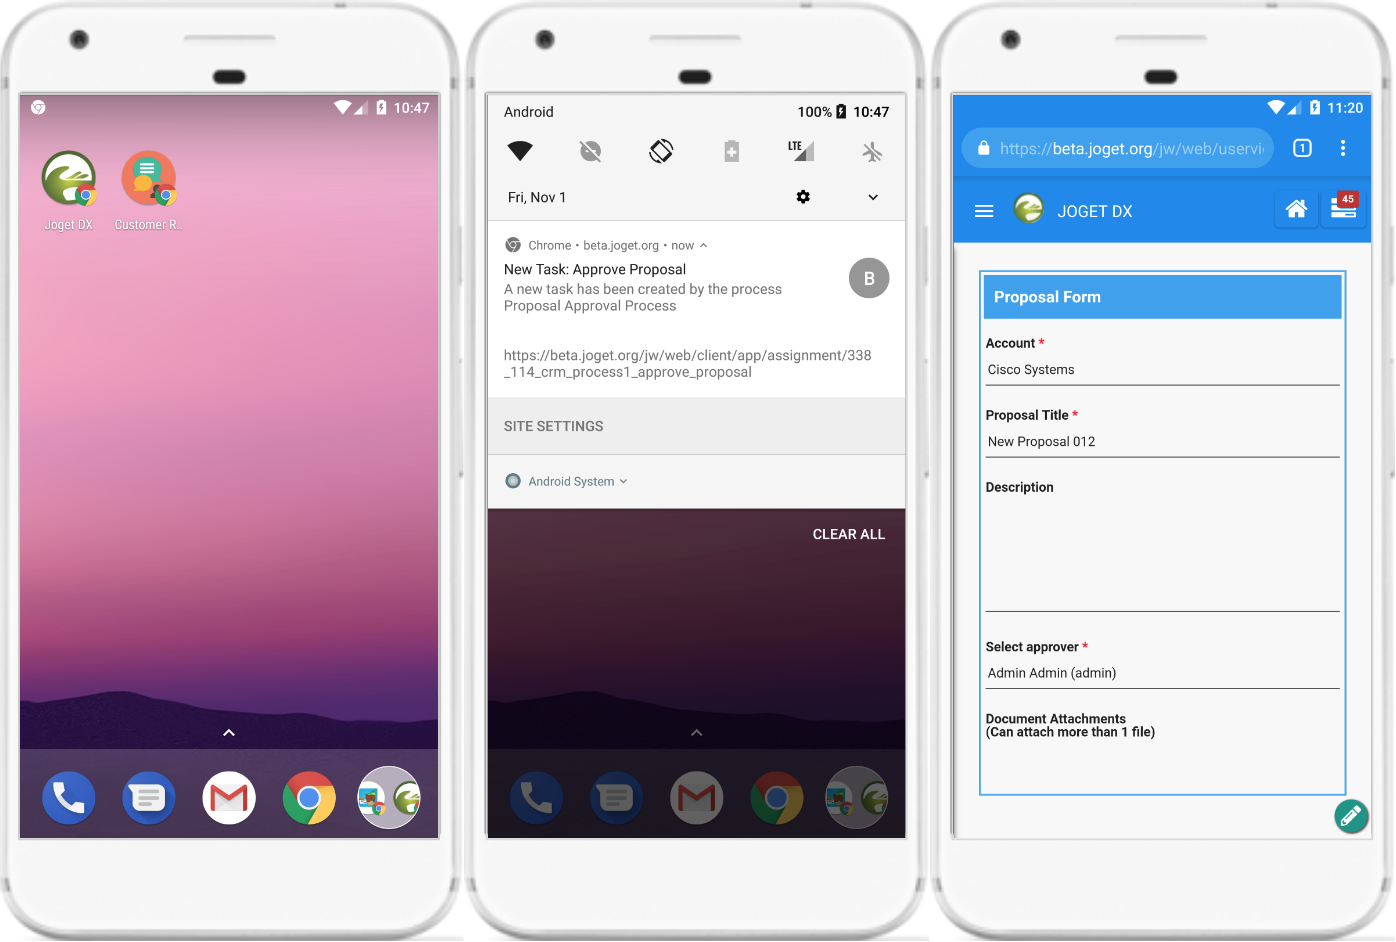 |
Push notifications showing on an Android phone, which engages the user to open the app
|
Pros and Cons of PWAs
As an enterprise or a developer, how do you decide whether or not to adopt PWAs when developing your apps? There are many advantages, as well as a couple of drawbacks that are perhaps holding it back.
Pro: Easier to Publish and Discover
PWAs can be initially accessed directly from a web browser, so they do not have to be restricted by arbitrary rules and policies of the Apple App Store or Google Play Store. They can also be indexed by search engines and can appear directly in web search results.
Pro: Easier to Publish and Discover
PWAs can be initially accessed directly from a web browser, so they do not have to be restricted by arbitrary rules and policies of the Apple App Store or Google Play Store. They can also be indexed by search engines and can appear directly in web search results.
Pro: Smaller and Easier to Update
Compared to native apps, PWAs are typically much smaller and can be accessed immediately without waiting for a download. Unlike a native app, PWAs do not need to be updated through an app store, and can be automatically updated when accessed.
Compared to native apps, PWAs are typically much smaller and can be accessed immediately without waiting for a download. Unlike a native app, PWAs do not need to be updated through an app store, and can be automatically updated when accessed.
Pro: Easier to Develop and Maintain
Unlike native apps which require separate code bases for different platforms, PWAs are developed using standard web technologies i.e. JavaScript, HTML and CSS.
Unlike native apps which require separate code bases for different platforms, PWAs are developed using standard web technologies i.e. JavaScript, HTML and CSS.
Pro: Backward Compatibility with Old Browsers
PWAs are just web apps, so they still run in browsers that don’t support PWA technology. Users might not get the additional functionality (e.g. push notifications or offline support), but standard web functionality should continue to work as before.
PWAs are just web apps, so they still run in browsers that don’t support PWA technology. Users might not get the additional functionality (e.g. push notifications or offline support), but standard web functionality should continue to work as before.
Con: Incomplete iOS Compatibility
Apple has started to support PWAs in iOS 11.3 in March 2018, but not all PWA features are fully supported. Notably missing are support for push notifications and background sync, but hopefully these will improve in newer iOS releases.
Apple has started to support PWAs in iOS 11.3 in March 2018, but not all PWA features are fully supported. Notably missing are support for push notifications and background sync, but hopefully these will improve in newer iOS releases.
Con: Restricted Access to Specific Hardware
PWAs are limited to the functionality offered by web technologies, so access to platform specific device features might be restricted. Having said that, current web technology already provides access to important features like geolocation, camera access, device orientation, offline storage and push notifications, so it might be sufficient for the majority of apps.
PWAs are limited to the functionality offered by web technologies, so access to platform specific device features might be restricted. Having said that, current web technology already provides access to important features like geolocation, camera access, device orientation, offline storage and push notifications, so it might be sufficient for the majority of apps.
What Does It Take to Build a PWA?
Let’s have a look at how to audit a web app for PWA features, as well as the steps to develop the PWA itself.
Audit a PWA
Here are the steps to run the PWA audit:
- Open Chrome in Incognito Mode for a clean state and to prevent browser extensions from messing with the results.
- Browse to the desired web app.
- Open Chrome DevTools from the Chrome menu “More Tools” > “Developer Tools”
- Click on the Audits tab, click on “Run audits” with the “Progressive Web App” Audit selected.
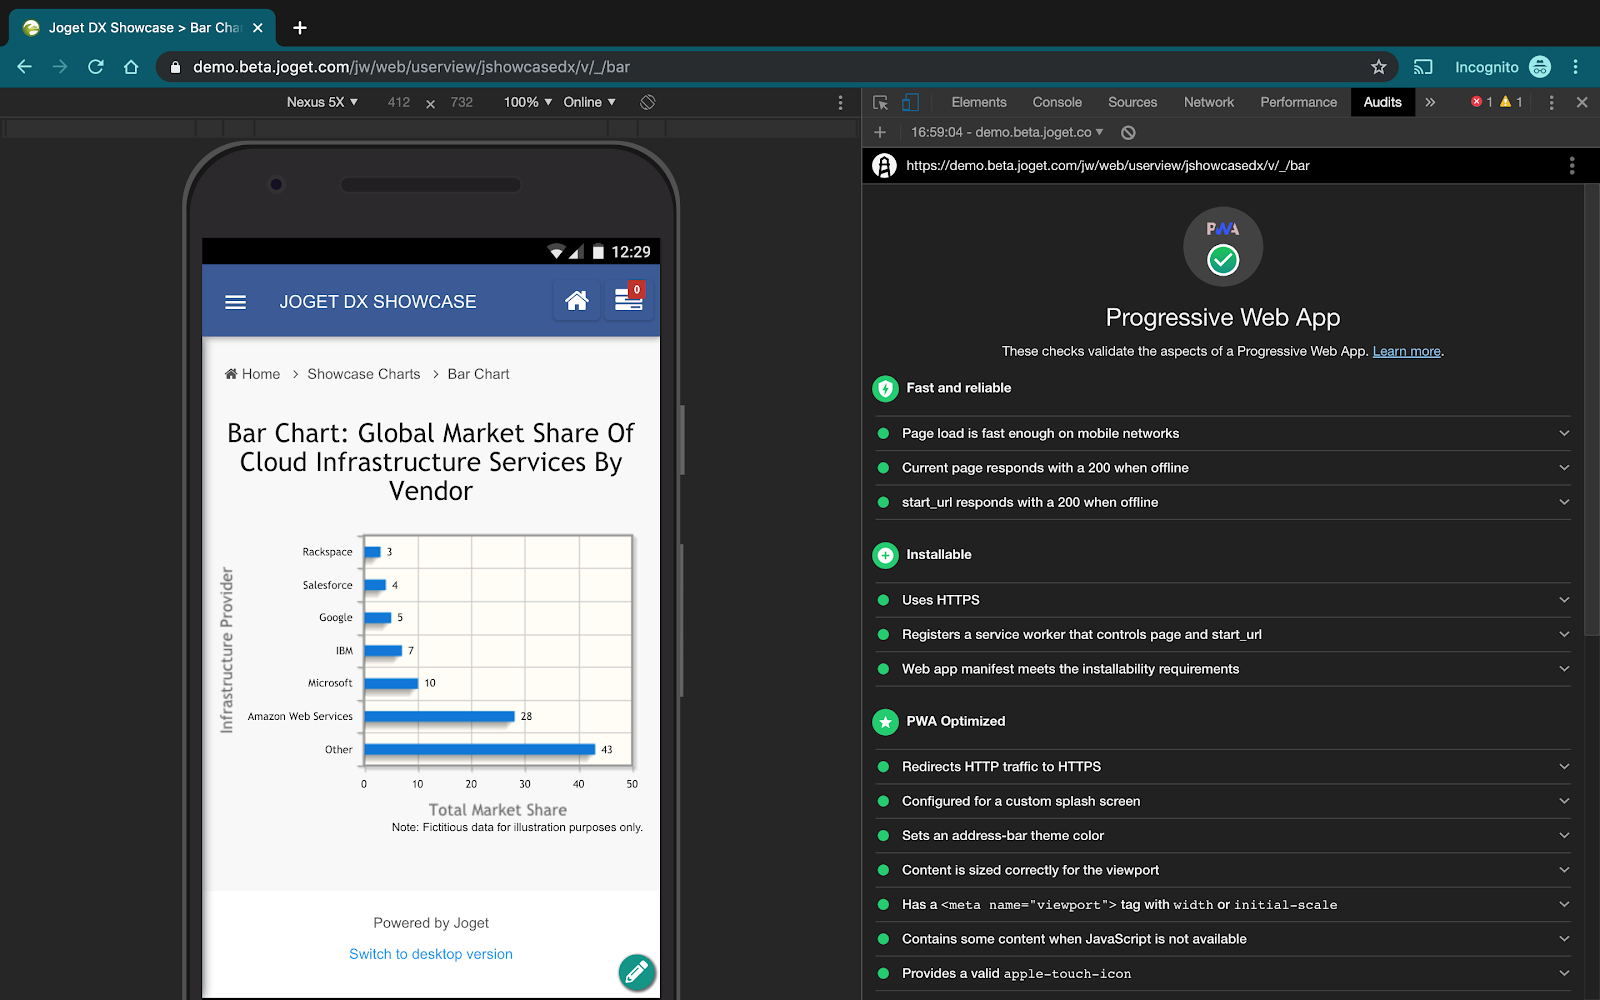 |
| Audit result of a fully compliant PWA |
There are many checks to validate PWA features in the audit. In the Lighthouse PWA Audit for Chrome 78, the baseline checks are as follows:
The first thing to keep in mind is that, for security reasons, PWAs require HTTPS. Without a secure HTTPS connection, PWA features will not work.
The only exception is when testing on localhost for local development. Otherwise, you will need to install commercial SSL certificates in your web server, or obtain free SSL certs from providers such as Let’s Encrypt.
The first key component in a PWA is the web app manifest. The web app manifest is a simple JSON file placed in the root of the web app that provides information regarding the web app. The manifest would include information about the app name, icons, splash screen, start URL and more.
An example web app manifest:
- Fast and reliable
- Page load is fast enough on mobile networks
- Current page responds with a 200 when offline
- start_url responds with a 200 when offline
- Installable
- Uses HTTPS
- Registers a service worker that controls page and start_url
- Web app manifest meets the installability requirements
- PWA Optimized
- Redirects HTTP traffic to HTTPS
- Configured for a custom splash screen
- Sets an address-bar theme color
- Content is sized correctly for the viewport
- Has a <meta name="viewport"> tag with width or initial-scale
- Contains some content when JavaScript is not available
- Provides a valid apple-touch-icon
- Additional items to manually check
- Site works cross-browser
- Page transitions don't feel like they block on the network
- Each page has a URL
Develop a PWA Using Code
Having seen the requirements to qualify as a Progressive Web App, let’s see what’s needed to actually build one. This section contains some partial code snippets to give developers an idea of what is required to code a PWA.
Step 1: Enable HTTPS
The first thing to keep in mind is that, for security reasons, PWAs require HTTPS. Without a secure HTTPS connection, PWA features will not work.
The only exception is when testing on localhost for local development. Otherwise, you will need to install commercial SSL certificates in your web server, or obtain free SSL certs from providers such as Let’s Encrypt.
Step 2: Create a Web App Manifest
The first key component in a PWA is the web app manifest. The web app manifest is a simple JSON file placed in the root of the web app that provides information regarding the web app. The manifest would include information about the app name, icons, splash screen, start URL and more.
An example web app manifest:
{
"short_name": "MyApp",
"name": "My App",
"icons": [
{
"src": "/images/icons-192.png",
"type": "image/png",
"sizes": "192x192"
},
{
"src": "/images/icons-512.png",
"type": "image/png",
"sizes": "512x512"
}
],
"start_url": "/myapp/",
"background_color": "#338888",
"display": "standalone",
"scope": "/myapp/",
"theme_color": "#338888"
}
Step 3: Develop a Service Worker
The next key PWA component, arguably the most important one, are service workers. Service workers are JavaScript code in the web app root that runs in the background. They intercept network requests and act like sort of a client-side proxy.The first step is to register the service worker e.g.
if ('serviceWorker' in navigator) {
window.addEventListener('load', () => {
navigator.serviceWorker.register('/service-worker.js')
.then((reg) => {
console.log('Service worker registered.', reg);
});
});
}
Service workers are event-driven and responds to 3 primary events: Install, Activate and Fetch.
The Install event occurs when the app is installed. This is typically used to cache pages, using the Cache API, e.g.
self.addEventListener('install', event => {
// cache core files
event.waitUntil(
caches.open(CACHE_NAME).then((cache) => {
console.log('Service worker pre-caching offline pages');
return cache.addAll(FILES_TO_CACHE);
})
);
});
The Activate event occurs when the service worker is activated, either immediately after installation or on return. You can use this event to clean up unused data, e.g.
self.addEventListener('activate', event => {
// delete old caches
evt.waitUntil(
caches.keys().then((keyList) => {
return Promise.all(keyList.map((key) => {
if (key !== CACHE_NAME) {
console.log('Service worker removing old cache', key);
return caches.delete(key);
}
}));
})
);
});
The Fetch event occurs whenever a network request is made. There are several offline strategies that could be used to serve content, for example you could use a network, falling back to cache strategy. In this case the service worker will first try to fetch the resource from the network and if that fails, it will return the offline page from the cache e.g.
self.addEventListener('fetch', event => {
event.respondWith(
fetch(event.request).catch(function() {
return caches.match(event.request);
})
);
}
Step 4: Add Push Functionality
Push Notifications are performed using two APIs: the Notifications API and the Push API. The former lets the app display system notifications to the user, while the latter allows a service worker to receive messages from a server, even in the background.
To actually send push messages and display the notification, the following general steps are required:
On the client app:
- Subscribe to the push service
- Send the subscription object to the server
- Generate the message data
- Encrypt the data with the user public key
- Send the encrypted data.
Step 5: Add Offline Functionality
Service workers can make use of 2 types of offline storage.Firstly, the Cache API can be used to cache pages to save and serve network resources (HTML, CSS, JavaScript, images). For typical requests, using the Cache API is sufficient to provide offline read-only access. Example code using the Cache API was given earlier under the service worker fetch event.
However, the Cache API does not support POST requests, so form data submission will not work. In this case, the IndexedDB API provides client-side storage for structured data. IndexedDB is like a SQL relational database (RDBMS) that is built into the browser. The service worker can be coded to intercept the form data to be stored into the IndexedDB. The data can then be synchronized using the Background Sync API back to the server once a network connection is reestablished.
An example of implementing this can be found in the article Background Sync with Service Workers.
Develop a PWA Using a No-Code/Low-Code Platform
The previous section shows that although simpler than developing native apps, building a PWA from the ground up is not as simple as it could be. A simpler way of developing Progressive Web Apps is to use a no-code/low-code platform that provides automatic PWA support, such as Joget DX.
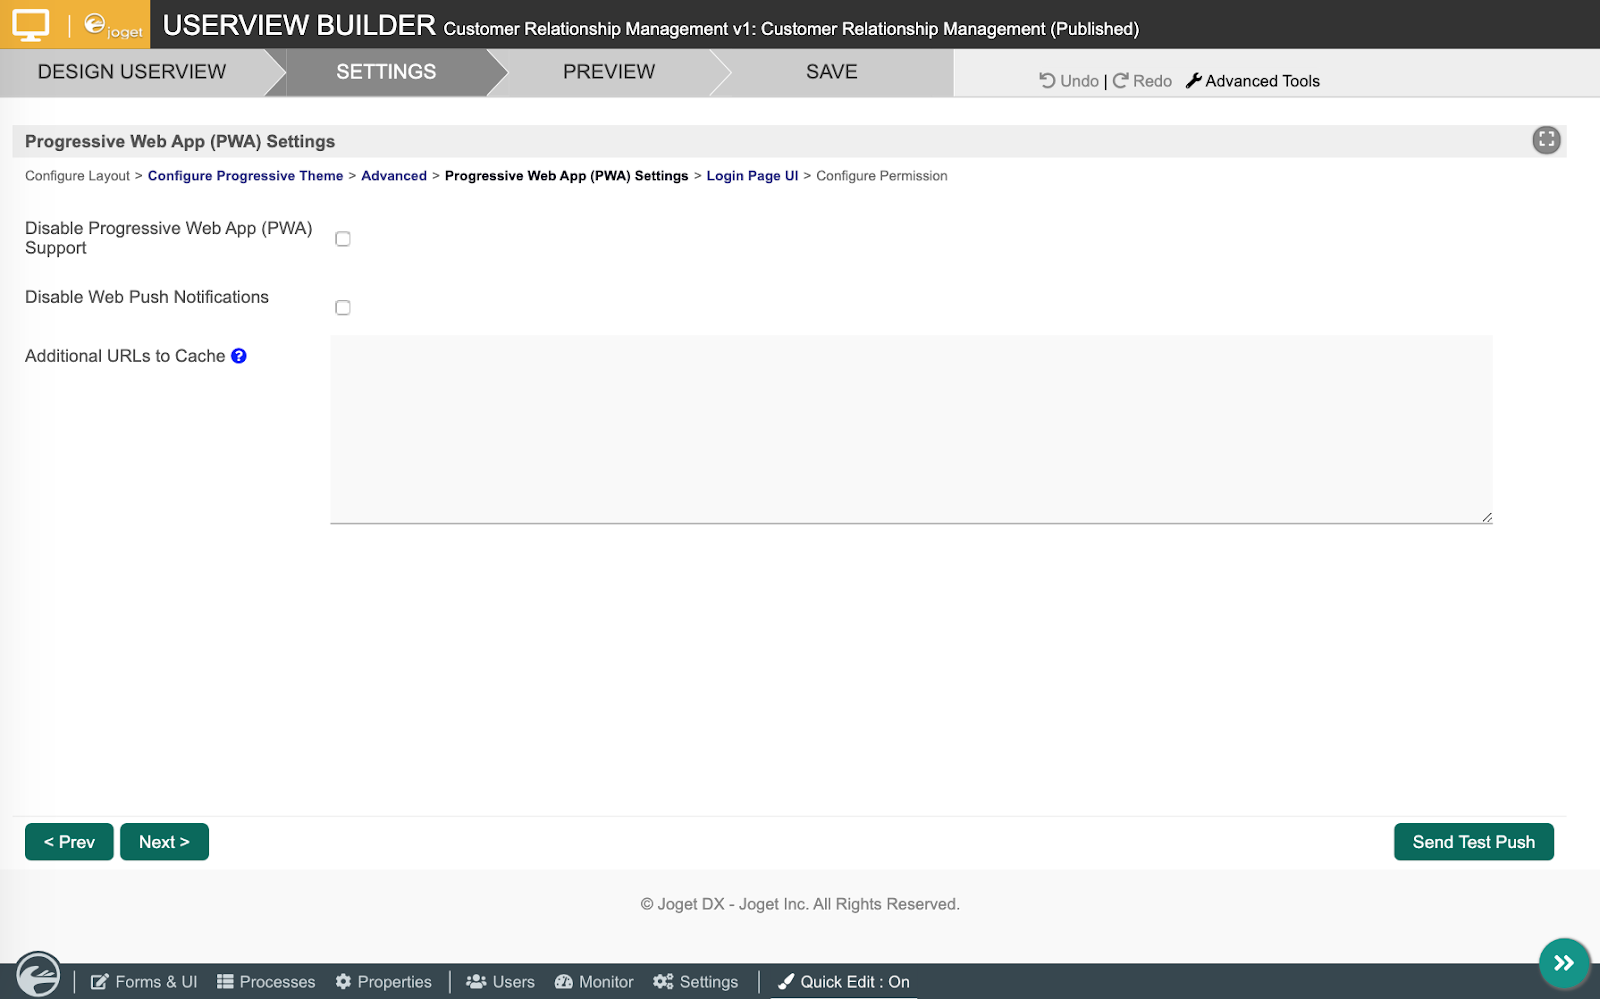
In Joget DX, apps that you design are automatically PWA compliant (as long as you host using HTTPS). For example, when you visually design a form and userview (end-user UI), PWA support is enabled by default. Offline functionality (both read-only and form submission with background sync) can be enabled via configuration, basically by ticking some checkboxes. Some sample screenshots below demonstrates the PWA support in Joget DX:
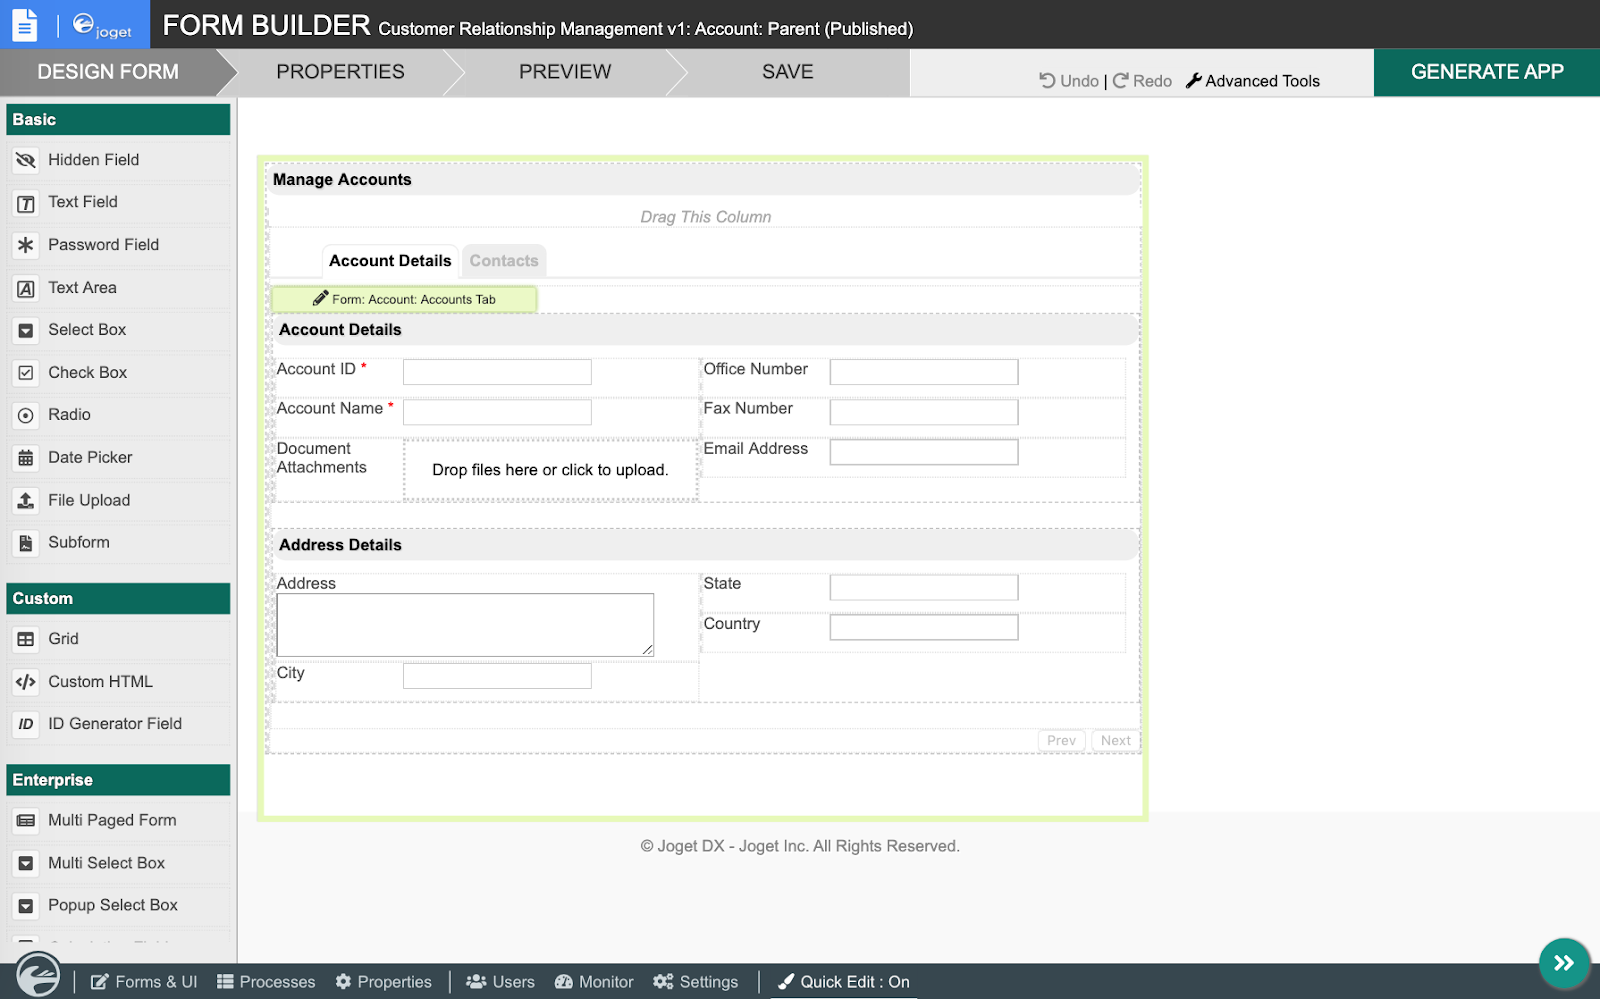 |
| Visually design a form in Joget DX |
 |
| Progressive Web App support and push notifications enabled by default |
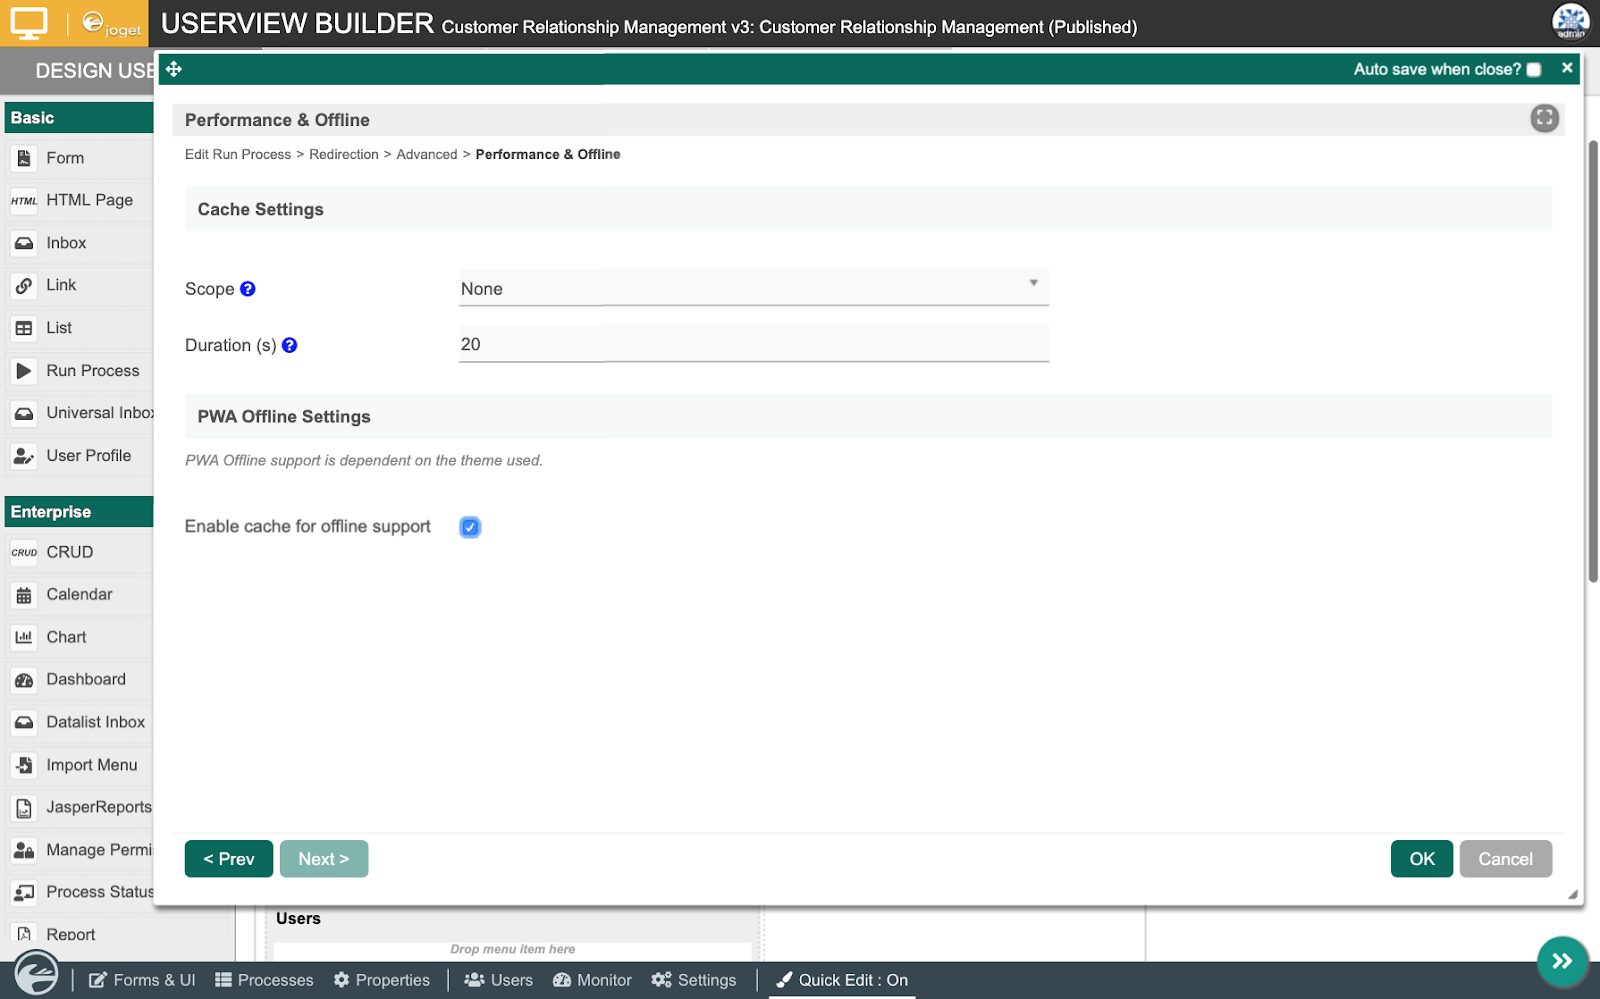 |
| Offline functionality enabled via checkbox |
 |
| Lighthouse PWA audit for a Joget DX app on mobile |
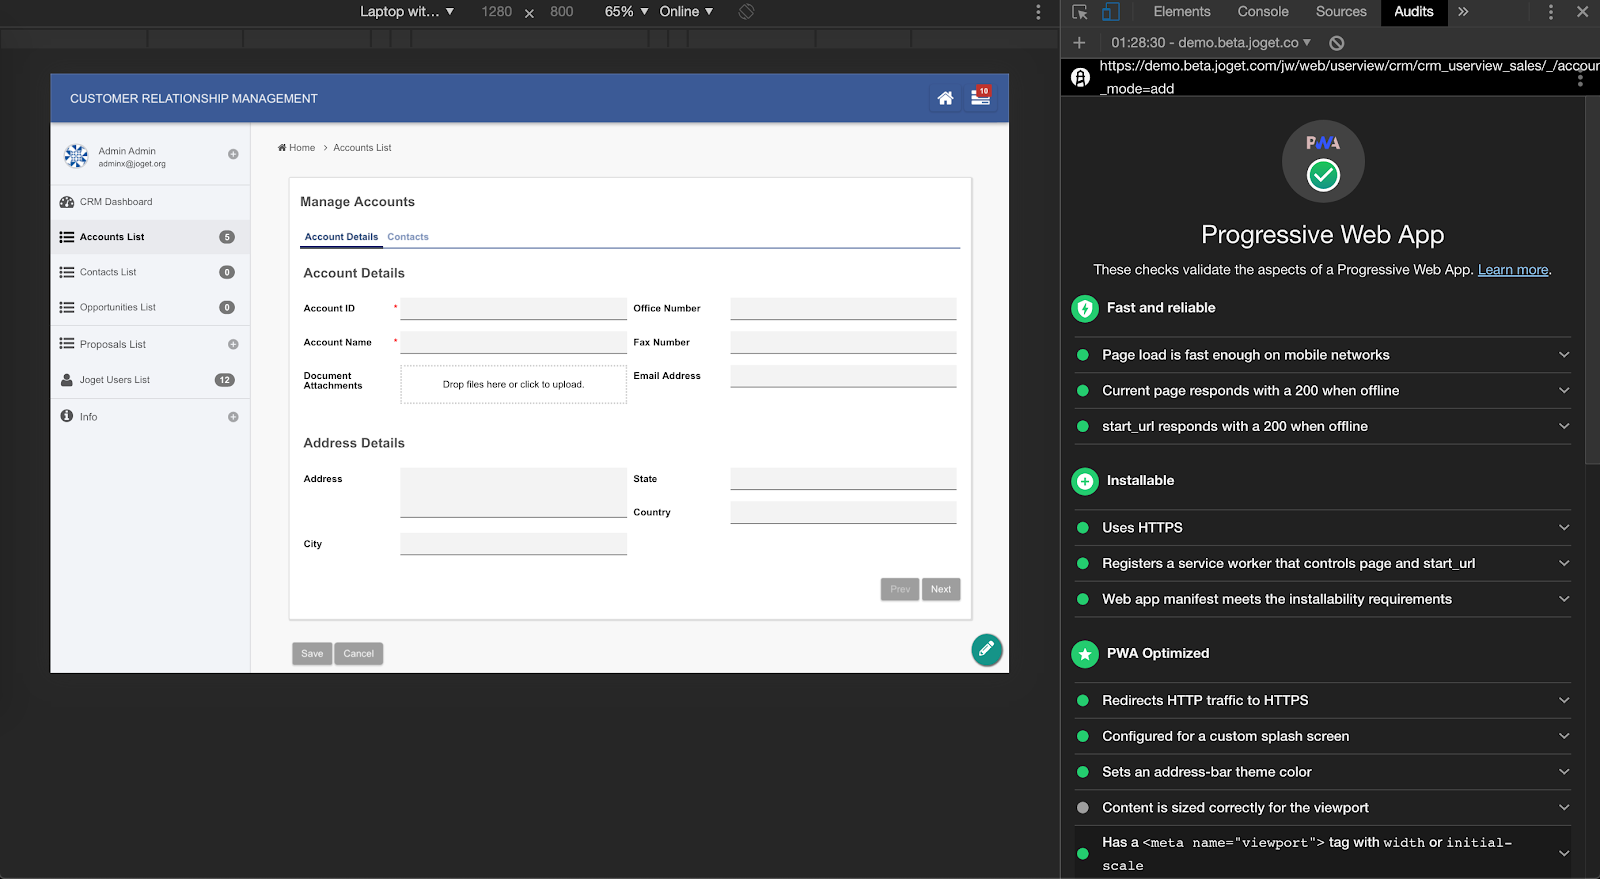 |
| Lighthouse PWA audit for a Joget DX app on desktop |
Should You Adopt PWAs Today?
To get started with Progressive Web Apps using a visual no-code/low-code platform, try Joget DX.


I am really happy to found the amazing content on Progressive Web App and i am totally agree pwa is the future of mobile and now it has high demand..
ReplyDeletenice
ReplyDeleteNIce
ReplyDeleteThanks
ReplyDelete