Simplifying Business Automation with Red Hat OpenShift and Joget Workflow

Business Automation and Low Code Platforms
As part of an organization’s digital transformation strategy, automation in software improves efficiency, delivers value faster, and solves IT and business workflow challenges. According to Red Hat, business automation is the alignment of business process management (BPM) and business rules management (BRM) with modern application development.
In recent years, the emergence of low code platforms has greatly expedited software development and delivery to meet customer needs and demands. Low code platforms reduce the time it typically takes to deliver apps to a fraction required for traditional enterprise development, from months to weeks or days. Or even just minutes for working prototypes.

As an open source low code platform to visually build enterprise web apps for coders and non-coders, Joget Workflow is a good complement for OpenShift.
In this example, we will deploy Joget Workflow on a full open source stack comprising the Red Hat JBoss WildFly application server and MySQL database on Linux. WildFly, formerly known as JBoss AS, is a leading lightweight application server and MySQL is the most popular open source database today.
NOTE: The following steps are summarized from the Joget Knowledge Base. For more detailed information please refer to the Joget Workflow on OpenShift article.

In recent years, the emergence of low code platforms has greatly expedited software development and delivery to meet customer needs and demands. Low code platforms reduce the time it typically takes to deliver apps to a fraction required for traditional enterprise development, from months to weeks or days. Or even just minutes for working prototypes.
Red Hat OpenShift and Joget Workflow
Red Hat OpenShift is a container application platform that brings Docker and Kubernetes to the enterprise. OpenShift Online is a public Platform-as-a-Service (PaaS) that offers a hosted solution in the cloud. With OpenShift Online, you can quickly build, host, and scale containerized applications in the public cloud–operated and supported by Red Hat.As an open source low code platform to visually build enterprise web apps for coders and non-coders, Joget Workflow is a good complement for OpenShift.
In this example, we will deploy Joget Workflow on a full open source stack comprising the Red Hat JBoss WildFly application server and MySQL database on Linux. WildFly, formerly known as JBoss AS, is a leading lightweight application server and MySQL is the most popular open source database today.
Deploy Joget Workflow on OpenShift Online
NOTE: The following steps are summarized from the Joget Knowledge Base. For more detailed information please refer to the Joget Workflow on OpenShift article.
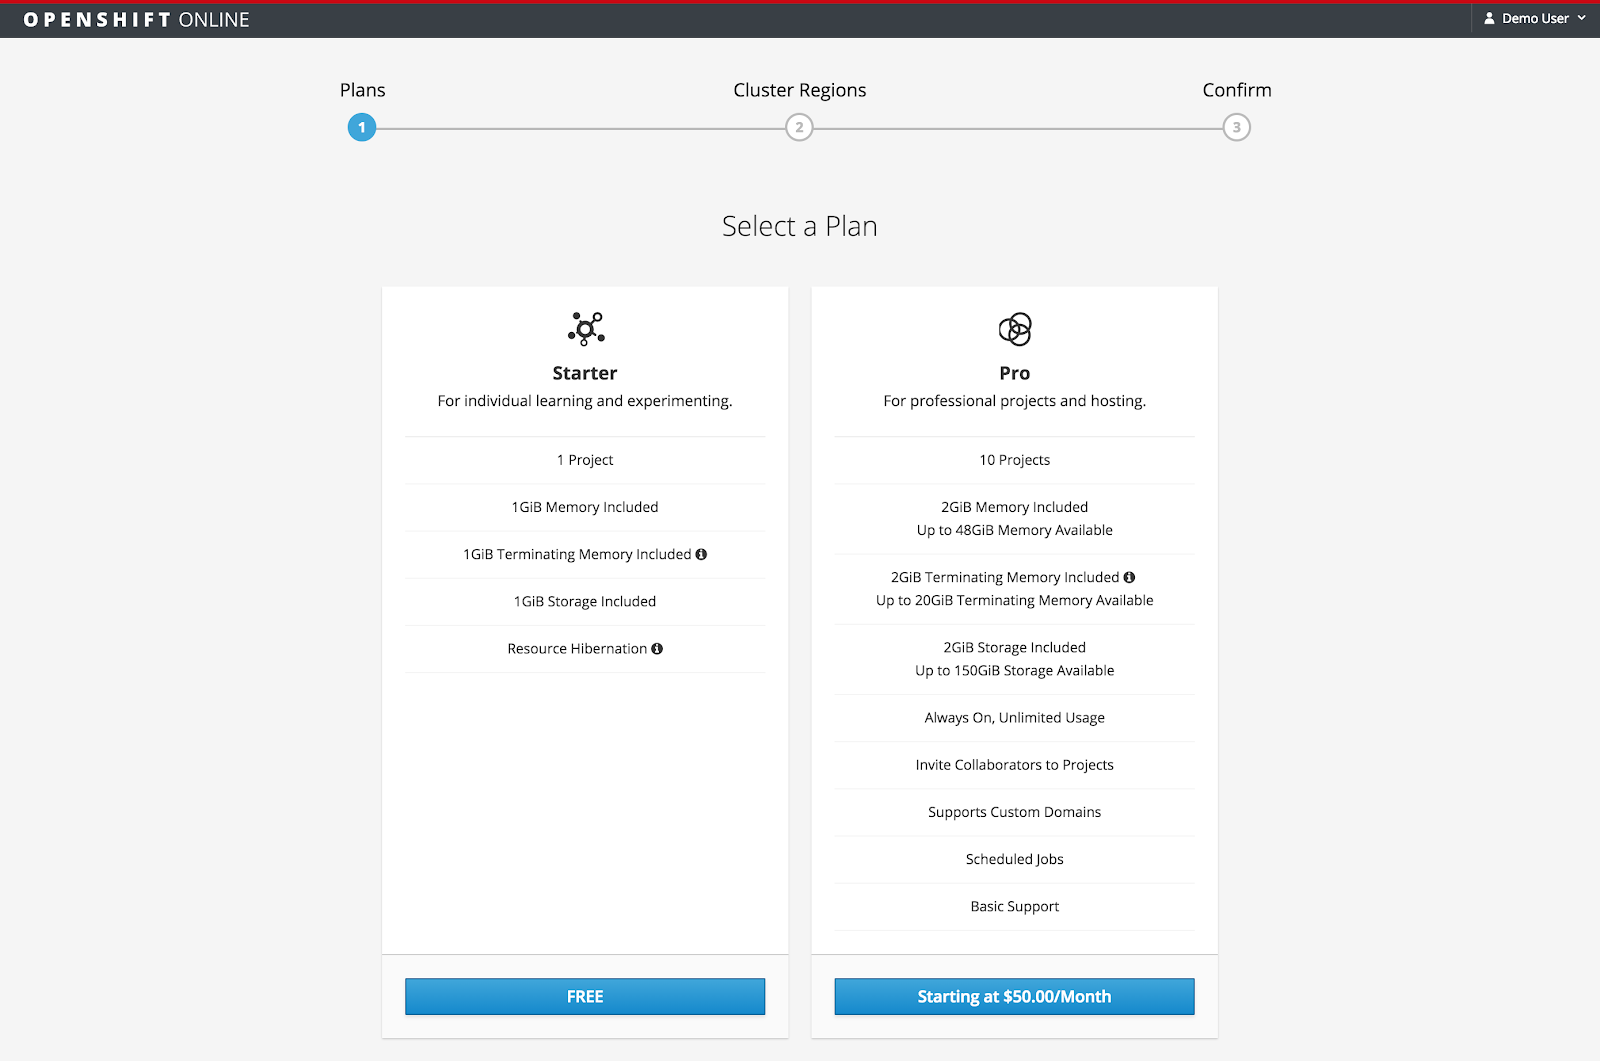
Step 1: Sign Up for OpenShift Online
Sign up for free at OpenShift Online and choose the desired plan and region.
OpenShift Online has a free Starter plan, so you can use it to learn and experiment at no cost.
OpenShift Online has a free Starter plan, so you can use it to learn and experiment at no cost.
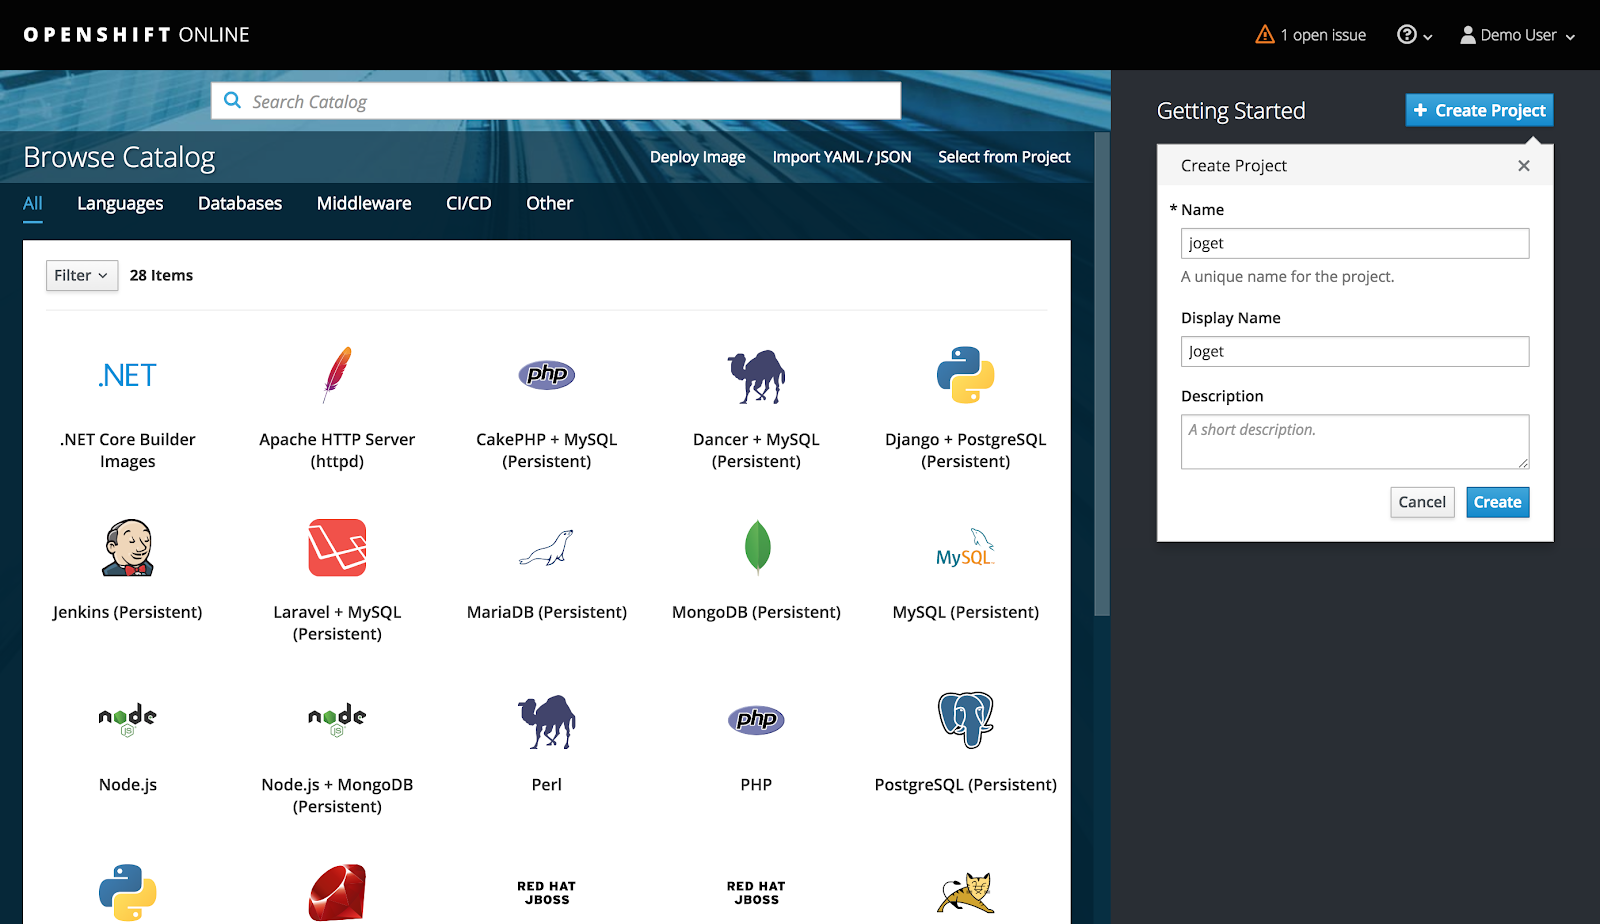
Step 2: Create OpenShift Project
In the OpenShift Web Console, create a project using the Create Project button and key in the desired Name, Display Name and Description.
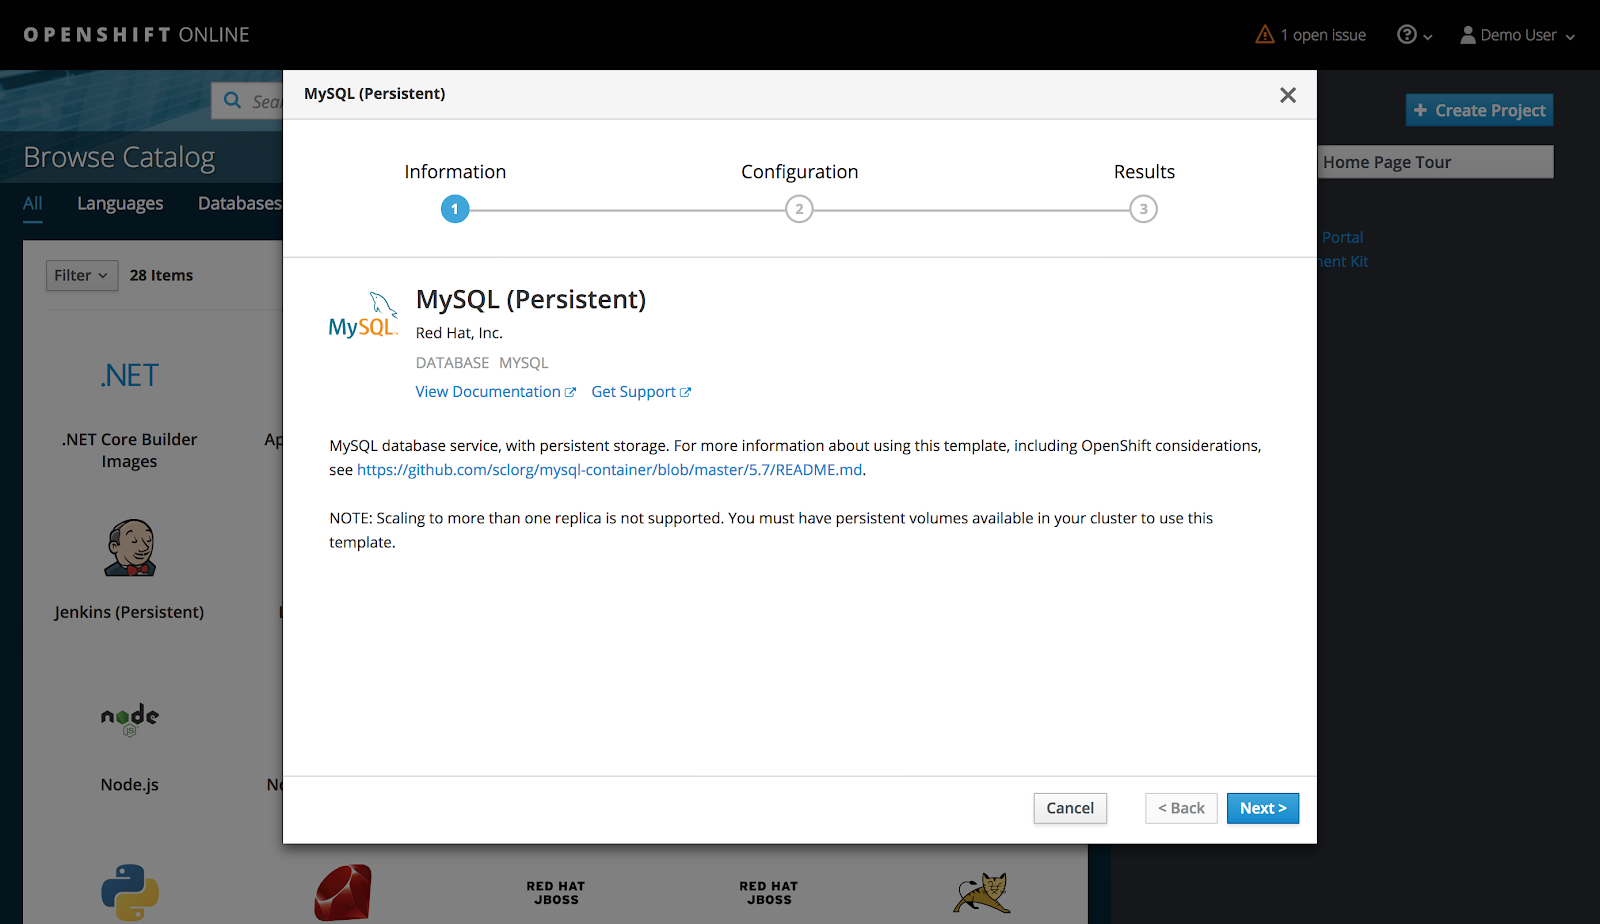
Step 3: Deploy MySQL Database
Under the selected project, select Add to Project > Browse Catalog and select the MySQL (Persistent) image.
Key in the appropriate settings and click on Create e.g.
Memory Limit
|
200Mi (This value is suitable for the OpenShift Starter plan which limits total memory to 1GB)
|
Database Service Name
|
jogetdb
|
MySQL Connection Username
|
joget
|
MySQL Connection Password
|
joget
|
MySQL Database Name
|
jwdb
|
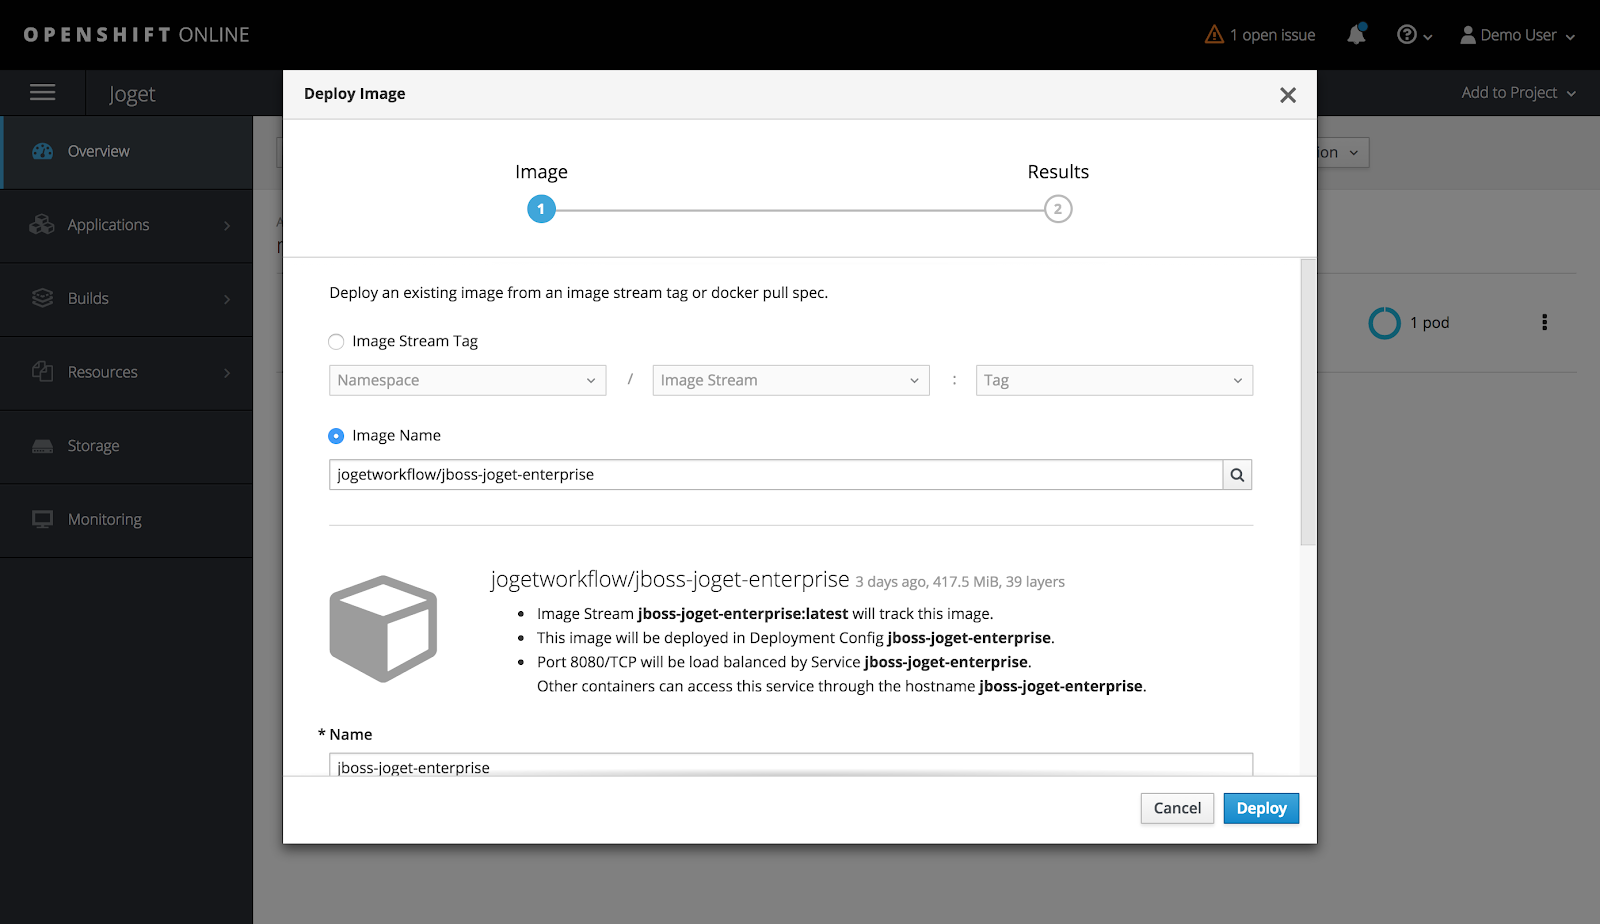
Step 4: Deploy Joget Workflow on JBoss WildFly Application Server
Under the selected project, select Add to Project > Deploy Image, select the Image Name option and key in jogetworkflow/jboss-joget-enterprise. Click on the small search icon to load the suitable Docker image hosted in Docker Hub.
Add Environment Variables to match the previously configured database settings for the MySQL container and click on Deploy e.g.
MYSQL_HOST
|
jogetdb
|
MYSQL_PORT
|
3306
|
MYSQL_DATABASE
|
jwdb
|
MYSQL_USER
|
joget
|
MYSQL_PASSWORD
|
joget
|
By default, the created pod (a pod is a group of one or more containers) is only allocated 512 MiB memory so we will need to allocate more resources to avoid memory errors.
Click on Applications > Deployments and select the jboss-joget-enterprise container. Reduce the running pods to zero by clicking on the down arrow.
Select Actions > Edit Resource Limits, set the Memory Limit to 800 MiB and click on Save.
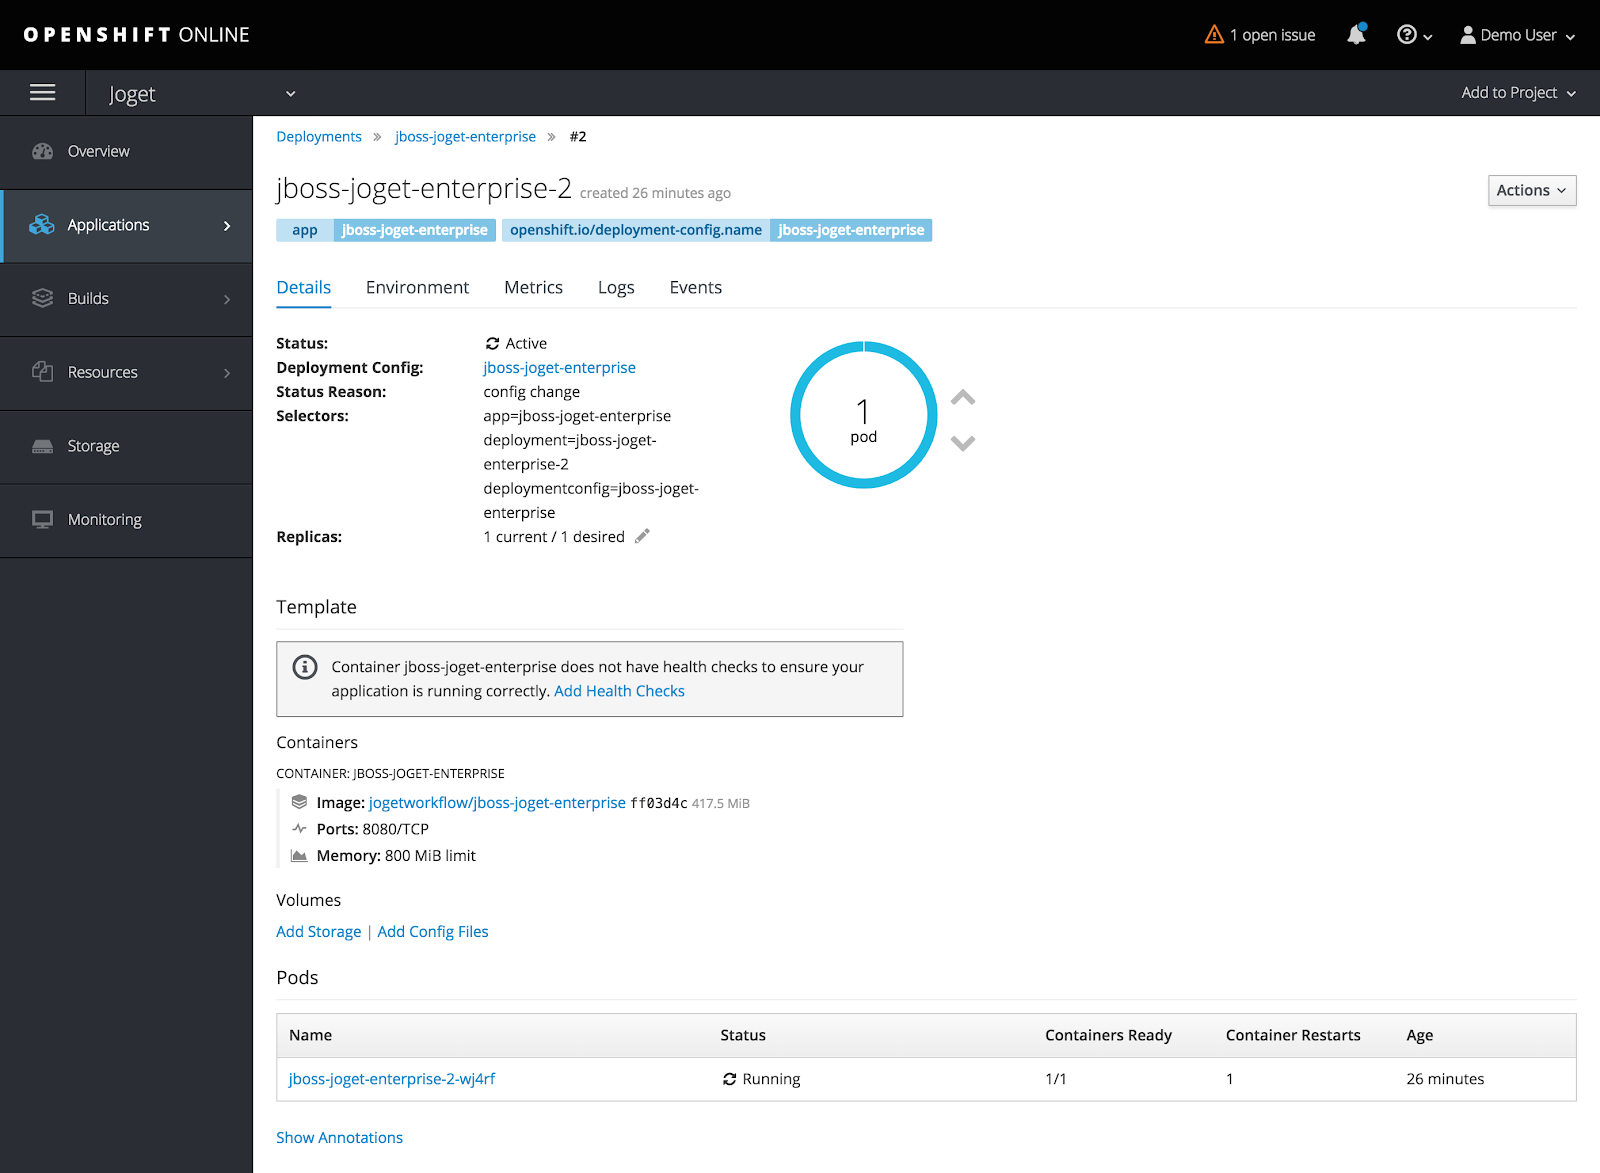
Return to Applications > Deployments and select the latest jboss-joget-enterprise version. Adjust the running pod back to one by clicking on the up arrow. At this point, a new pod will start up and the status should change to Active.
Step 5: Create Service Route for External Access
At this point, the pod is running but is not accessible from an external web browser so you will need to create a route, which exposes a service at a host name.
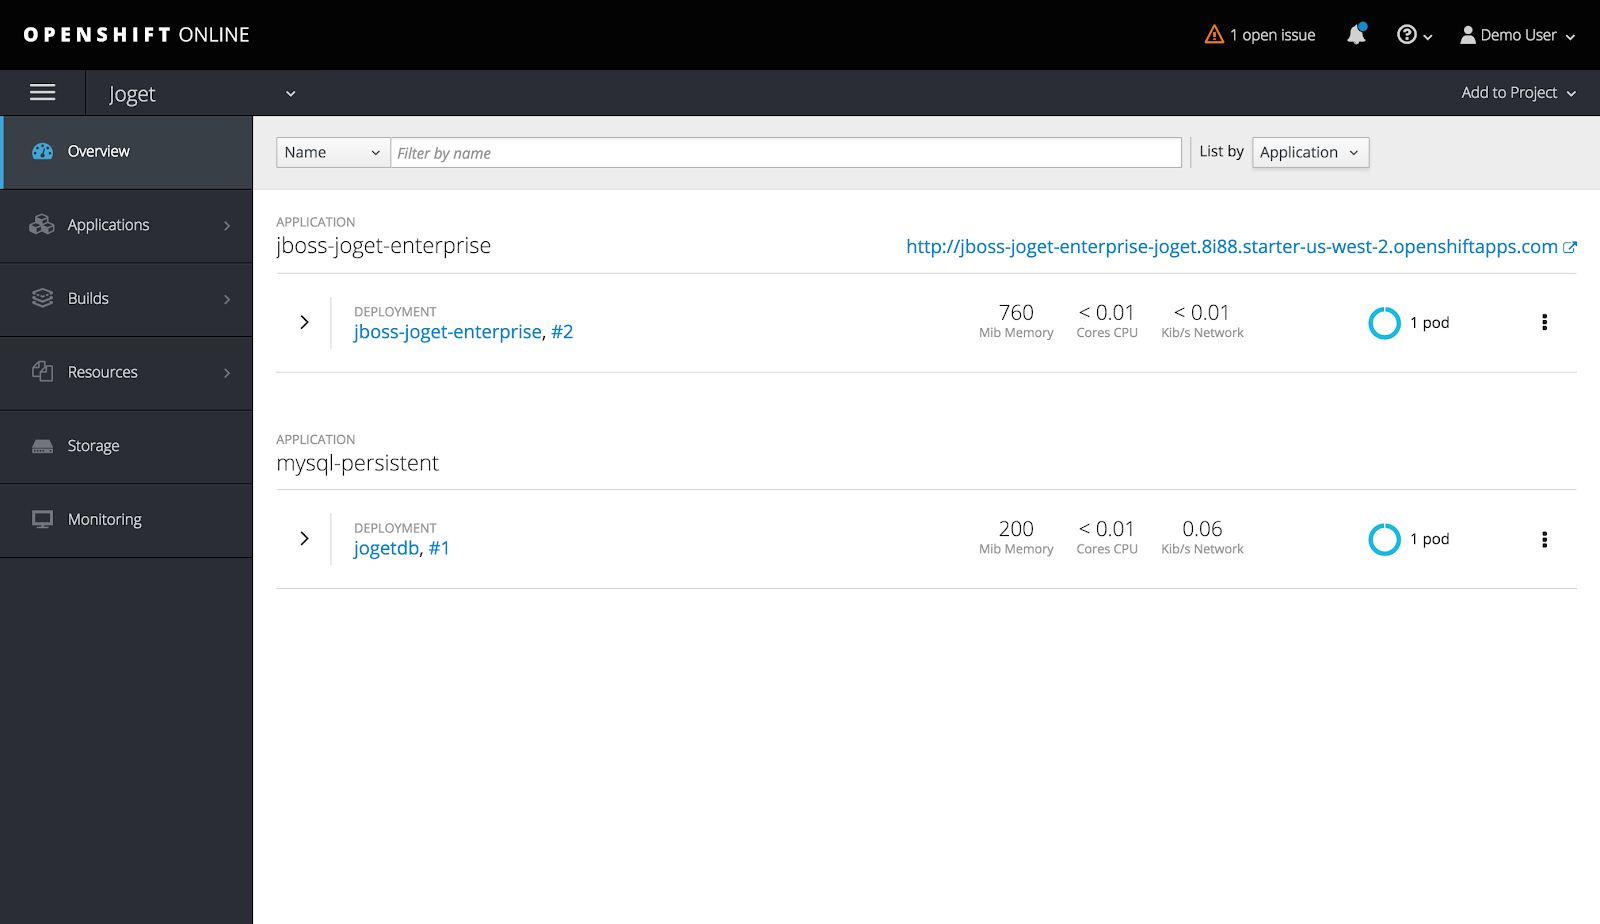
Click on Applications > Services and select jboss-joget-enterprise.
Select Actions > Create Route and click on Create.
And that’s it. Click on the host name link to access the application.
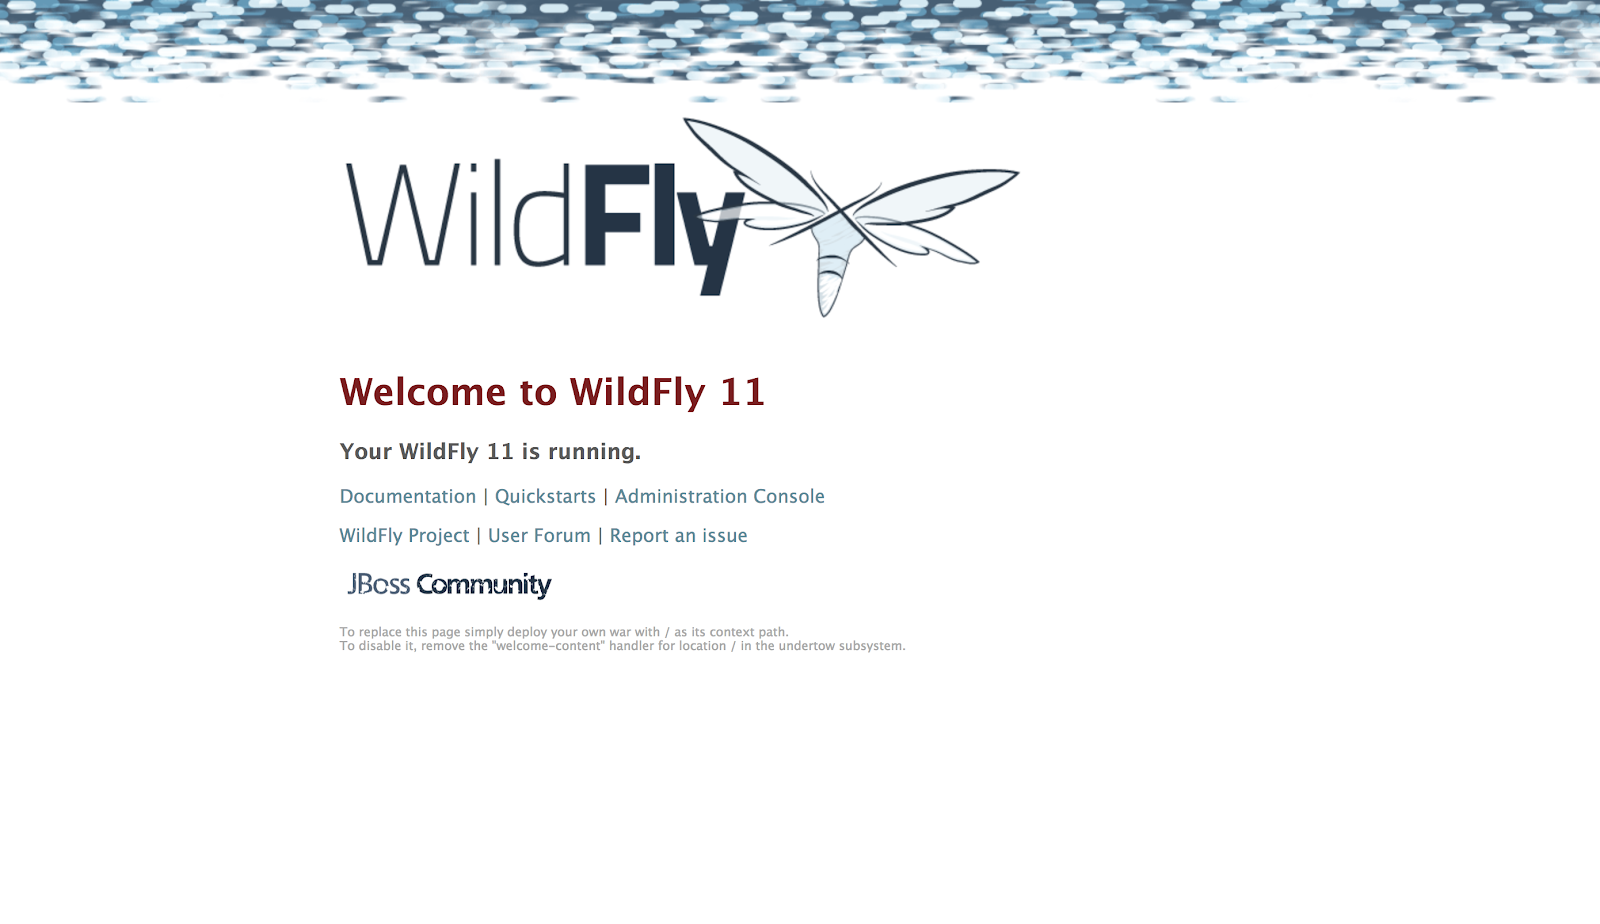
For example, in the screenshot above the URL http://jboss-joget-enterprise-joget.8188.starter-us-west-2.openshiftapps.com/ returns the WildFly welcome page.
Access Joget Workflow by adding /jw to the URL e.g. http://jboss-joget-enterprise-joget.8188.starter-us-west-2.openshiftapps.com/jw
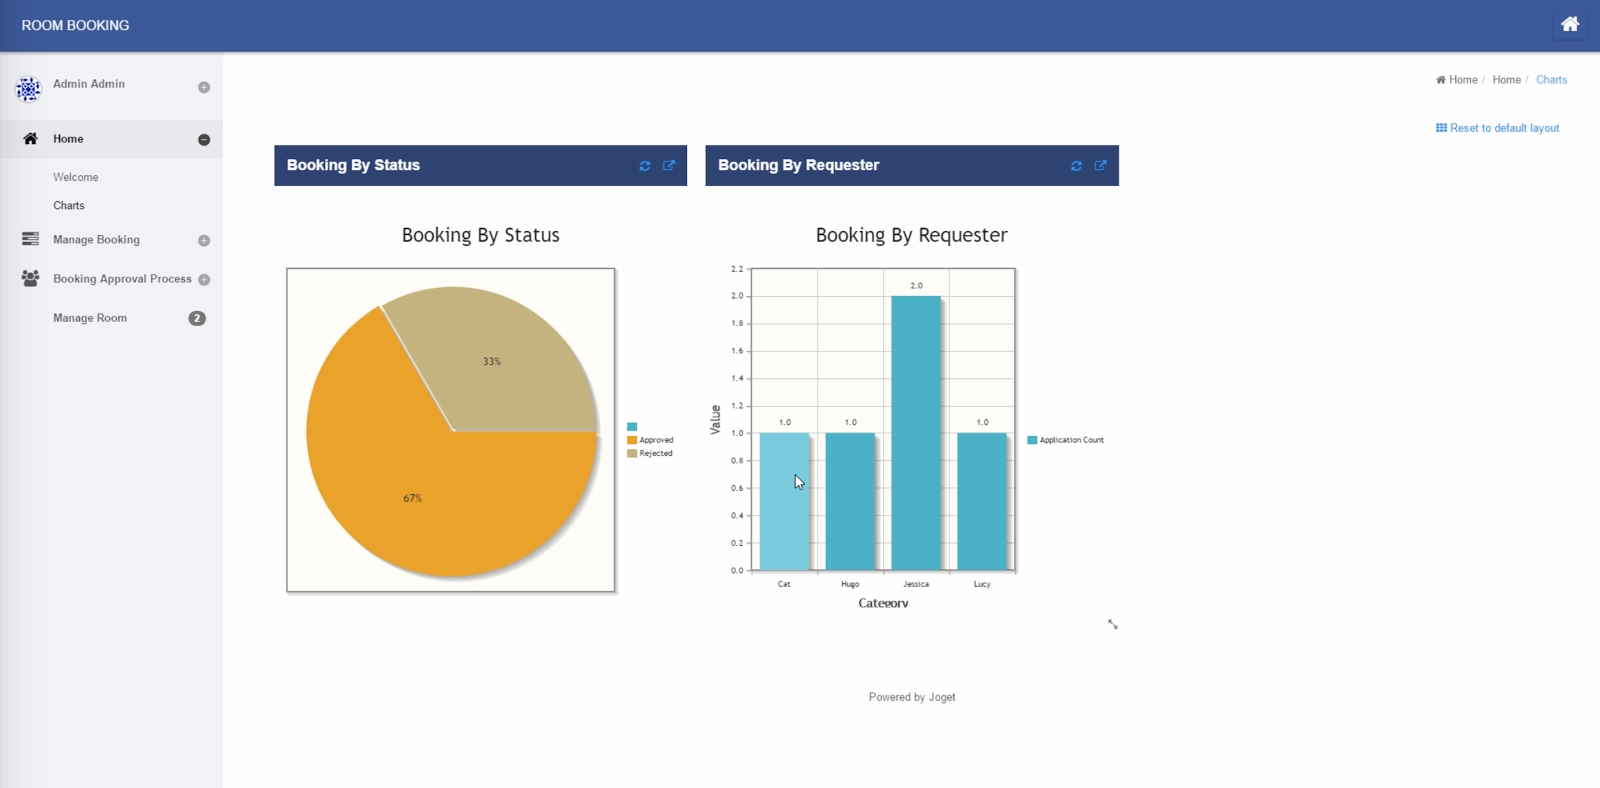
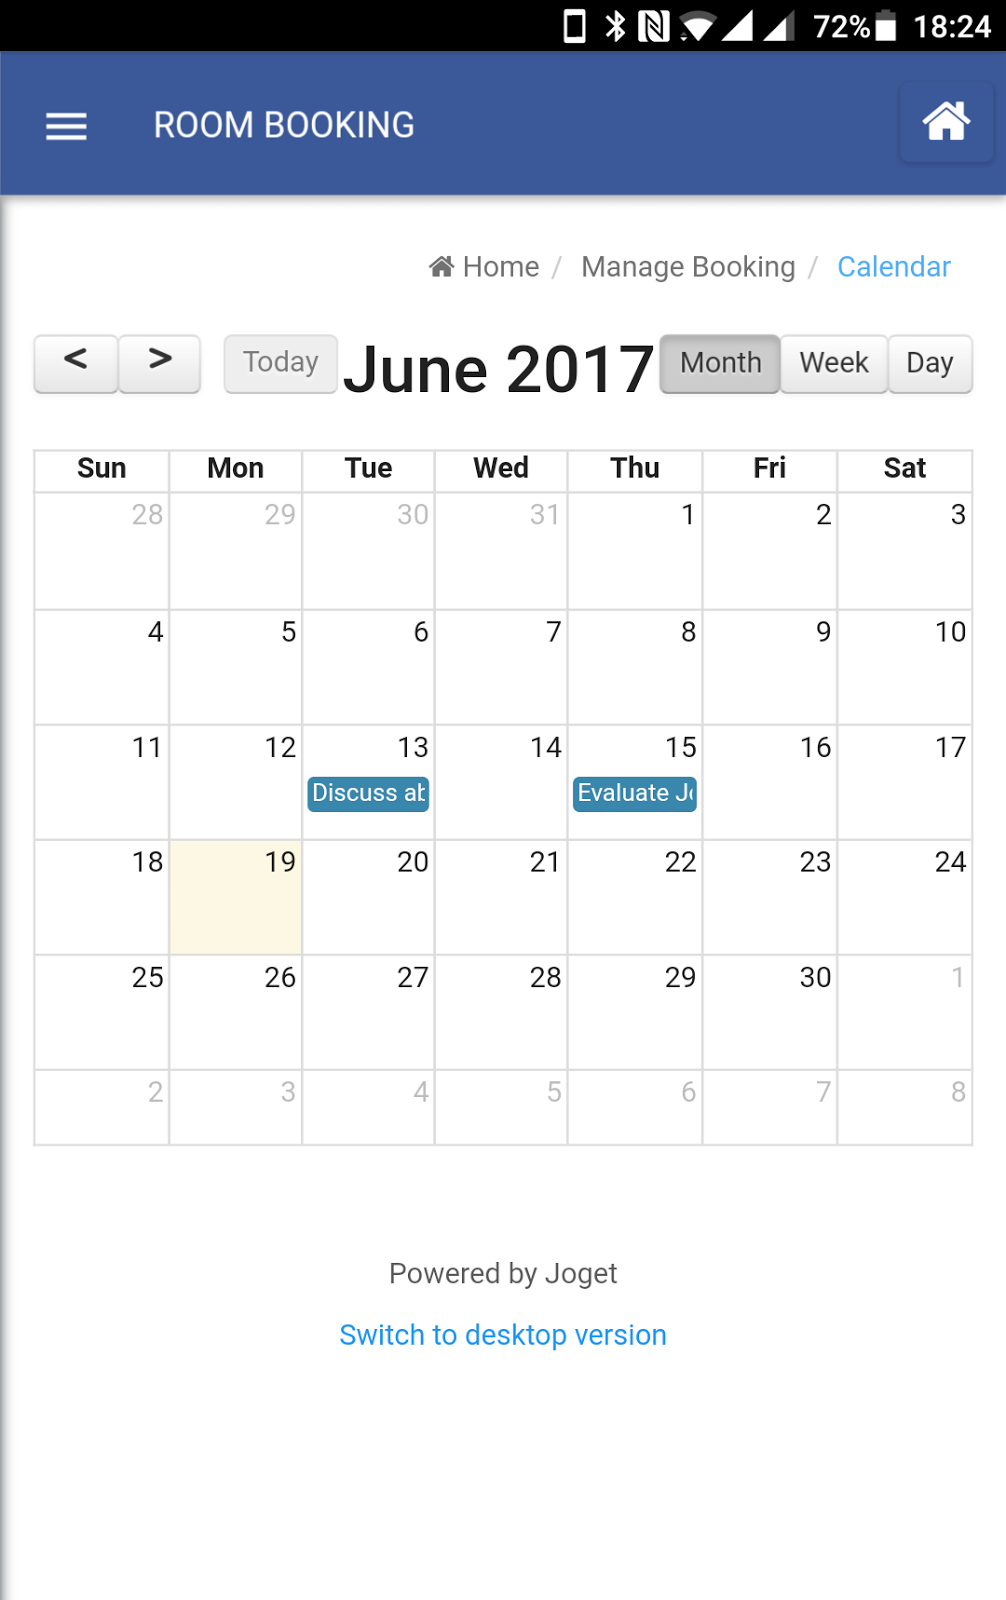
Build a Complete App in 30 minutes, No Code!
With the Joget Workflow platform ready, it is now possible to build a full-fledged app with dashboards, calendar, approval workflow and data management within 30 minutes. And, it can be done without coding and you essentially drag-and-drop, point-and-click and configure your way through instead. It’s also possible to use your touch device to build it.
Watch the 30 minute video below, which demonstrates an authentic, real-time example of building the app from scratch. No special effects, no marketing fluff :)
Users can also download the Joget Mobile App from the Apple App Store and Google Play Store to access the very same app with the UI automatically tailored for mobile devices.
Get Started with Joget Workflow
To get started with Joget Workflow:
- Visit the Joget Workflow product page


Comments
Post a Comment