Enterprise Integration and Low Code Applications: A Practical Tutorial with MuleSoft Anypoint Platform and Joget Workflow

Enterprise integration platforms connect various applications, systems and technologies within the cloud or on-premise. Integration platforms provide ways to manage these connections, typically by consuming and exposing these systems as APIs (application programming interfaces). Integration platforms also provide ready made connectors to many modern and legacy enterprise systems. According to the Gartner Magic Quadrant for Enterprise Integration Platform as a Service (iPaaS), there is huge growth in the interest and adoption of integration platforms by both SMBs and large enterprises.
As an open source no-code/low-code platform, Joget allows coders and non-coders to rapidly develop and deploy enterprise web apps. Joget also provides extensible integration capabilities via APIs and plugins, so enterprise integration platforms are an ideal complement especially with the availability of ready made connectors. For example, a Joget purchase requisition application could send data to the integration platform to be stored in an SAP ERP or Salesforce CRM.
In this article, we will introduce one of the leading enterprise integration platforms, MuleSoft Anypoint Platform, and demonstrate how it can be integrated with a Joget application.
Introduction to MuleSoft Anypoint Platform
MuleSoft, acquired by Salesforce in 2018, is a leader in the Gartner Magic Quadrant for Enterprise iPaaS. MuleSoft Anypoint Platform is a unified platform for integration and API management comprising of many tools and services:- Anypoint Exchange - a central hub to store and access APIs, templates, connectors, documentation and other resources
- Anypoint Design Center - a graphical design environment to build APIs and data integrations
- Anypoint Security - provides security defence for APIs and integrations
- Anypoint Management Center - provides real-time, graphical view of APIs and integrations with dashboards, functional tests, and alerts
- Mule Runtime Engine - a lightweight, Java-based enterprise service bus (ESB) for APIs, integrations, and microservices
- CloudHub - a hosted, fully-managed and multi-tenanted platform as a service (PaaS) offering of the Anypoint Platform
Tutorial Part 1: Build and Deploy Hello World Mule Application
For this tutorial, let’s start with a simple hello world example application to be deployed on Anypoint Platform.Step 1. Sign Up for MuleSoft Anypoint Platform
Sign up for a MuleSoft account at anypoint.mulesoft.com.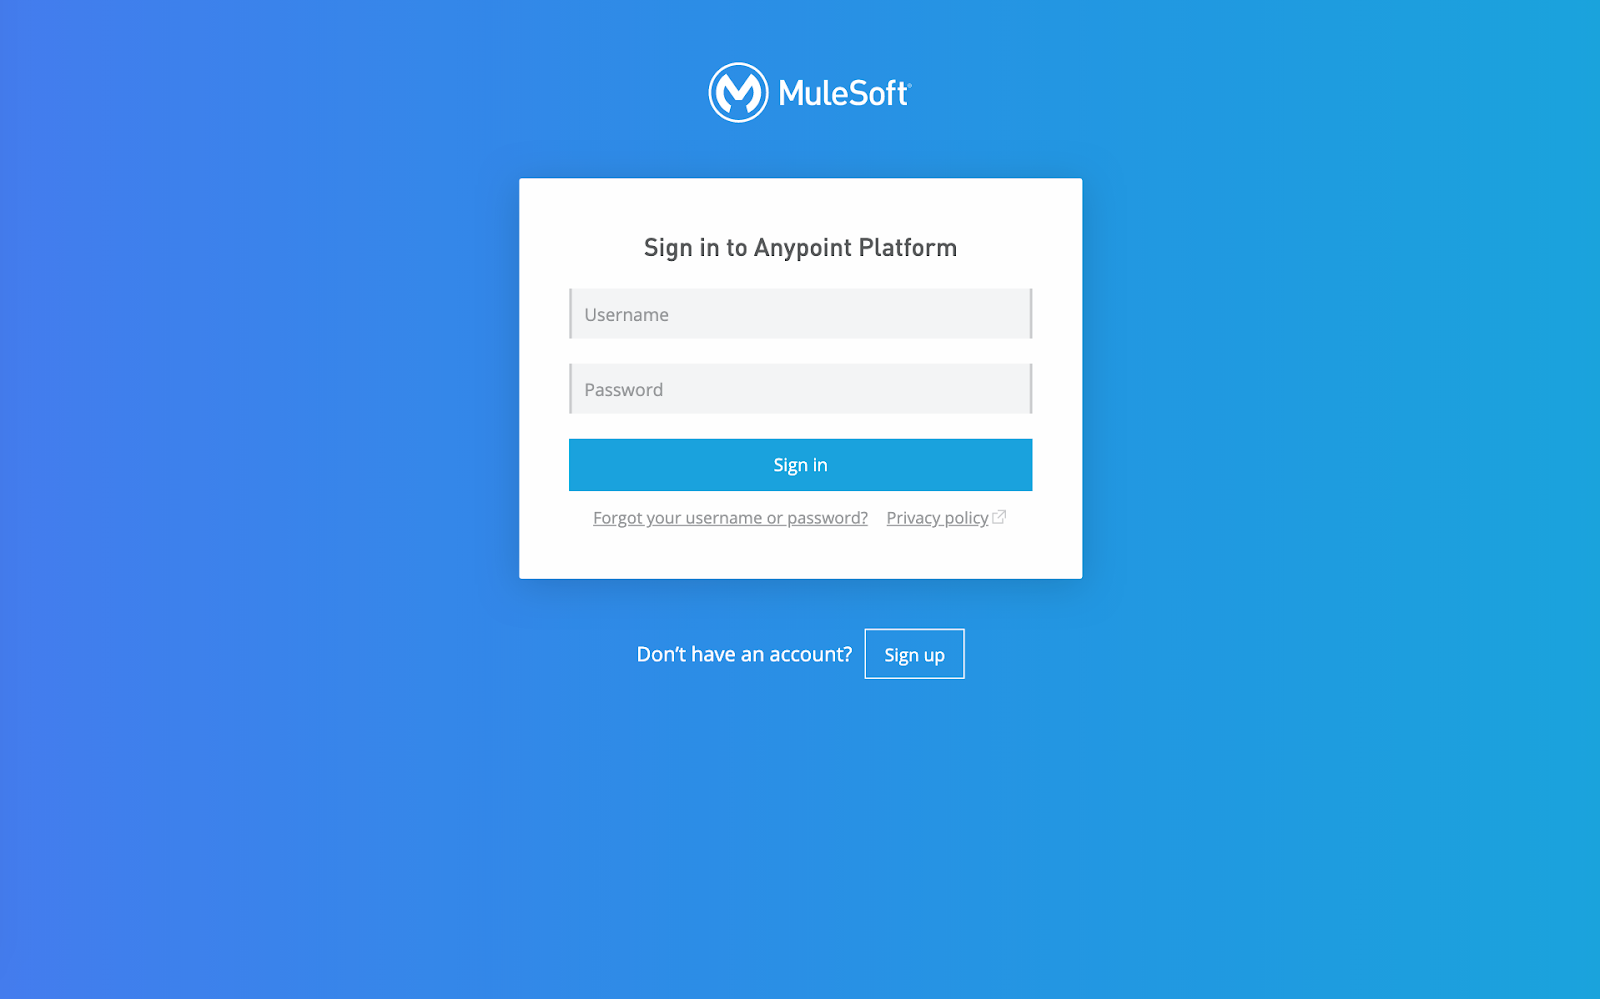
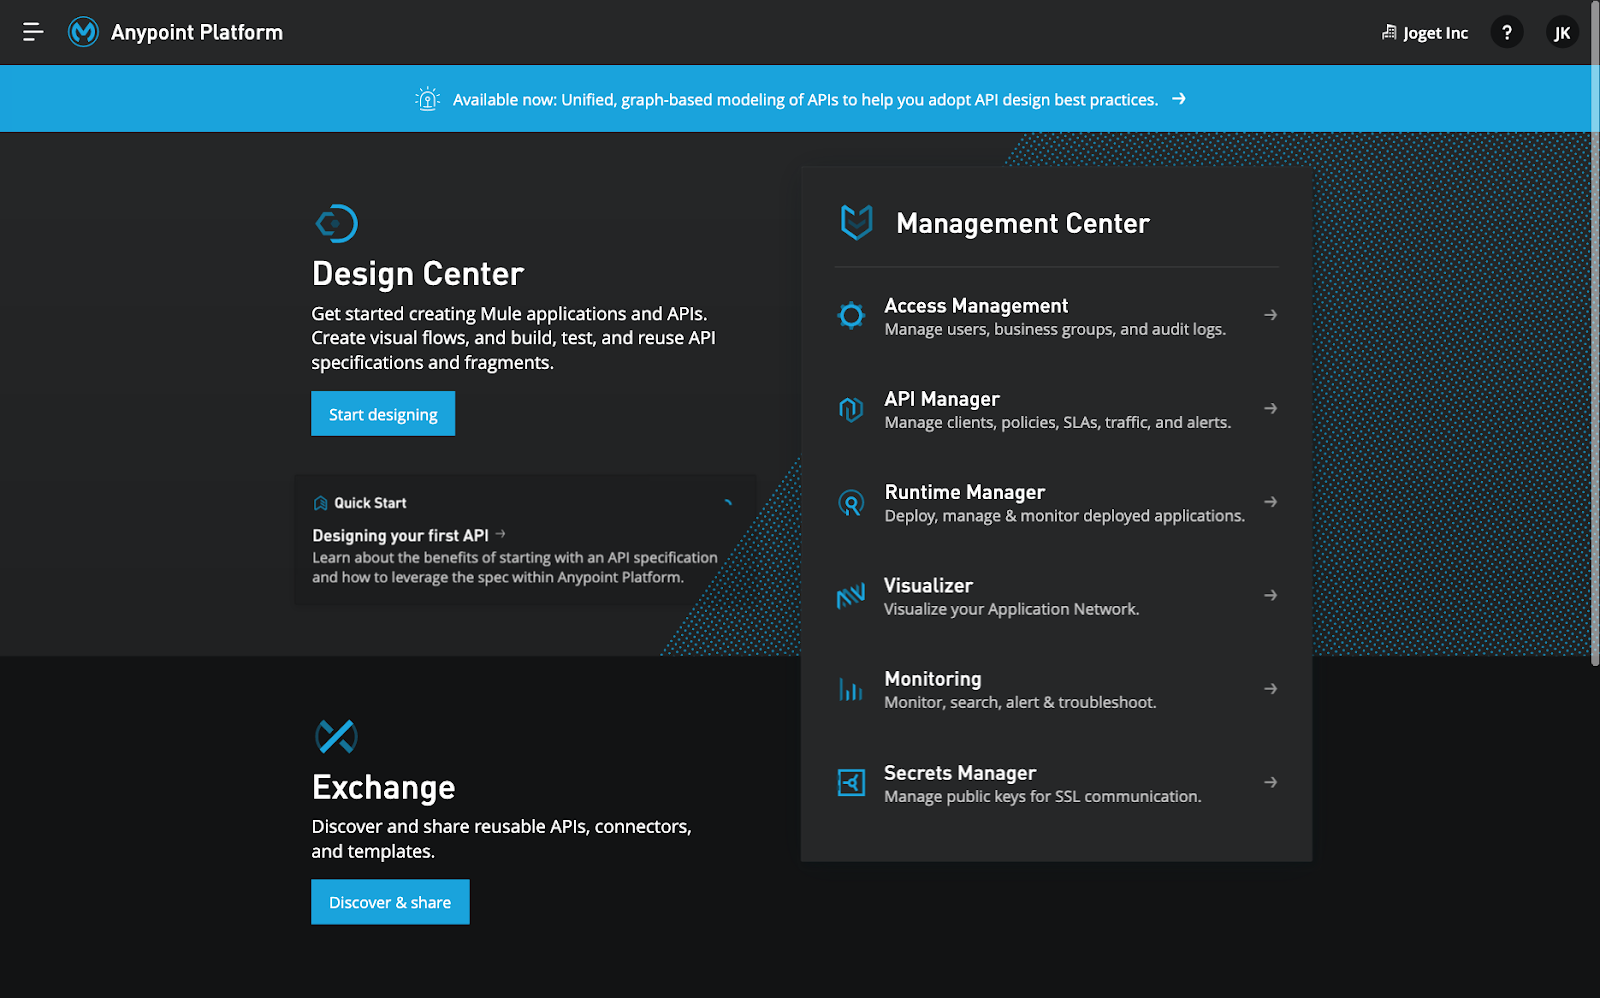
Once registered and logged in, you will be brought to the Anypoint Platform home.
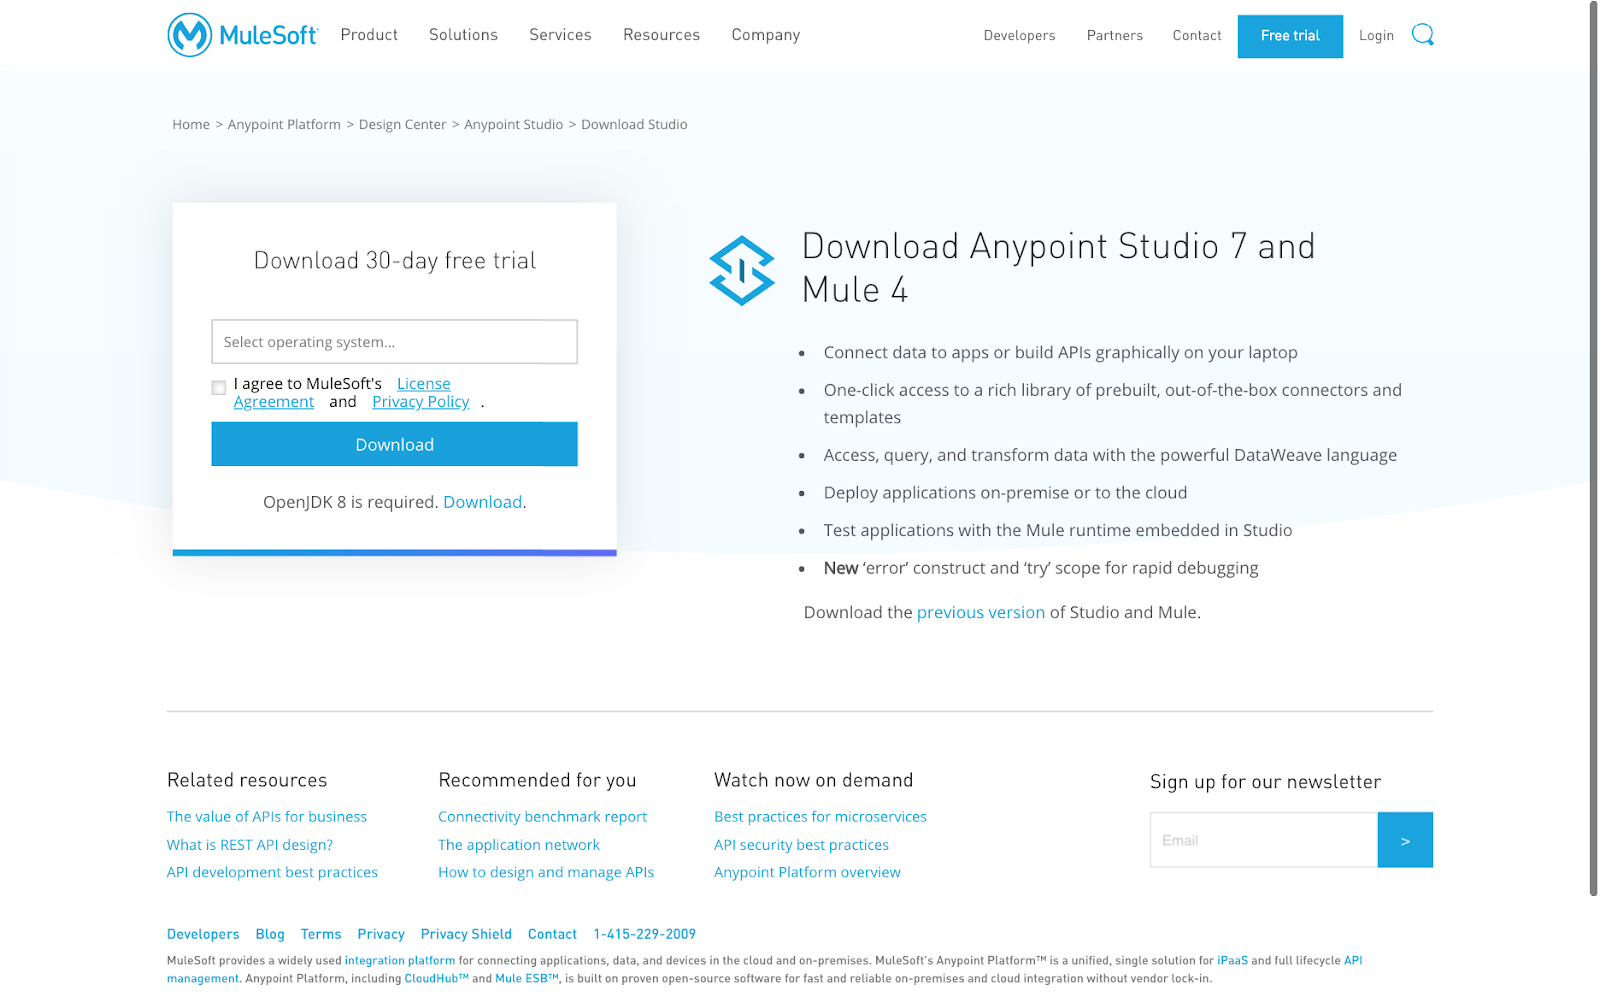
Step 2. Install Anypoint Studio
Scroll to the bottom of the Anypoint Platform home and click on the Download button for Anypoint Studio. A part of the Anypoint Design Center, Anypoint Studio is a graphical environment based on the Eclipse IDE to design and deploy integration applications.Download the version for your operating system and install it on your PC.
Step 3. Download Hello World Example from Anypoint Exchange
From the Anypoint Platform home, visit the Anypoint Exchange by clicking on the Discover & share button.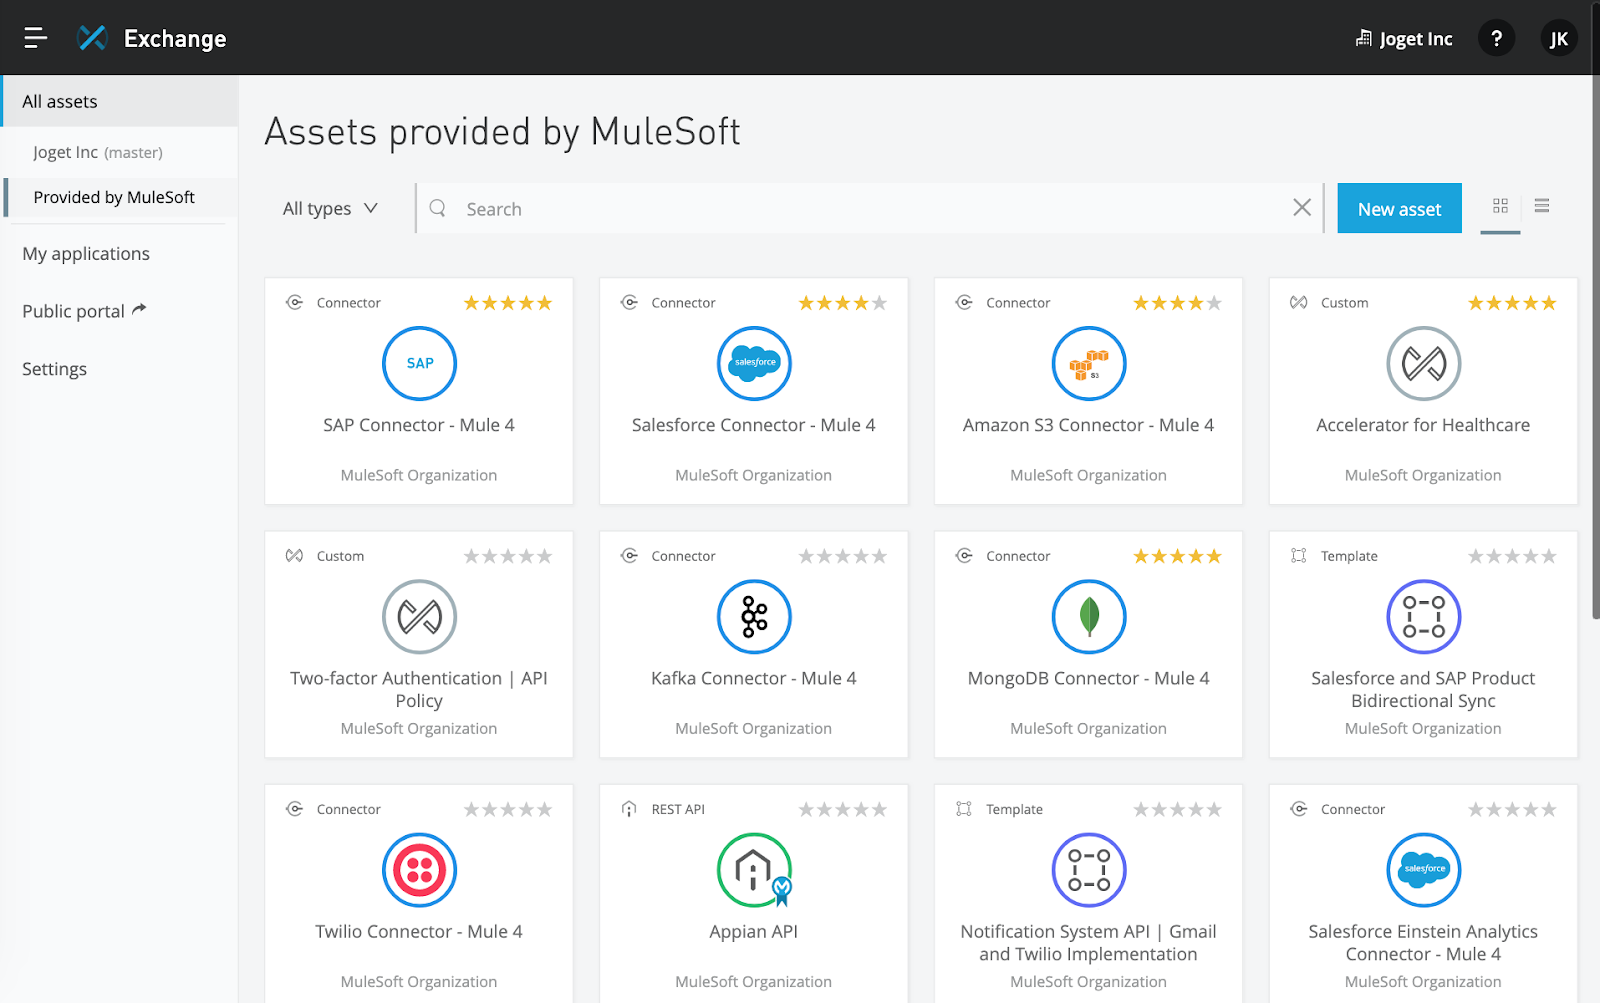
In the Anypoint Exchange, click on Provided by MuleSoft in the left menu, search for Hello World, and select the Hello World Example.
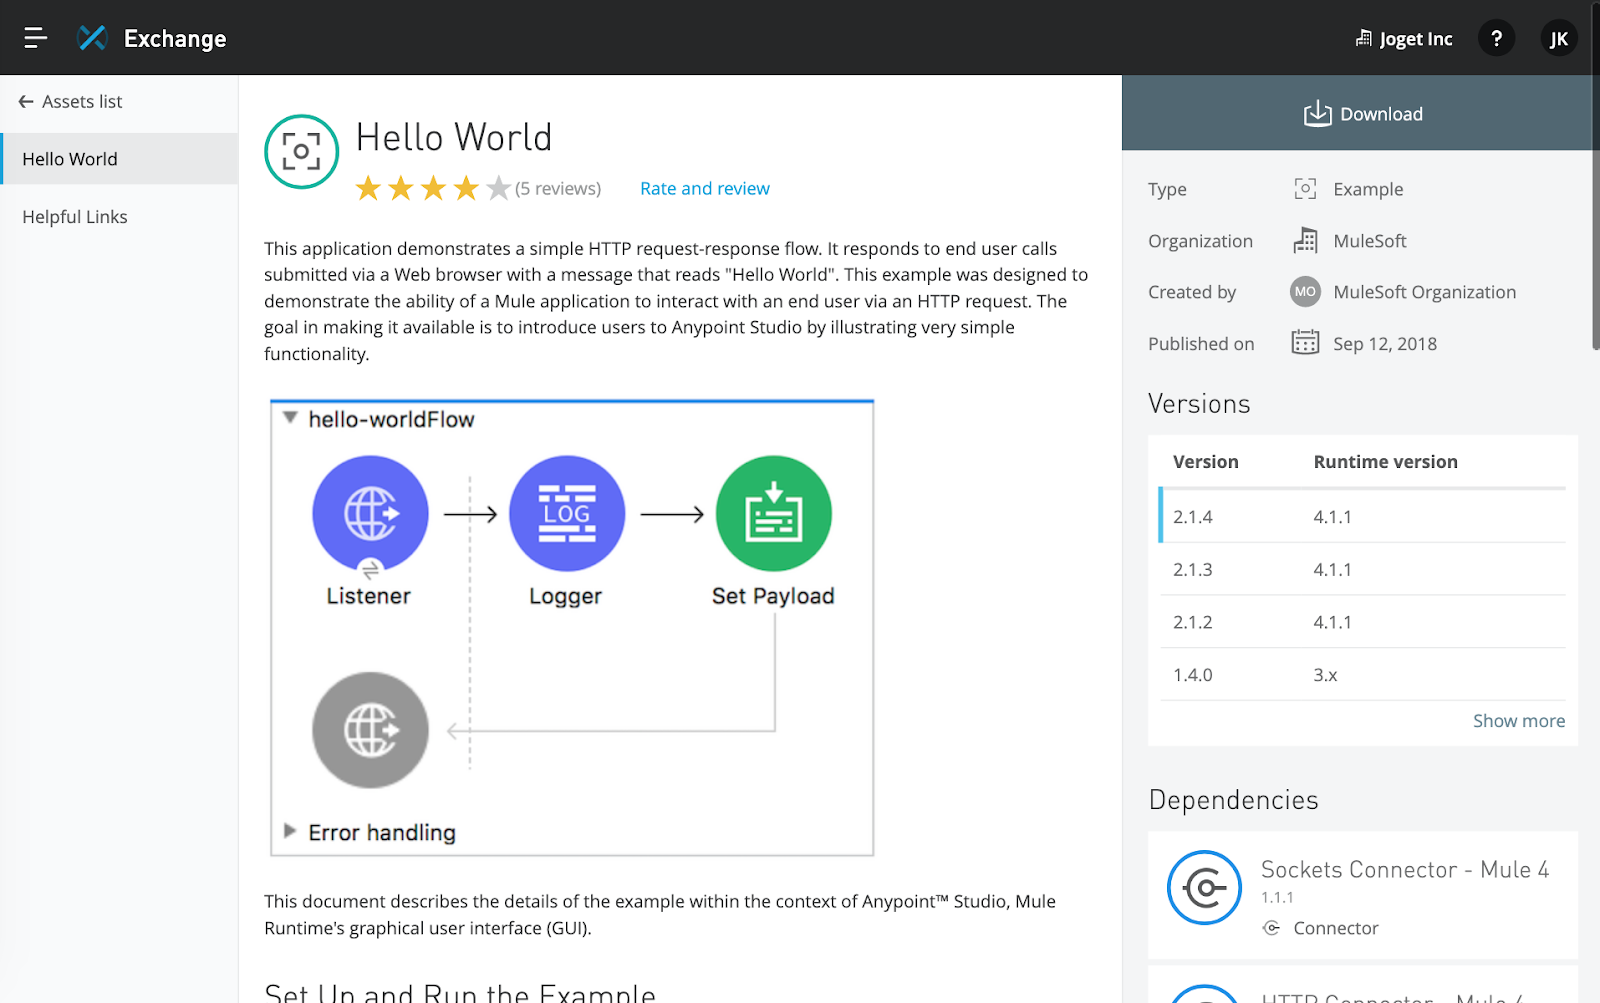
Click on the Download button on the top right to download the application JAR file.
Step 4. Import Hello World Example into Anypoint Studio
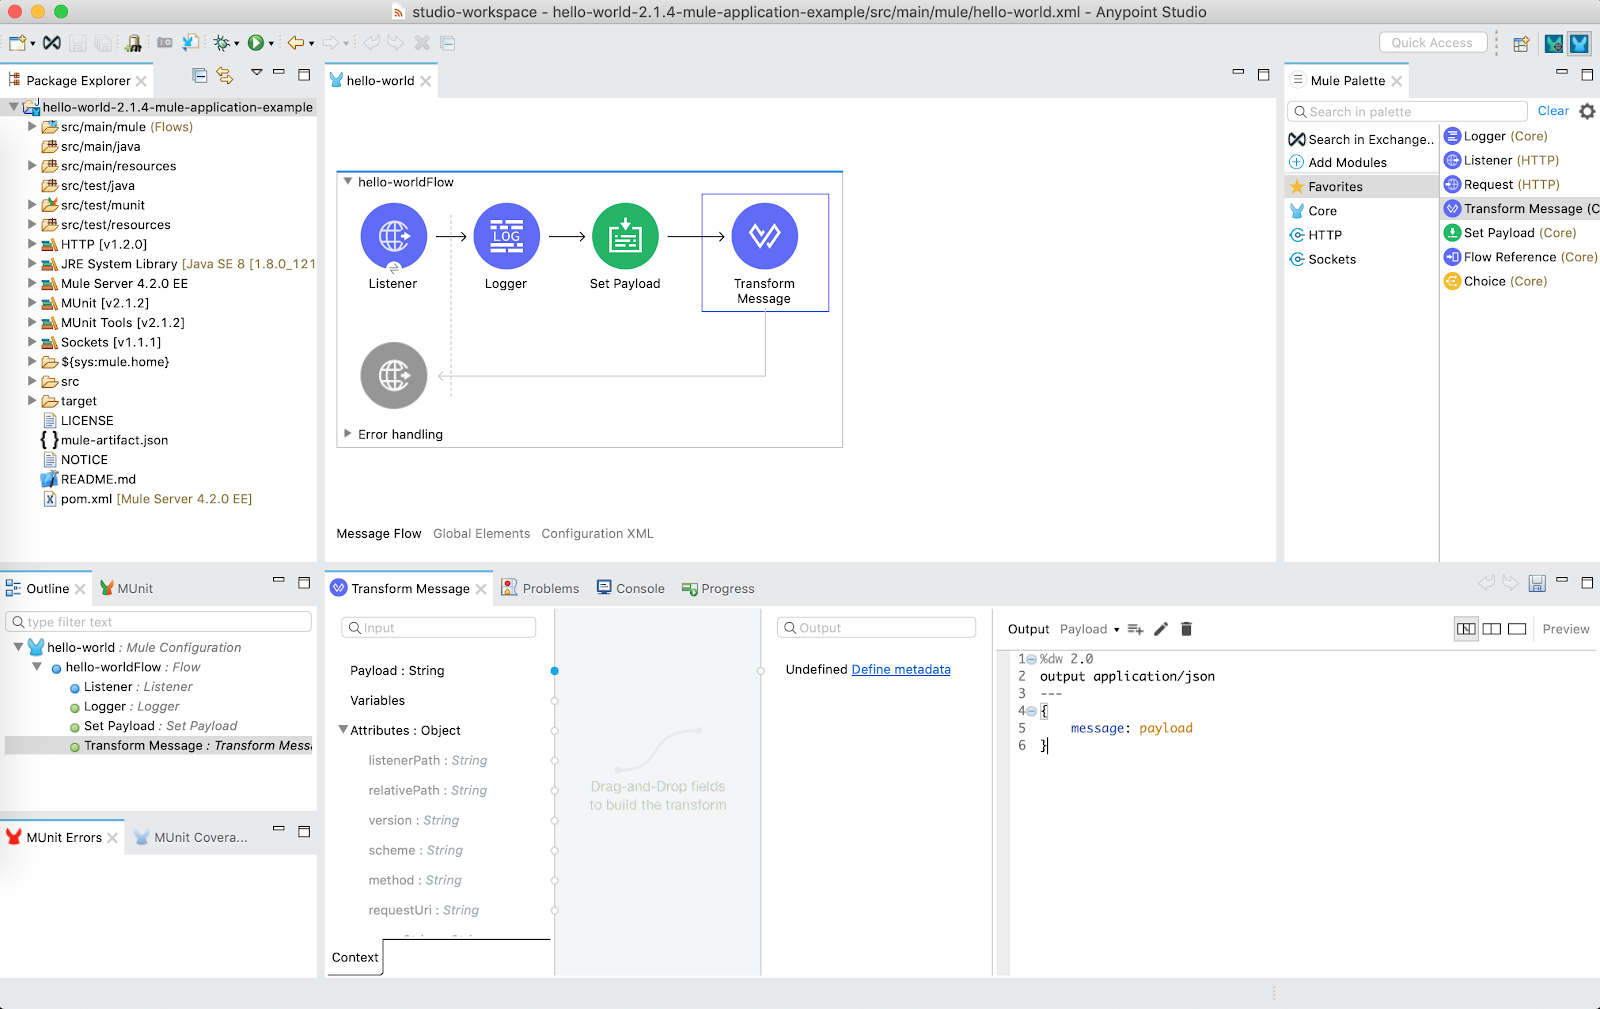
Launch Anypoint Studio in your PC.Select File > Import, choose Packaged mule application (.jar) and select the Hello World example JAR downloaded in the previous step.

Once the JAR has been imported, let’s test the application. In the Package Explorer, browse to src/main/mule and open the hello-world.xml file to view the preconfigured message flow.

Select the Global Elements tab, and Edit the HTTP Listener. You will see the HTTP connection port is 8081.

Right click on the project name in the Package Explorer and select Run As > Mule Application.

Once the Console shows that the application has started (message shows * Started app hello-world-2.1.4-mule-application-example), navigate to http://localhost:8081/helloWorld in a browser and you will see the message “Hello World!”

Step 5. Update Flow to Add JSON Response
At this point, let’s make a slight modification to the application. The current response is the text “Hello World!”, which is not quite suitable for an API call so we’ll transform it to a JSON response.From the Mule Palette on the right, drag a Transform Message component as the last part of the flow. In the configuration, modify the Output to
%dw 2.0
output application/json
---
{
message: payload
}
Run the application again by right clicking on the project name in the Package Explorer and select Run As > Mule Application. Navigate to http://localhost:8081/helloWorld in a browser and the response should now display in JSON format:
{
"message": "Hello World!"
}
Step 6. Export Updated Hello World Example
Now that the application is done, we can export it as a new deployable JAR. In Anypoint Studio, select File > Export, choose Anypoint Studio Project to Mule Deployable Archive.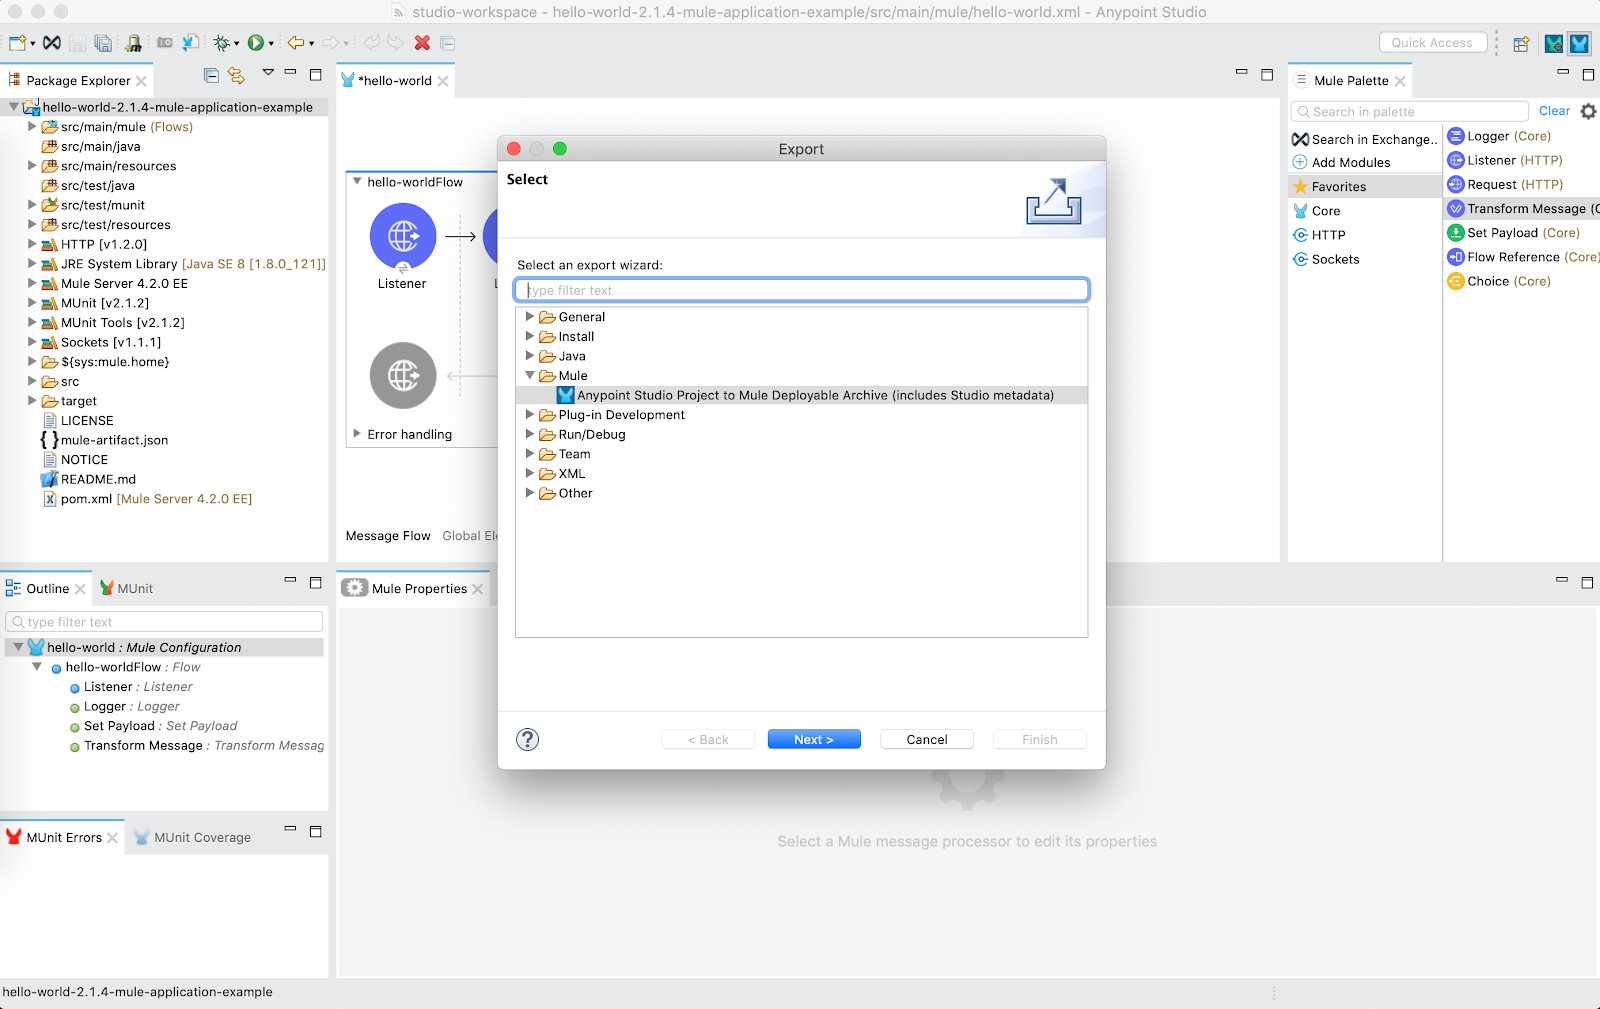
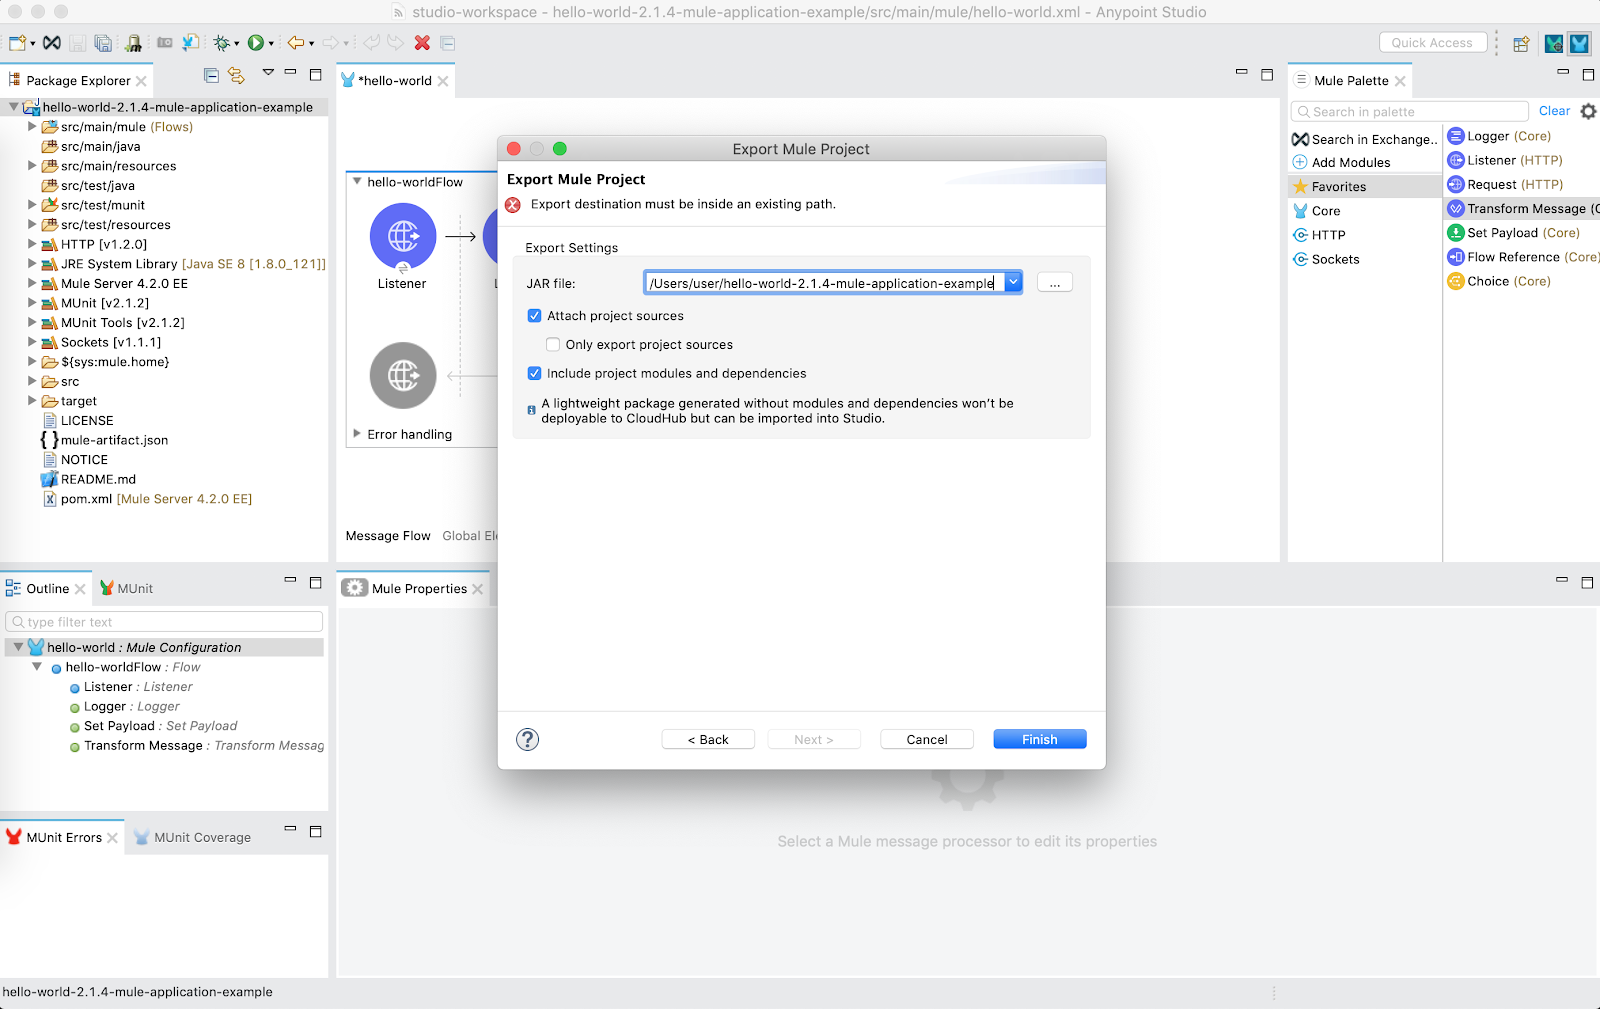
In the Export Settings, enter a name for the new JAR file, and ensure that “Include project modules and dependencies” is selected, then click Finish to export the JAR file.
Step 7. Deploy Hello World Example to CloudHub
In a browser, navigate to the Anypoint CloudHub Runtime Manager and select Deploy application.Enter a name for the application (e.g. hello-world-example), choose the JAR file exported from the previous step and then click on the Deploy Application button.
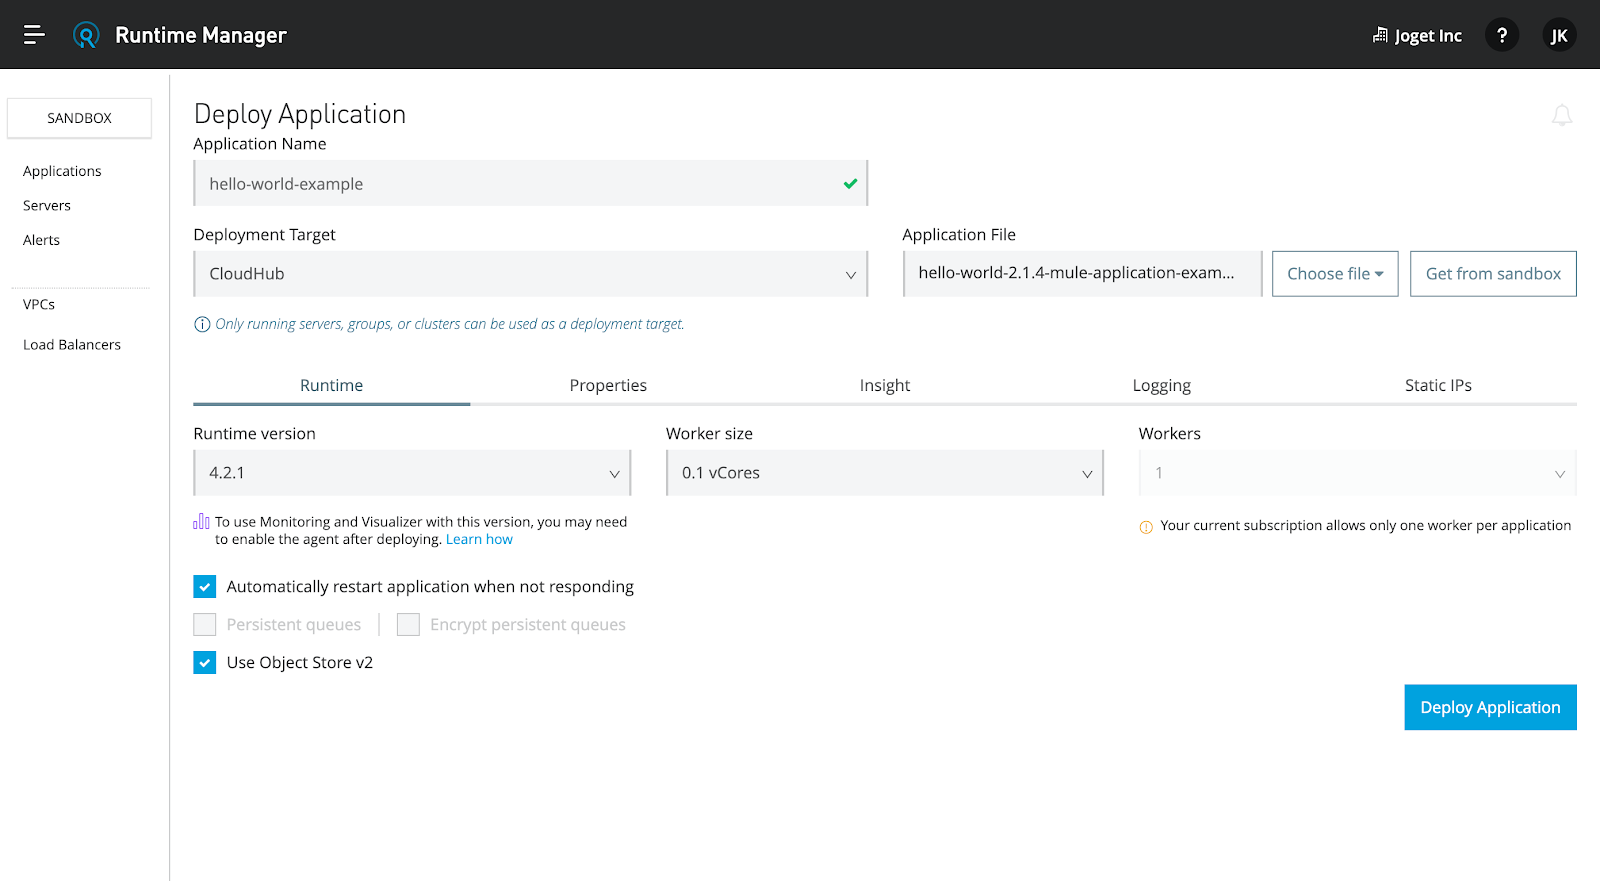
The Logs will show the application starting up, and once completed you will see the message “Your application has started successfully”.

Select the Dashboard, and copy the domain.

Navigate your browser to the /helloWorld API path in that domain e.g. http://hello-world-example.us-e2.cloudhub.io/helloWorld and you should see the JSON output:
{
"message": "Hello World!"
}
Tutorial Part 2: Design Joget App to Invoke API
Step 1. Sign Up for Joget Workflow On-Demand
If you already have your own installation of the Joget platform, you can use it and skip this step. Otherwise, you can sign up for Joget Workflow On-Demand, a hosted version of the Joget platform that allows you to quickly get started.
Visit cloud.joget.com and click on Sign Up Free to register a new account.

Once you have successfully verified your email, you will be linked to your own running installation of Joget Workflow where you’ll be able to visually build a full app in 30 minutes without coding.
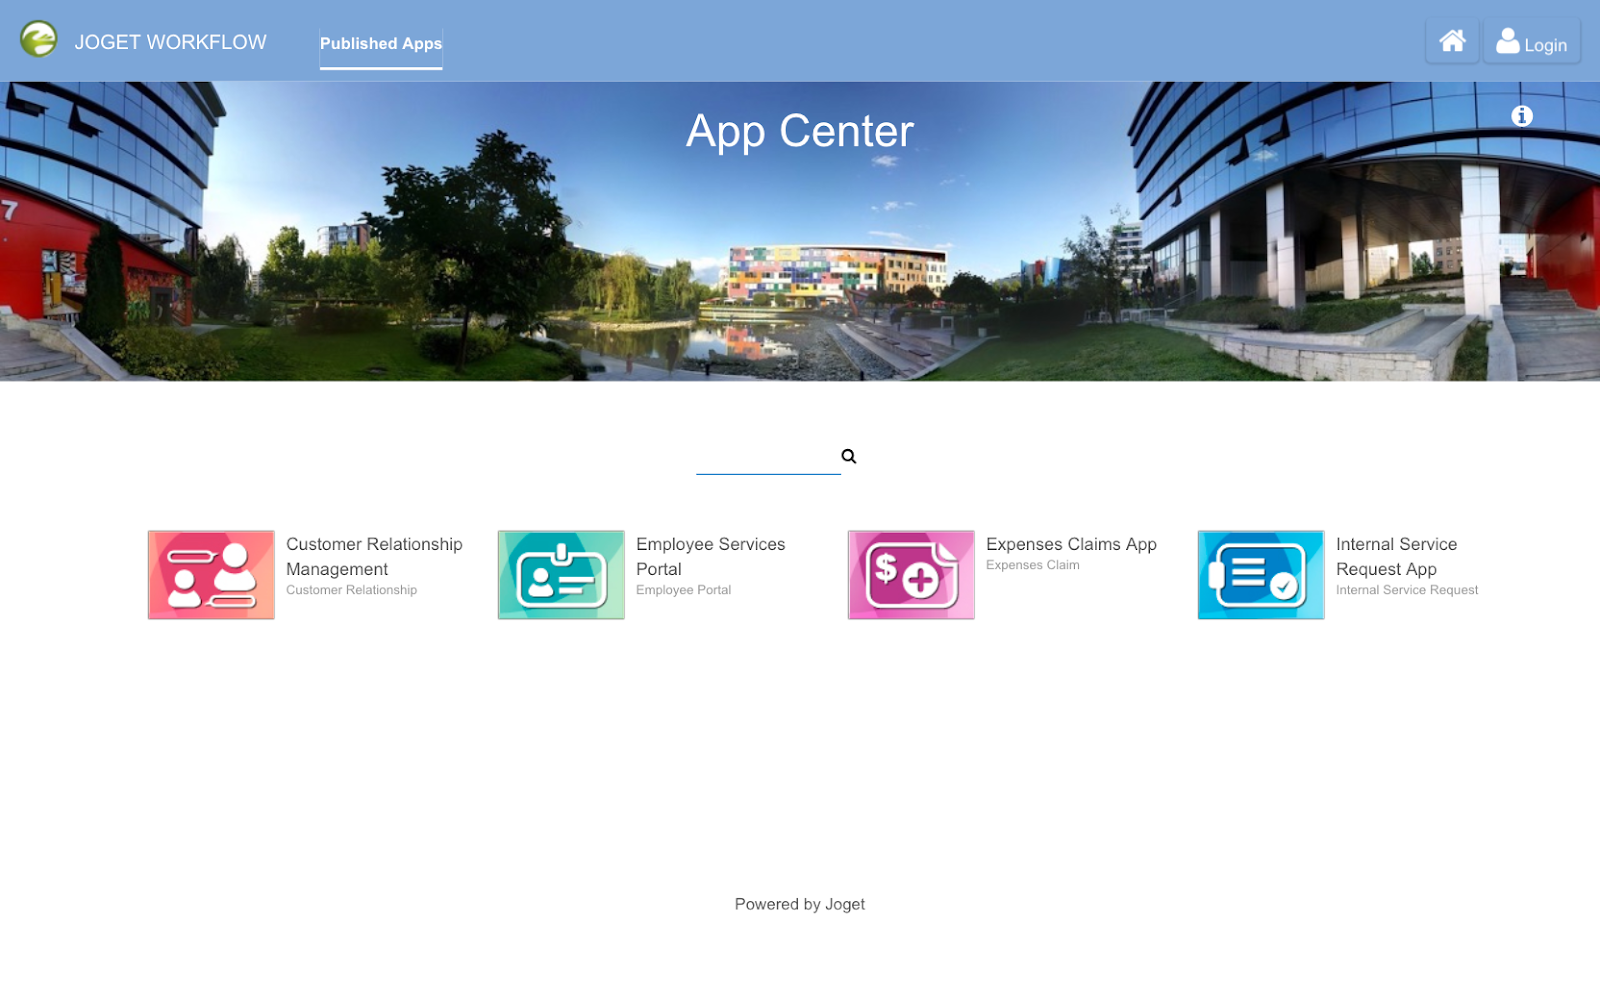
Step 2. Design New App
First, let’s design a new app by clicking on Design New App in the Joget App Center.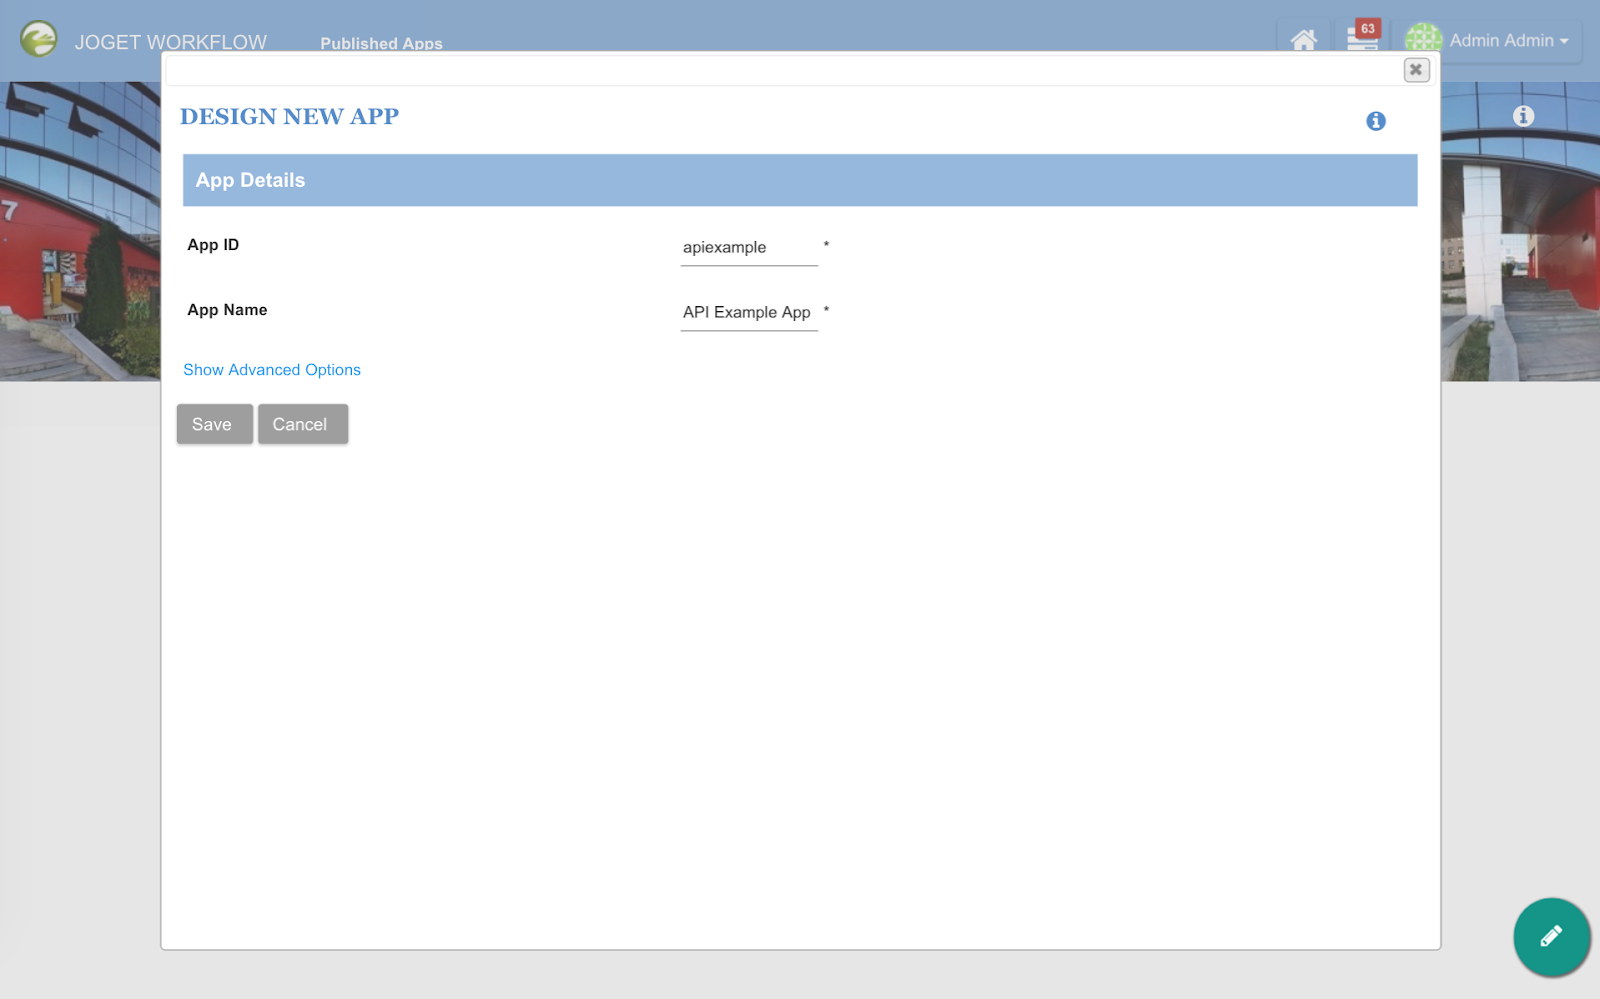
Fill in desired values for the App ID and App Name, and click Save.
Step 3. Design New Process
Click on the Processes menu, then on the Design Process button to launch the Process Builder.Design a simple process containing 1 tool, as shown below.

Click on the edit pencil icon after hovering over the process name along the top. Enter a suitable process name and create 1 workflow variable “message” to store the response value from the API call:
- status
- message
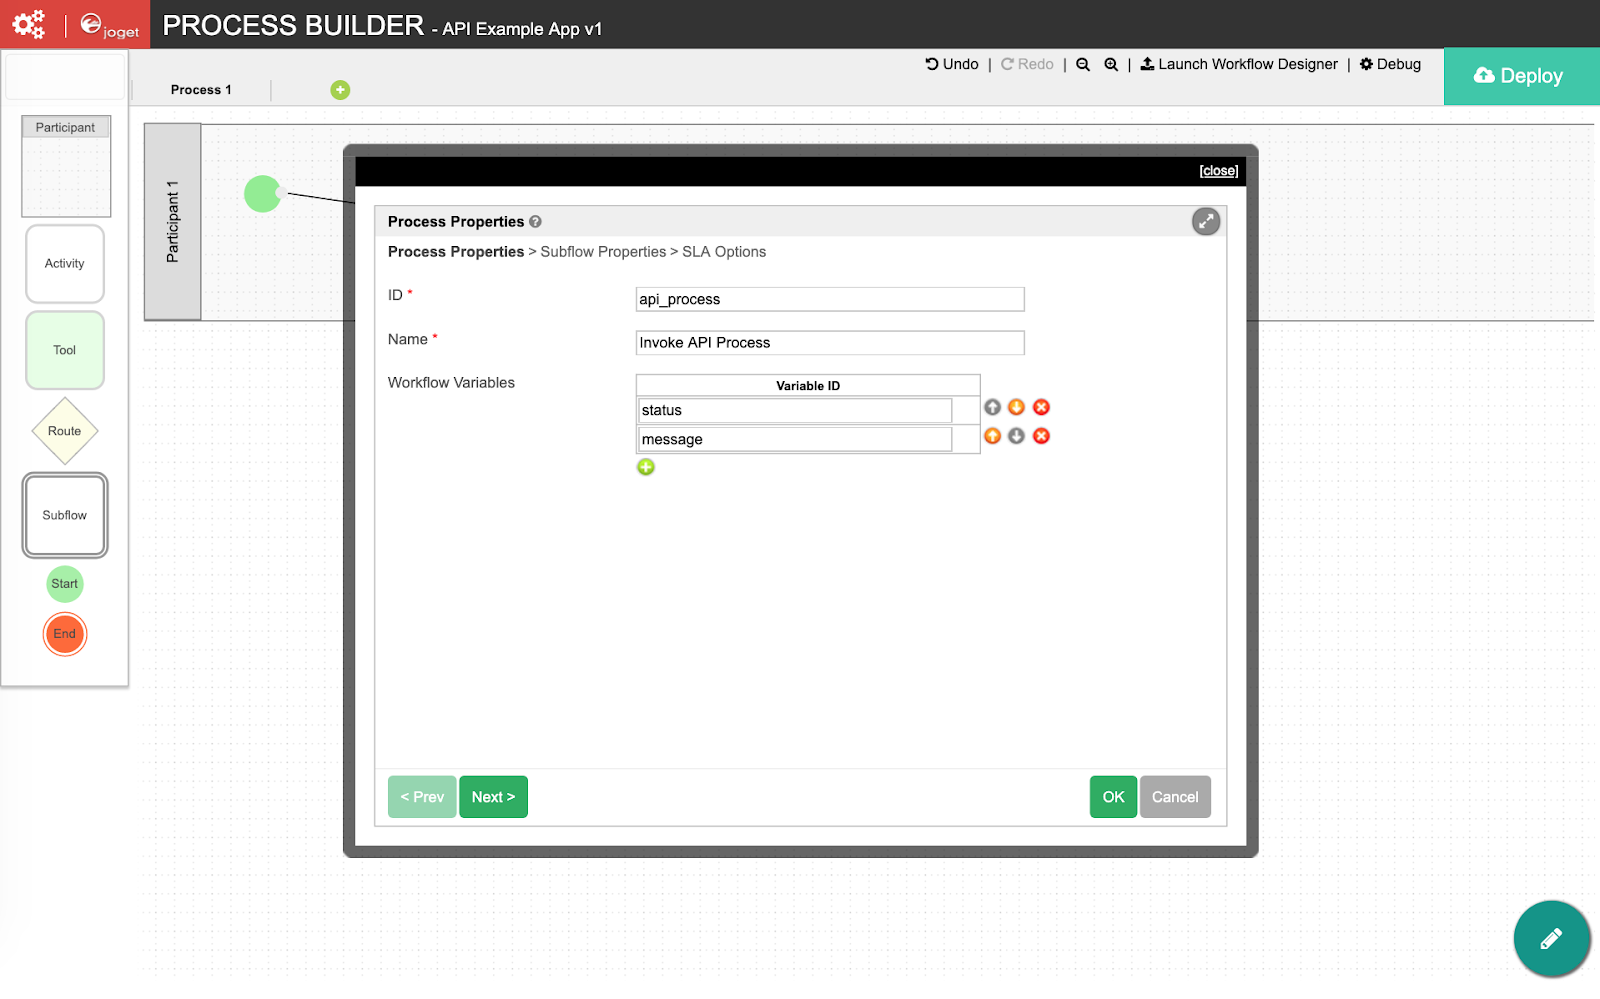
Click on OK, then Deploy.
Step 4. Configure Tool to Invoke API
Once the process has been deployed, close the Process Builder. In the process view page, select the Map Tools to Plugins tab.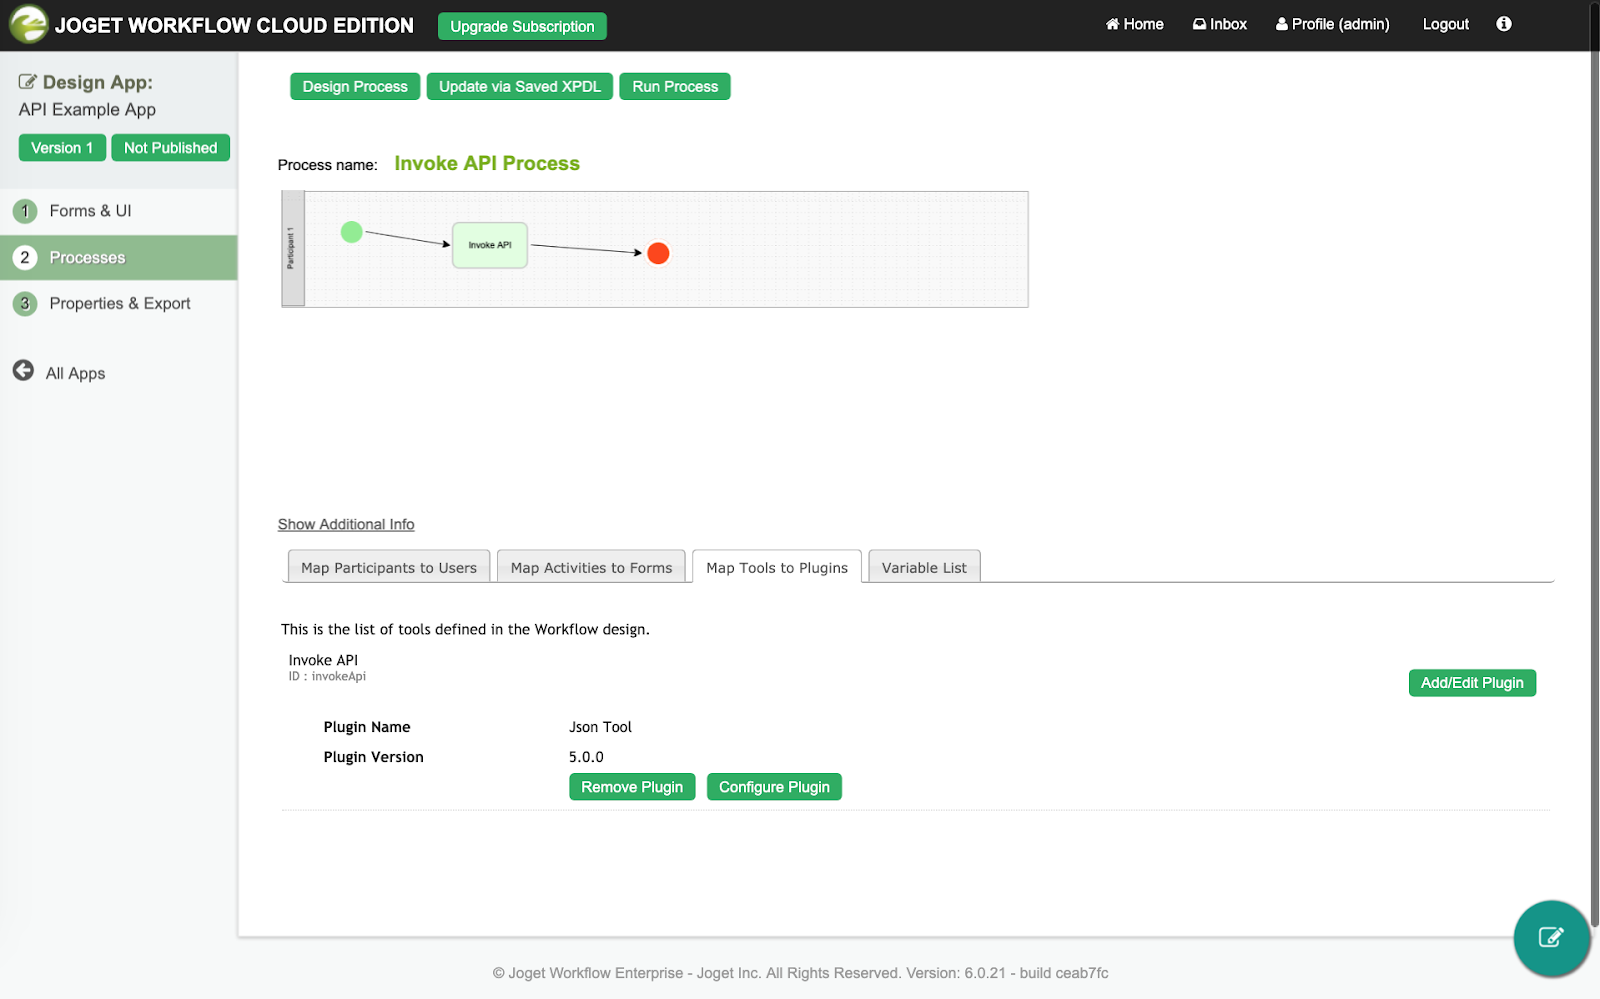
Click on Configure Plugin for the first tool and select JSON Tool, then key in the following configuration:
JSON URL
| |
Call Type
|
GET
|
Under Store to Workflow Variable, map the variables to store the JSON result in the matching workflow variable i.e.
message
|
message
|
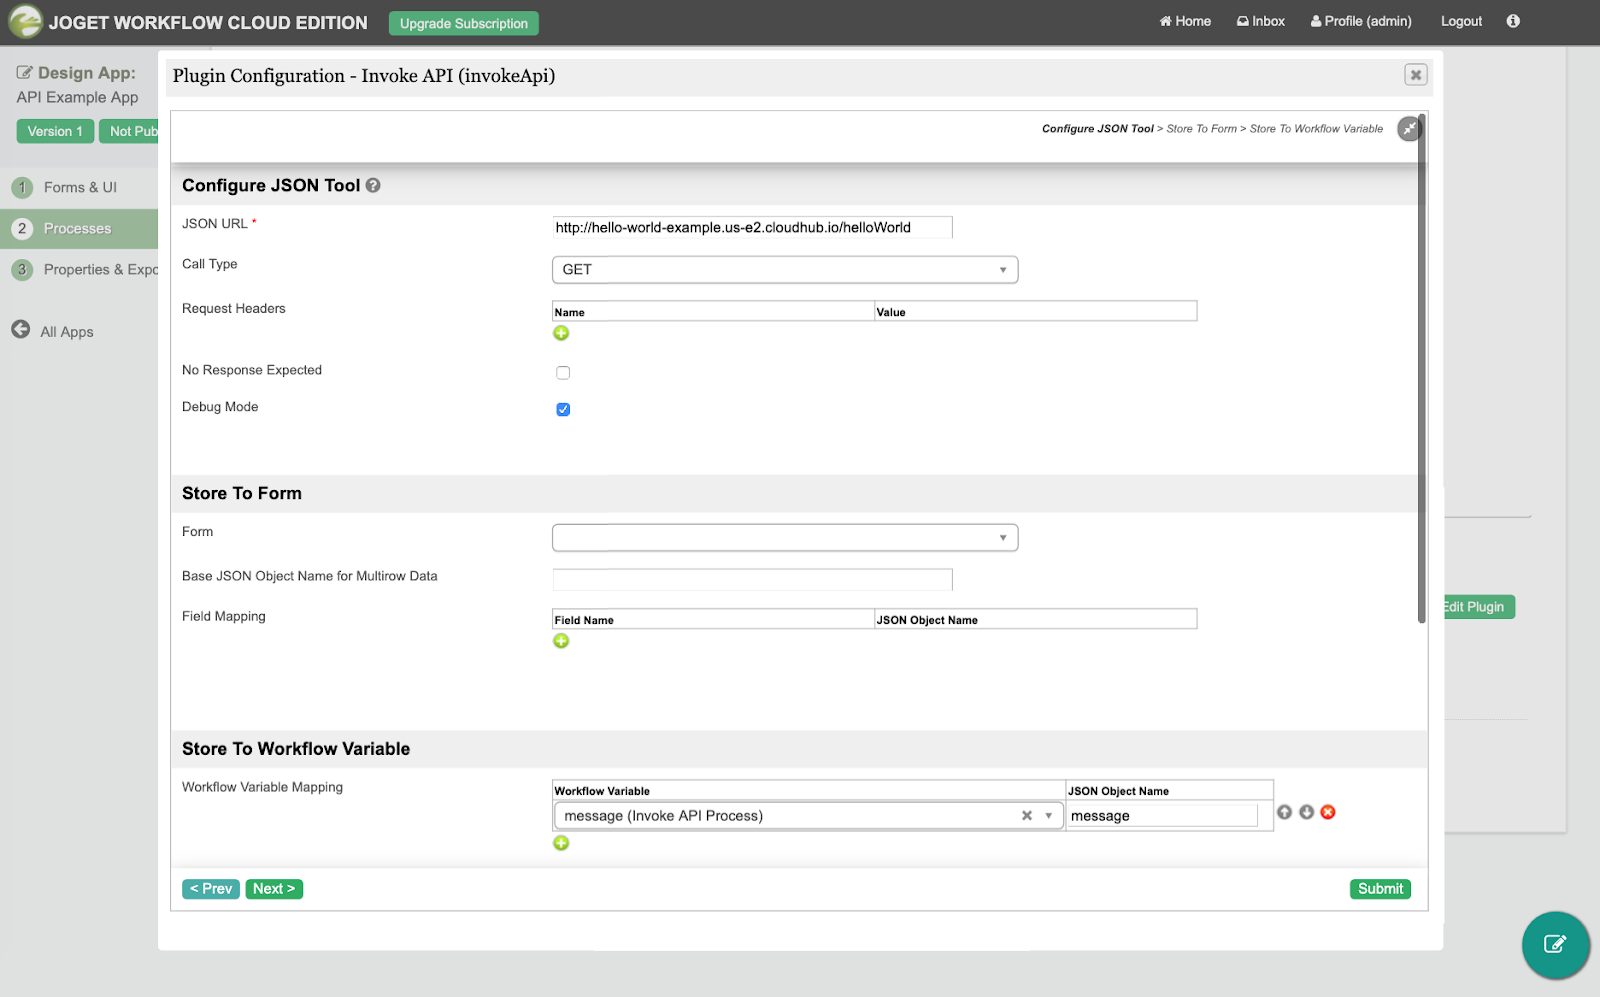
Click on Submit to save.
That’s it. The Joget process has been configured to invoke the API and capture the result.
Step 5. Run the Process
Now, let’s test the process. Click on the Run Process button at the top, then Run Process again in the confirmation dialog.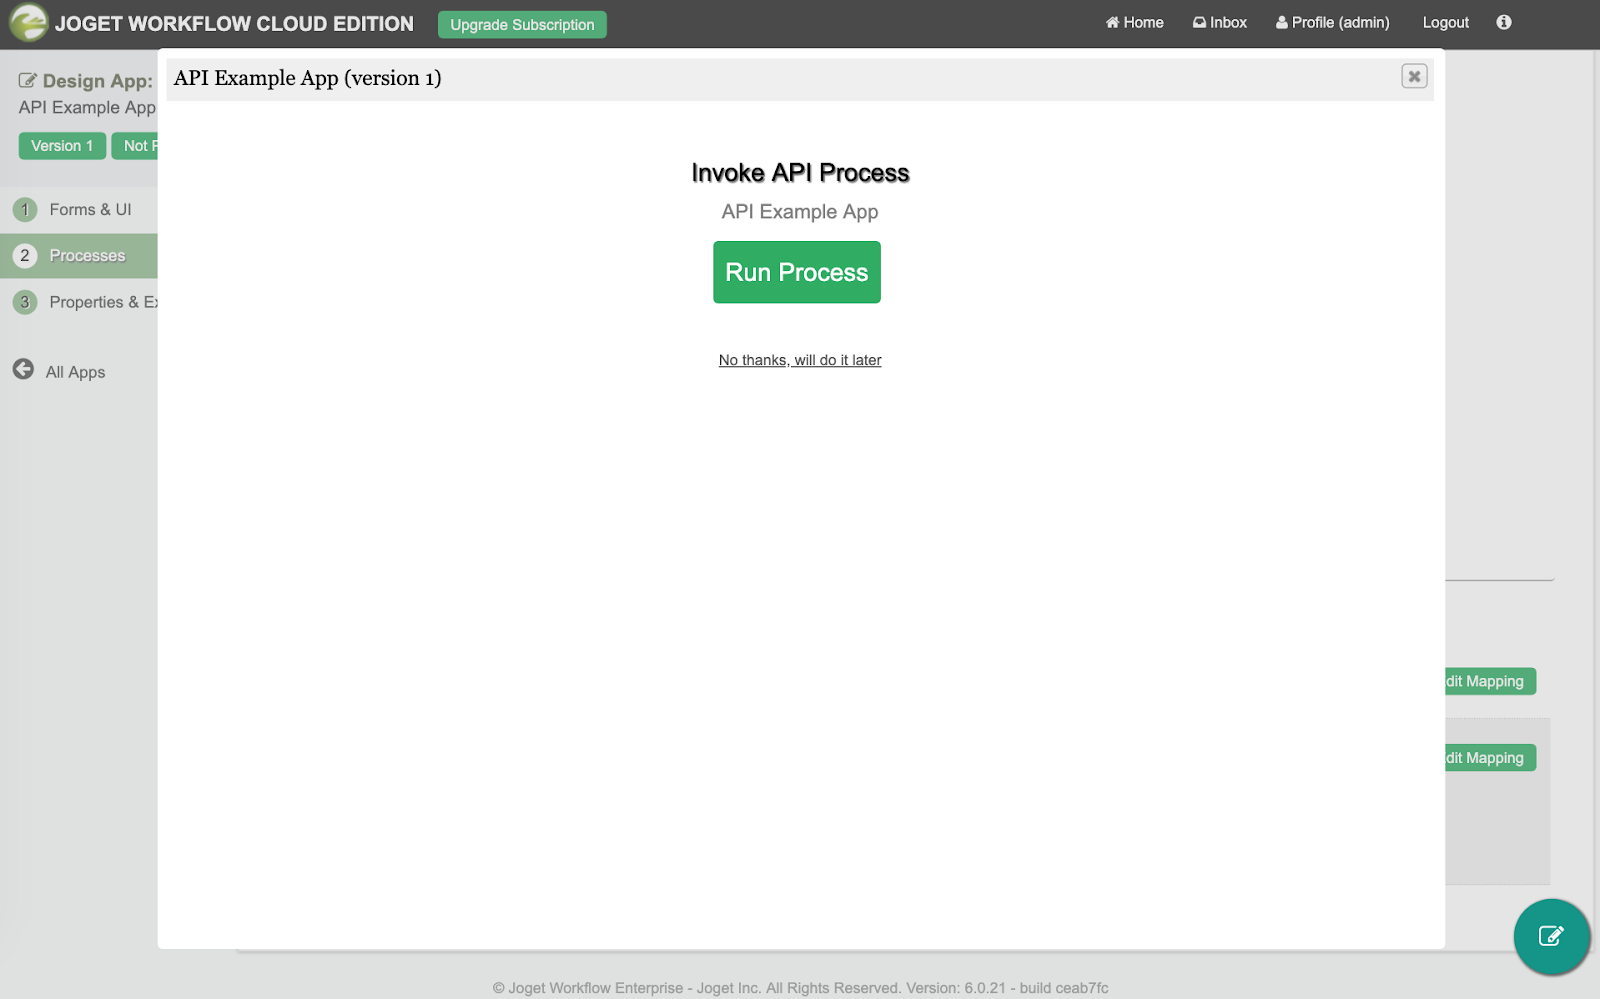
Once the process has started, the tool will execute as configured. To view the results of the process, navigate to Monitor -> Completed Processes.
Select the process instance and you will see the tool executed.
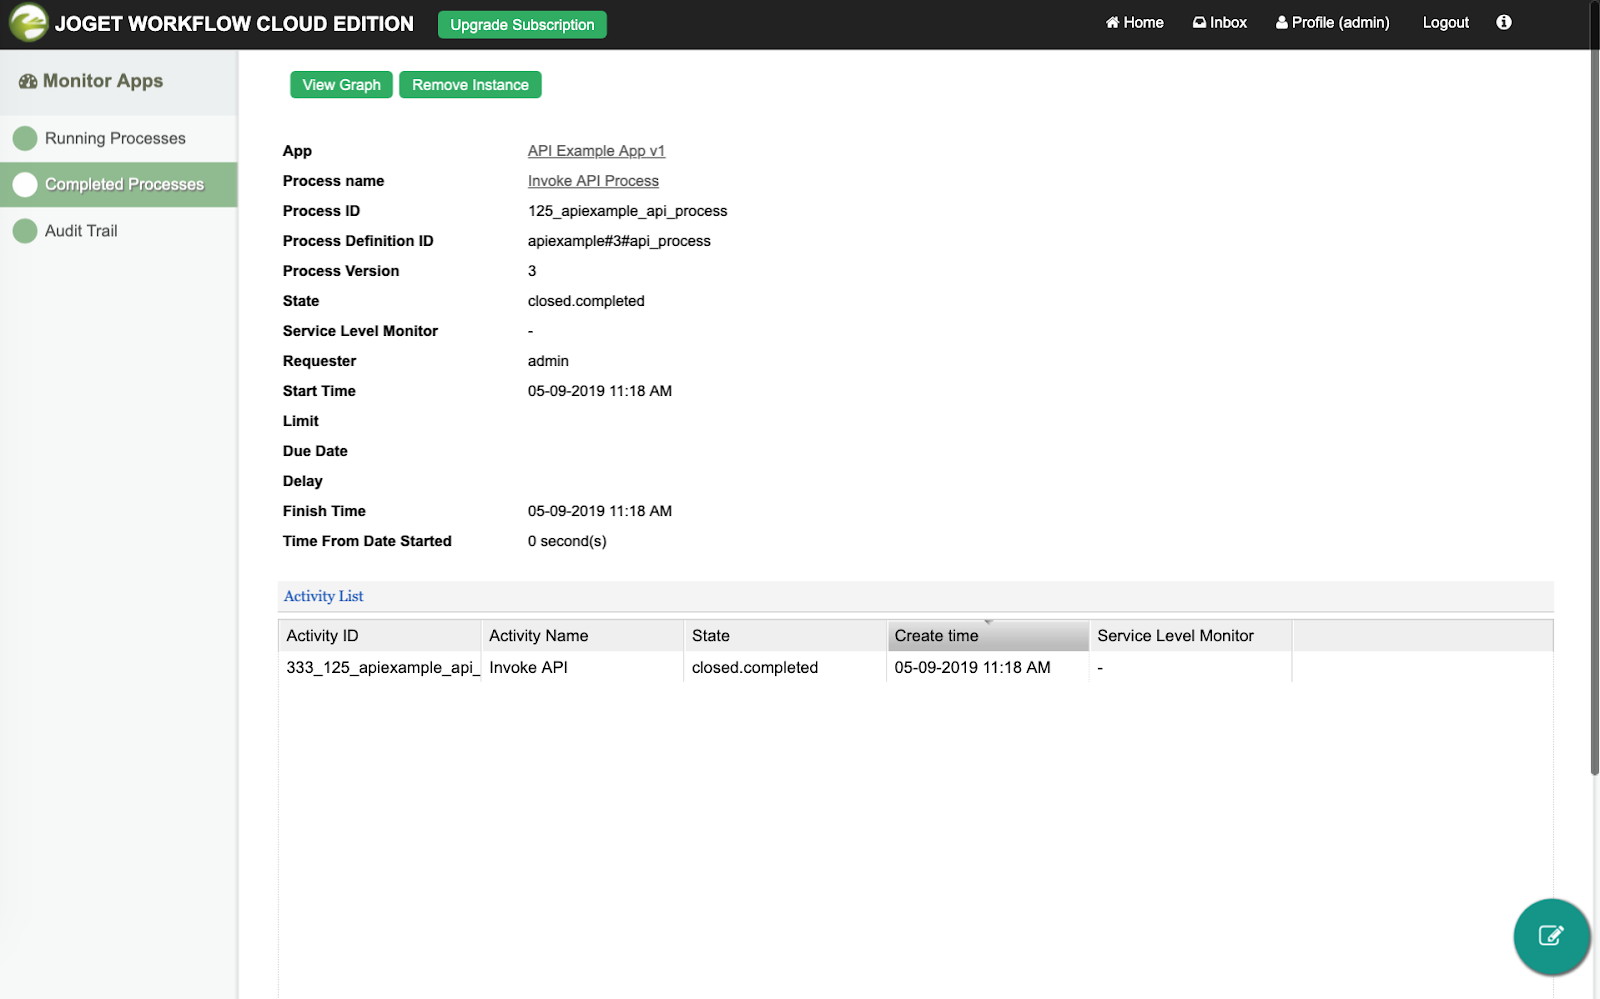
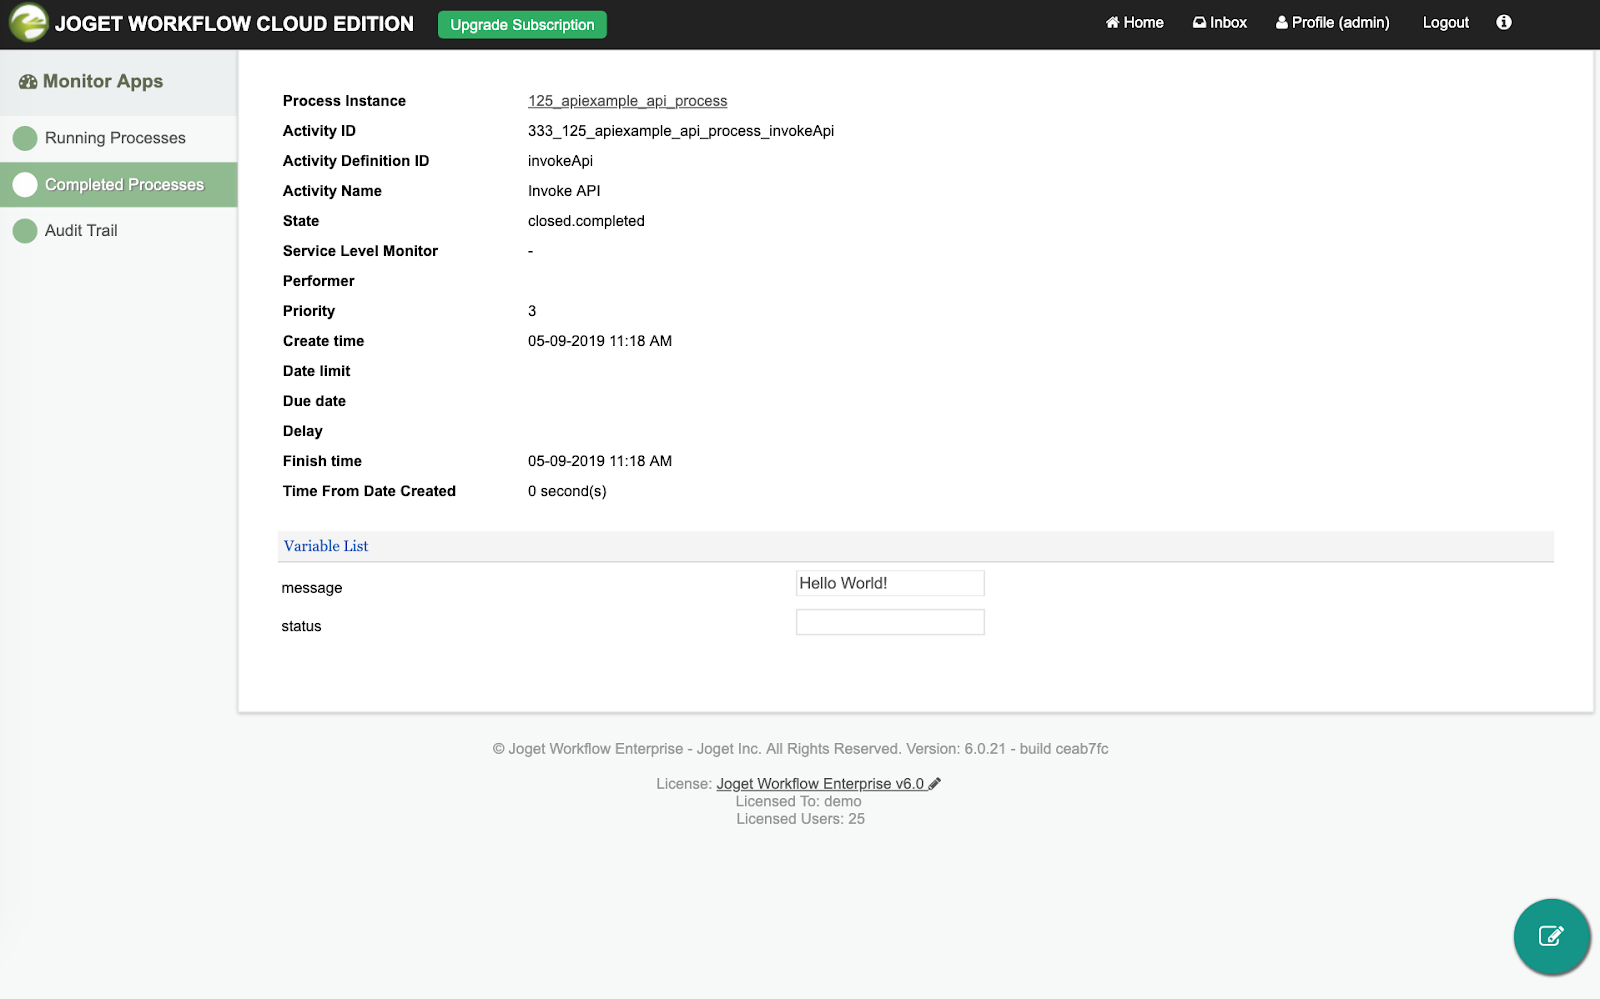
Click on the activity to verify the value of the “message” workflow variable which obtained the result of the API call, i.e. “Hello World!”
If you are running Joget on-premise and have access to the system logs, you will be able to see the tool requests and responses if the debugging option is enabled.
Sample log output:
INFO 05 Sep 2019 03:18:13 org.joget.apps.app.lib.JsonTool - GET http://hello-world-example.us-e2.cloudhub.io/helloWorld
Sample log output:
INFO 05 Sep 2019 03:18:13 org.joget.apps.app.lib.JsonTool - GET http://hello-world-example.us-e2.cloudhub.io/helloWorld
INFO 05 Sep 2019 03:18:13 org.joget.apps.app.lib.JsonTool - http://hello-world-example.us-e2.cloudhub.io/helloWorld returned with status : 200
INFO 05 Sep 2019 03:18:13 org.joget.apps.app.lib.JsonTool - {_ "message": "Hello World!"_}
If you are using Joget DX, you can stream the logs directly in the web browser.
Conclusion
Low-code apps are used to rapidly build new apps, which complements enterprise integration platforms connecting to legacy and external systems.The application integration tutorial in this article is a very simplistic example just to demonstrate the general integration flow. For more practical integration examples for MuleSoft Anypoint Platform there are many resources available, for example:
Quick Start for Data from MySQL Database
Salesforce Connector
- https://anypoint.mulesoft.com/exchange/com.mulesoft.connectors/mule-salesforce-connector/
- https://docs.mulesoft.com/connectors/salesforce/salesforce-connector
- https://dzone.com/articles/salesforce-connector-with-anypoint-mulesoft-1
SAP Connector
- https://anypoint.mulesoft.com/exchange/com.mulesoft.connectors/mule-sap-connector/
- https://docs.mulesoft.com/connectors/sap/sap-connector
- http://mulesoft.github.io/mule-sap-connector/3.1.0/functional/user-manual.html


Comments
Post a Comment